Silvercrest SHBS 3.7 C2 Bedienungsanleitung
Akku haar- und bartschneider
Vorschau ausblenden
Andere Handbücher für SHBS 3.7 C2:
- Bedienungsanleitung (170 Seiten) ,
- Bedienungsanleitung (132 Seiten) ,
- Bedienungsanleitung (58 Seiten)
Inhaltsverzeichnis
Werbung
Verfügbare Sprachen
Verfügbare Sprachen
Werbung
Kapitel
Inhaltsverzeichnis
Fehlerbehebung

Verwandte Anleitungen für Silvercrest SHBS 3.7 C2


Inhaltszusammenfassung für Silvercrest SHBS 3.7 C2
- Seite 2 Español ..........2 Italiano..........30 English..........58 Deutsch ..........84...
- Seite 3 Vista general / Panoramica / Overview / Übersicht...
-
Seite 4: Inhaltsverzeichnis
Indice 1. Vista general ........... 3 2. Uso adecuado ..........5 3. Indicaciones de seguridad ........ 5 4. Volumen de suministro ........11 5. Carga del aparato ......... 12 6. Uso ..............13 Bloqueo de transporte ........13 Cambiar los accesorios de corte .......14 Cambiar los peines guía ........14 Cortar el cabello ..........15 Cortar la barba..........16... -
Seite 5: Vista General
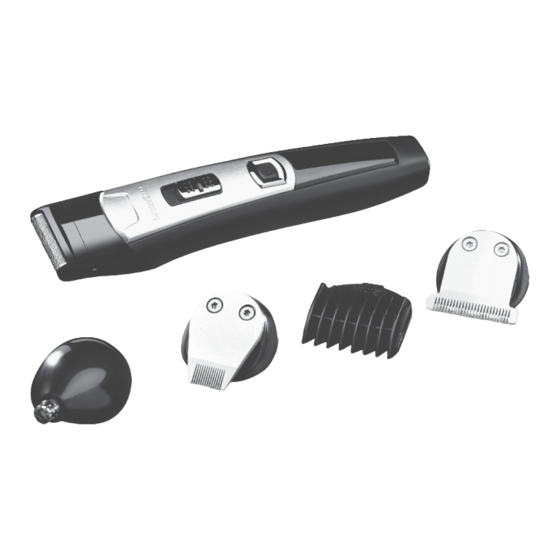
1. Vista general Peine guía de ajuste variable (3, 4, 5, 6 mm) para el acce- sorio recortador de barba Peines guía para el accesorio cortapelo 3, 6, 9, 12 mm Accesorio de afeitado (adecuado solo para afeitar los con- tornos) Accesorio recortador de precisión Recortador de pelo y barba con conexión para cable del... - Seite 6 Sin ilustración: 15 Tijeras 16 Aceite para tijeras 17 Cepillo de limpieza 18 Peine 19 Bolsa de almacenamiento (para recortador de pelo y barba y accesorios) ¡Muchas gracias por su confianza! Le felicitamos por haber adquirido este recortador de pelo y bar- ba 5en1.
-
Seite 7: Uso Adecuado
2. Uso adecuado El recortador de pelo y barba 5en1 está diseñado exclusivamen- te para cortar el pelo humano. Utilícelo únicamente sobre el ca- bello seco. El aparato está concebido para el uso doméstico y no es apto para fines industriales. El aparato solo deberá utilizarse en el in- terior. - Seite 8 Instrucciones para un manejo seguro Este aparato puede ser utilizado por niños ma- yores de 8 años y por personas con las capaci- dades físicas, sensoriales o mentales disminuidas o que carezcan de la experiencia y/o los conocimientos necesarios, bajo supervi- sión o habiendo recibido las instrucciones opor- tunas para el uso seguro del aparato y siendo conscientes del peligro de un uso incorrecto.
- Seite 9 PELIGRO para y debido a los animales de compañía y de granja Los aparatos eléctricos pueden presentar peligros para los animales de compañía y de granja. Además, los animales también pueden ocasionar daños en el aparato. Por ello, como regla general mantenga a los animales alejados de los aparatos eléctricos.
-
Seite 10: Peligro De Descarga Eléctrica
PELIGRO de descarga eléctrica No ponga en funcionamiento el aparato si éste, la estación de carga o el cable presentan daños visibles o si el aparato se ha caído antes al suelo. Enchufe la fuente de alimentación a la toma de corriente solo cuando el cable esté... - Seite 11 PELIGRO derivado de las baterías Proteja la batería de daños mecánicos. ¡Peligro de incendio! No exponga el aparato al sol directo ni al calor. La tempera- tura ambiente deberá estar comprendida entre los -10 °C y los +40 °C. Los contactos de carga del aparato no deben quedar conec- tados por objetos metálicos.
- Seite 12 ADVERTENCIA sobre lesiones Coloque el cable de conexión de modo que nadie lo pise ni tropiece con él. No introduzca el accesorio cortapelo de nariz/orejas muy profundamente en la fosa nasal o en la oreja. No utilice el aparato sobre heridas abiertas, cortes, quema- duras o ampollas.
-
Seite 13: Volumen De Suministro
4. Volumen de suministro 1 Recortador de pelo y barba 5en1 5 1 Fuente de alimentación 10 1 Estación de carga 11 5 Accesorios de corte intercambiables: Accesorio cortapelo 13 Accesorio recortador de barba 14 Accesorio recortador de precisión 4 Accesorio cortapelo de nariz/orejas 12 Accesorio de afeitado 3 4 Peines guía 2 para el accesorio cortapelo 3, 6, 9, 12 mm... -
Seite 14: Carga Del Aparato
5. Carga del aparato NOTAS: • Antes de usarlo por primera vez (sin cable) y para los si- guientes procesos de carga, cargue el recortador de pelo y barba 5 durante aprox. 90 minutos. • Cuando las baterías estén casi agotadas, el símbolo del en- chufe 9 parpadea en rojo. -
Seite 15: Uso
6. Uso Usted puede utilizar el recortador de pelo y barba 5en1, indepen- dientemente del estado de carga de la batería, conectándolo a la red. 1. Si enchufa el recortador de pelo y barba 5 a la red, asegú- rese de que esté desconectado. 2. -
Seite 16: Cambiar Los Accesorios De Corte
6.2 Cambiar los accesorios de corte ¡ADVERTENCIA sobre lesiones! Desconecte el recortador de pelo y barba 5 antes de colo- car o quitar los accesorios. • Ilustración A: para quitar los accesorios 3, 4, 12, 13, 14 apriete el accesorio con el pulgar hacia atrás sacándolo del recortador de pelo y barba 5. -
Seite 17: Cortar El Cabello
6.4 Cortar el cabello Accesorio cortapelo NOTAS: • El pelo a cortar deberá estar seco. • La longitud de corte puede variar en función del ángulo de corte. • Ponga un pañuelo o una capa protectora alrededor del cue- llo y la nuca, para evitar que caigan restos de pelo en el cuello. -
Seite 18: Cortar La Barba
6.5 Cortar la barba Accesorio recortador de barba NOTA: tenga en cuenta que la longitud de corte solo será exac- ta si el interruptor para ajustar la longitud de corte 6 se coloca en la posición 1 y el recortador de pelo y barba 5 se mantiene perpendicular a la superficie cutánea. -
Seite 19: Cortar Los Contornos
6.6 Cortar los contornos Accesorio recortador de precisión • Utilice el accesorio recortador de precisión 4, para recortar y dar forma al bigote, las patillas largas, las patillas o las cejas. • Coloque el borde del accesorio a la altura deseada de la raíz del pelo y desplace el recortador de pelo y barba 5 ha- cia abajo. -
Seite 20: Limpieza Y Mantenimiento
7. Limpieza y mantenimiento ¡PELIGRO de descarga eléctrica! Desenchufe la fuente de alimentación 10 de la toma de co- rriente antes de limpiar el recortador de pelo y barba 5 y la estación de carga 11. ¡ADVERTENCIA sobre lesiones! Desconecte el recortador de pelo y barba 5 siempre antes de limpiarlo. - Seite 21 3. Ponga algunas gotas de aceite para tijeras 16 en el borde de corte del accesorio. En caso necesario, retire el aceite sobrante con un paño suave. Utilice aceite libre de ácido, como el aceite para máquinas de coser. Accesorio cortapelo de nariz/orejas •...
-
Seite 22: Almacenamiento
cidan con las correspondientes muescas del accesorio de afeitado y presione el cabezal ligeramente hacia abajo, has- ta que encaje con un clic. 8. Almacenamiento • Para almacenar el aparato ... … coloque el recortador de pelo y barba 5 en la estación de carga 11 o …... -
Seite 23: Solicitar Piezas Suplementarias
9. Solicitar piezas suplementarias Puede solicitar posteriormente el accesorio de afeitado 3: Pedido en línea shop.hoyerhandel.com 1. Escanee el código QR con su smartphone/tablet. 2. Mediante el código QR accederá a un sitio web en el que podrá realizar el nuevo pedido. -
Seite 24: Eliminación
10. Eliminación La batería integrada en este aparato no se debe desechar con la basura doméstica. El aparato se debe desechar de manera profesional con la ba- tería incorporada. Al eliminar el aparato es nece- sario indicar en el punto de eliminación que le Li-Ion corresponda que el aparato contiene una batería integrada. -
Seite 25: Solución De Problemas
11. Solución de problemas Si en algún momento el aparato no funciona como es debido, con- sulte en primer lugar la siguiente lista. Es posible que se trate de un problema sin importancia que usted mismo pueda solucionar. ¡PELIGRO de descarga eléctrica! No intente reparar el aparato usted mismo en ningún caso. -
Seite 26: Datos Técnicos
12. Datos técnicos Modelo: SHBS 3.7 C2 Recortador de pelo y barba: Entrada: 5 V 1000 mA Fuente de alimentación: Entrada: 100–240 V ~ New Wise International 50/60 Hz, 0,2 A máximo Holdings Limited Salida: 5 V Modelo SW-050100EU 1000 mA Clase de protección de la... -
Seite 27: Símbolos Empleados
Símbolos empleados Aislamiento de protección Seguridad verificada (GS). Los aparatos deben satisfacer las normas técnicas reconocidas con carácter general y ser con- formes a la Ley alemana de seguridad de productos (ProdSG). Mediante el marcado CE, HOYER Handel GmbH declara la conformidad de la UE. -
Seite 28: Garantía De Hoyer Handel Gmbh
13. Garantía de HOYER Handel GmbH Estimado cliente, Este aparato tiene un plazo de garantía de 3 años desde la fecha de com- pra. Si el producto presenta algún problema, usted tiene unos derechos le- gales de garantía frente al vendedor. Estos derechos legales de garantía no quedan limitados por nuestra garantía. - Seite 29 Quedan excluidas de la garantía las piezas de desgaste que están expuestas al desgaste normal y los daños en piezas frágiles, p. ej., interruptores, baterías, lámparas u otras pie- zas fabricadas en vidrio. Esta garantía dejará de tener validez si se daña el producto por un uso in- debido o inadecuado o si el producto ha sido manipulado.
- Seite 30 Servicio técnico Servicio España Tel.: 902 59 99 22 (0,08 EUR/Min. + 0,11 EUR/llamada (tarifa normal)) (0,05 EUR/Min. + 0,11 EUR/llamada (tarifa reducida)) E-Mail: hoyer@lidl.es IAN: 311427 Distribuidor Tenga en cuenta que esta dirección no es la dirección del servicio técnico.
- Seite 32 Indice 1. Panoramica ..........31 2. Uso conforme ..........33 3. Istruzioni per la sicurezza ......33 4. Materiale in dotazione ........39 5. Ricarica ............40 6. Uso ............... 41 Sicurezza per il trasporto ........41 Sostituzione degli accessori di taglio ....42 Sostituzione degli accessori pettine ....42 Taglio dei capelli ..........43 Tagliare la barba ...........44...
-
Seite 33: Panoramica
1. Panoramica Accessorio pettine regolabile in modo variabile (3, 4, 5, 6 mm) per l'accessorio regolabarba Accessori pettine per l'accessorio tagliacapelli 3, 6, 9, 12 mm Accessorio di rasatura (adatto soltanto alla rasatura di bordi) Accessorio trimmer di precisione Tagliacapelli e regolabarba con collegamento per cavo dell'alimentatore a spina/stazione di carica Interruttore con regolazione di precisione delle lunghezze di taglio 1: 0,8 mm / 2: 1,3 mm / 3: 1,8 mm... - Seite 34 Non illustrato: 15 Paio di forbici 16 Olio lubrificante 17 Pennello per pulizia 18 Pettine 19 Custodia (per tagliacapelli e regolabarba e accessori) Vi ringraziamo per la vostra fiducia! Ci congratuliamo per il Vostro nuovo tagliacapelli e regolabarba 5 in 1. Per un impiego sicuro dell'apparecchio e per conoscerne tutto il ventaglio di prestazioni: •...
-
Seite 35: Uso Conforme
2. Uso conforme Il tagliacapelli e regolabarba 5 in 1 è previsto esclusivamente per tagliare capelli umani. Usare l'apparecchio solo su capelli asciutti. L'apparecchio è pensato per l'uso domestico e non va utilizzato in ambito commerciale. Usare l'apparecchio solo al chiuso. Uso indebito prevedibile AVVERTENZA: rischio di danni materiali! Non usare l'apparecchio per tagliare capelli sintetici o peli... - Seite 36 Istruzioni per un impiego sicuro Questo apparecchio può essere utilizzato da bambini di età superiore a 8 anni e da perso- ne con facoltà fisiche, sensoriali o mentali ri- dotte o prive di esperienza e/o conoscenze, a condizione che vengano sorvegliati o istruiti circa l'utilizzo sicuro dell'apparecchio e che abbiano compreso i rischi derivanti da tale uti- lizzo.
- Seite 37 PERICOLO per gli animali domestici e causato dagli animali domestici Gli apparecchi elettrici possono comportare pericoli per gli animali domestici e da lavoro. Inoltre gli animali possono anche causare danni all'apparecchio. Come regola genera- le, mantenere gli animali lontani dagli apparecchi elettrici. PERICOLO di scossa elettrica a causa dell'umidità...
-
Seite 38: Pericolo Di Scossa Elettrica
PERICOLO di scossa elettrica Non mettere in funzione l'apparecchio se esso, la stazione di carica o il cavo presentano danni visibili o se l'apparec- chio è caduto a terra in precedenza. Inserire l'alimentatore a spina in una presa di corrente solo dopo aver collegato il cavo all'apparecchio/alla stazione di carica. - Seite 39 PERICOLO dovuto alle batterie Proteggere la batteria dai danni meccanici. Pericolo di incendio! Non esporre l'apparecchio ai raggi solari o al calore diretti. La temperatura ambiente non deve essere inferiore a -10 °C né superiore a +40 °C. Non collegare i contatti di carica dell'apparecchio con og- getti metallici.
- Seite 40 AVVERTENZA: rischio di lesioni Posare il cavo in modo da evitare di inciamparvi o di calpe- starlo. Non premere troppo profondamente l'accessorio trimmer dei peli del naso e delle orecchie nella cavità nasale o nel padi- glione auricolare. Non usare l'apparecchio in caso di ferite aperte, ferite da taglio, scottature solari o vesciche.
-
Seite 41: Materiale In Dotazione
4. Materiale in dotazione 1 Tagliacapelli e regolabarba 5 in 1 5 1 Alimentatore 10 1 Stazione di carica 11 5 Accessori di taglio sostituibili: Accessorio tagliacapelli 13 Accessorio regolabarba 14 Accessorio trimmer di precisione 4 Accessorio trimmer per i peli del naso e delle orecchie 12 Accessorio di rasatura 3 4 Accessori pettine 2 per l'accessorio tagliacapelli 3, 6, 9, 12 mm... -
Seite 42: Ricarica
5. Ricarica NOTE: • Prima del primo utilizzo (senza cavo) e per le ricariche suc- cessive caricare il tagliacapelli e regolabarba 5 per circa 90 minuti. • Quando le batterie sono quasi scariche, lampeggia il simbo- lo della spina 9 con luce rossa. Da quel punto in poi l'appa- recchio continua a funzionare senza collegamento alla rete elettrica solo per poco tempo. -
Seite 43: Uso
6. Uso È possibile utilizzare il tagliacapelli e regolabarba 5 in 1 in qualsi- asi momento con il funzionamento tramite rete elettrica indipenden- temente dal livello di carica della batteria. 1. Per il funzionamento tramite rete elettrica, assicurarsi che il tagliacapelli e regolabarba 5 sia spento. -
Seite 44: Sostituzione Degli Accessori Di Taglio
6.2 Sostituzione degli accessori di taglio AVVERTENZA: rischio di lesioni! Spegnere il tagliacapelli e regolabarba 5, prima di inserire o rimuovere gli accessori. • Figura A: per rimuovere gli accessori 3, 4, 12, 13, 14 premere con il pollice l'accessorio all'indietro dal tagliaca- pelli e regolabarba 5. -
Seite 45: Taglio Dei Capelli
6.4 Taglio dei capelli Accessorio tagliacapelli NOTE: • I capelli da tagliare devono essere asciutti. • La lunghezza di taglio può variare in funzione dell'angolo di taglio. • Collocarsi un panno o una mantellina tutt'intorno al collo per evitare che cadano resti di capelli nel colletto. •... -
Seite 46: Tagliare La Barba
6.5 Tagliare la barba Accessorio regolabarba NOTA: far sì che le corrispondenti lunghezze di taglio vengano at- tuate soltanto quando l'interruttore per la regolazione di precisione delle lunghezze di taglio 6 si trova nella posizione 1 e il tagliaca- pelli e regolabarba 5 viene tenuto ad angolo retto rispetto alla su- perficie della cute. -
Seite 47: Tagliare I Bordi
6.6 Tagliare i bordi Accessorio trimmer di precisione • Utilizzare l'accessorio trimmer di precisione 4, per accorcia- re e dare forma a baffi, basette, pizzetto o sopracciglia. • Disporre lo spigolo dell'accessorio all'altezza desiderata dell'attaccatura dei capelli e spostare il tagliacapelli e rego- labarba 5 verso il basso. -
Seite 48: Pulizia E Cura
7. Pulizia e cura PERICOLO di scossa elettrica! Estrarre l'alimentatore 10 dalla presa di corrente, prima di pulire il tagliacapelli e regolabarba 5 e la stazione di cari- ca 11. AVVERTENZA: rischio di lesioni! Prima di effettuare qualsiasi pulizia, spegnere il tagliacapelli e regolabarba 5. - Seite 49 3. Applicare poche gocce di olio lubrificante 16 sullo spigolo di taglio dell'accessorio. Se necessario, eliminare l'olio su- perfluo con un panno morbido. Usare solo olio neutro, ad es. olio per macchine da cucire. Accessorio trimmer per i peli del naso e delle orecchie •...
-
Seite 50: Conservazione
5. Riposizionare il telaio lamina di rasatura sull'accessorio di ra- satura 3. Durante l'applicazione, fare in modo che le linguet- te di fissaggio sul telaio lamina entrino correttamente nelle corrispondenti cavità dell'accessorio di rasatura e premere leggermente il telaio lamina verso il basso finché non fa uno scatto percepibile. -
Seite 51: Ordinare Componenti
9. Ordinare componenti È possibile ordinare successivamente l’accessorio di rasatura 3. Ordinazione online shop.hoyerhandel.com 1. Scansionate il codice QR con lo smartphone/tablet. 2. Con il codice QR giungete ad un sito web nel quale potete effettuare la nuova ordinazione. -
Seite 52: Smaltimento
10. Smaltimento La batteria integrata in questo apparecchio non va gettata tra i rifiuti domestici. Smaltire corretta- mente l’apparecchio con la batteria montata. Quando si smaltisce l’apparecchio, comunicare all’istanza competente che il dispositivo contiene Li-Ion una batteria integrata. Questo prodotto è soggetto alla Direttiva europea 2012/19/UE. -
Seite 53: Risoluzione Dei Problemi
11. Risoluzione dei problemi Qualora l'apparecchio non funzioni correttamente, scorrere la checklist seguente, poiché l'anomalia di funzionamento potrebbe essere dovuta a un piccolo problema che l'utente è in grado di ri- solvere autonomamente. PERICOLO di scossa elettrica! Non tentare mai di riparare autonomamente l'apparecchio. Guasto Possibili cause / rimedi •... -
Seite 54: Dati Tecnici
12. Dati tecnici Modello: SHBS 3.7 C2 Tagliacapelli e regolabarba: Ingresso: 5 V 1000 mA Alimentatore: Ingresso: 100–240 V ~ New Wise International Holdings 50/60 Hz, 0,2 A max. Limited Uscita: 5 V Modello SW-050100EU: 1000 mA Classe di protezione... -
Seite 55: Simboli Utilizzati
Simboli utilizzati Isolamento di protezione Sicurezza verificata (GS). Gli apparecchi devono soddisfa- re le regole tecniche riconosciute e sono conformi alla legge in materia di sicurezza dei prodotti. Con la marcatura CE, la HOYER Handel GmbH dichiara la conformità UE. Gli apparecchi con questo marchio possono essere utilizzati solo in ambito domestico (ambiente asciutto). -
Seite 56: Garanzia Della Hoyer Handel Gmbh
13.Garanzia della HOYER Handel GmbH Gentile cliente, questo apparecchio è dotato di una garanzia di 3 anni a decorrere dalla data d'acquisto. In caso di difetti del prodotto dispone di diritti legali con- tro il venditore. Questi diritti legali non sono limitati dalla garanzia da noi prestata, che viene descritta di seguito. - Seite 57 La garanzia decade se il prodotto è stato danneggiato o non è stato cor- rettamente utilizzato o sottoposto a manutenzione. Per un uso adeguato del prodotto occorre attenersi strettamente a tutte le indicazioni riportate nel manuale di istruzioni per l'uso. Occorre evitare assolutamente usi o azioni sconsigliati o evidenziati negativamente nel manuale di istruzioni per l'uso.
- Seite 58 Centri assistenza Assistenza Italia Tel.: 02 36003201 E-Mail: hoyer@lidl.it Assistenza Malta Tel.: 80062230 E-Mail: hoyer@lidl.com.mt IAN: 311427 Fornitore Si tenga presente che il seguente indirizzo non è un indirizzo di as- sistenza. Rivolgersi innanzitutto ai centri assistenza riportati sopra. HOYER Handel GmbH Tasköprüstraße 3 DE-22761 Hamburg GERMANIA...
- Seite 60 Contents 1. Overview ............59 2. Intended purpose .......... 61 3. Safety information ........61 4. Items supplied ..........66 5. Charging ............67 6. Operation ............. 68 Transport safety lock ........68 Changing the cutting attachments ..... 68 Changing the comb attachments....... 69 Cutting hair ...........
-
Seite 61: Overview
1. Overview Adjustable (3, 4, 5, 6 mm) comb attachment for the beard trimmer attachment Comb attachments for the hair trimmer attachment 3, 6, 9, 12 mm Shaving attachment (only suitable for shaving hairlines) Precision trimmer attachment Hair and beard trimmer with connection for plug-in power unit cable/battery charger Switch for cutting length fine tuning 1: 0.8 mm / 2: 1.3 mm / 3: 1.8 mm... - Seite 62 not shown: 15 Scissors 16 Blade oil 17 Cleaning brush 18 Comb 19 Storage bag (for the hair and beard trimmer and its acces- sories) Thank you for your trust! Congratulations on your new 5-in-1 hair and beard trimmer. For a safe handling of the device and in order to get to know the entire scope of features: •...
-
Seite 63: Intended Purpose
2. Intended purpose The 5-in-1 hair and beard trimmer is intended exclusively for trim- ming human hair. Only use the device for dry hair. The device is designed for private home use and must not be used for commercial purposes. The device must only be used indoors. Foreseeable misuse WARNING! Risk of material damage! Do not use the device to cut artificial hair or animal hair. -
Seite 64: Instructions For Safe Operation
Instructions for safe operation This device can be used by children from the age of 8 and people with restricted physical, sensory or intellectual abilities or people with- out adequate experience and/or understand- ing, if they are supervised or instructed on how to use this device safely and if they are aware of the resulting danger. - Seite 65 vice. For this reason you should keep animals away from electrical devices at all times. DANGER! Risk of electric shock due to moisture Protect the device from moisture, water drops and water splashes. Never touch the device with wet hands. The device, the battery charger and the power unit must not fall into water or other liquids and must not be rinsed under running water.
-
Seite 66: Danger From Batteries
Only connect the power unit to a properly installed, easily accessible wall socket, the voltage of which corresponds to the specifications on the rating plate. The wall socket must continue to be easily accessible after the device is plugged Ensure that the cable cannot be damaged by sharp edges or hot surfaces. - Seite 67 Should the electrolyte solution leak out of the battery, avoid contact with eyes, mucous membranes and skin. Rinse imme- diately with plenty of clean water and consult a doctor. The electrolyte solution can cause irritation. The device is provided with a lithium-ion battery. - The battery cannot be removed! - This device must not be opened! - The device with the installed battery must be disposed of...
-
Seite 68: Items Supplied
Never place the device on hot surfaces (e.g. hob plates) or near heat sources or open fire. Do not cover the power unit to prevent overheating. Do not exert too much pressure on the shaving foil of the shaving attachment, to avoid damaging the shaving foil. Do not detach the shaving foil from the shaving foil frame, and do not clean it using the brush. -
Seite 69: Charging
5. Charging NOTES: • Before first use (without cable), and for every charging pro- cedure afterwards, charge the hair and beard trimmer 5 for approx. 90 minutes. • When the batteries are almost empty, the plug symbol 9 flashes in red. The device can then only be used for a short time without being connected to the electricity supply. -
Seite 70: Operation
6. Operation Regardless of the charging state of the battery, the 5-in-1 hair and beard trimmer can always be mains-operated. 1. For mains operation, ensure that the hair and beard trim- mer 5 is switched off. 2. Connect the power unit 10 to the connector of the hair and beard trimmer 5. -
Seite 71: Changing The Comb Attachments
• Figure B: to attach the attachments, put the lower flap of the attachment 3, 4, 12, 13, 14 into the slot in the hair and beard trimmer 5 and press the upper part of the attach- ment against the hair and beard trimmer until it audibly locks into place and sits firmly in position. -
Seite 72: Trimming A Beard
• First, start with a comb attachment 2 with a longer cutting length and then, in the course of the cutting process, use shorter cutting lengths step by step. • Start by cutting the hair in the neck or on the sides and cut towards the centre of the head. -
Seite 73: Cutting A Hairline
ing the marking on the side of the comb attachment 1 (3, 4, 5, 6 mm). Now, shorten your beard step-by-step. • Use the beard trimmer attachment 14 without a comb attach- ment 1, to cut the beard very short or to cut a moustache and hairline. -
Seite 74: Trimming Nose And Ear Hair
• Stretch your skin in complicated areas, such as the chin, to achieve better results. 6.8 Trimming nose and ear hair Nose/ear hair trimmer attachment • Insert only the metal tip slowly into a nostril or an ear. • Slowly move the hair and beard trimmer 5 with a circular motion to trim the hair. -
Seite 75: Nose/Ear Hair Trimmer Attachment
Comb attachments • Remove the comb attachment. Rinse the comb attachment with water and let it dry before using it again. Hair trimmer, beard trimmer and precision trim- mer attachments 1. Figure A: remove the attachment from the hair and beard trimmer 5 by pressing it with the thumb towards the rear. -
Seite 76: Storage
1. Remove the shaving attachment 3. 2. Press the button on the side of the shaving attachment and remove the shaving foil frame. While removing the shaving foil frame, only hold it at the side and do not press against the shaving foil. -
Seite 77: Reordering Parts
9. Reordering parts You can subsequently order the shaving attachment 3. Online ordering shop.hoyerhandel.com 1. Scan the QR code with your smartphone/tablet. 2. The QR code will take you to a website where you can reor- der. -
Seite 78: Disposal
10. Disposal The battery integrated into this device must not be disposed of in household waste. The device must be disposed of properly with the battery installed. When disposing of this device, the waste disposal facility responsible must be informed that the de- Li-ions vice contains an integrated battery. -
Seite 79: Troubleshooting
11. Troubleshooting If your device fails to function as required, please try this checklist first. Perhaps there is only a minor problem, and you can solve it yourself. DANGER! Risk of electric shock! Do not attempt to repair the device yourself under any cir- cumstances. -
Seite 80: Technical Specifications
12. Technical specifications Model: SHBS 3.7 C2 Hair and beard trimmer: Input: 5 V 1000 mA Power unit: Input: 100–240 V ~ New Wise International 50/60 Hz, 0.2 A max. Holdings Limited Output: 5 V (Model SW-050100EU) 1000 mA Protection class of the power... -
Seite 81: Symbols Used
Symbols used Double insulation Certified Safety. Devices must comply with the generally ac- knowledged rules of technology and the German Product Safety Act (Produktsicherheitsgesetz - ProdSG). With the CE marking, HOYER Handel GmbH declares the conformity with EU guidelines. Devices with this symbol may only be operated indoors (dry environment). -
Seite 82: Warranty Of The Hoyer Handel Gmbh
13.Warranty of the HOYER Handel GmbH Dear Customer, your device is provided with a 3 year warranty starting with the purchase date. In the event of product defects, you are entitled to statutory rights against the vendor. These statutory rights are not restricted by our war- ranty presented in the following. - Seite 83 This warranty expires if the product is damaged, not used as intended or not serviced. For the proper operation of the product, all instructions listed in the operating instructions must be observed carefully. Any form of use and handling that is advised against in the operating instructions or warned against must always be avoided.
- Seite 84 Service Centre Service Great Britain Tel.: 0871 5000 720 (£ 0.10/Min.) E-Mail: hoyer@lidl.co.uk Service Ireland Tel.: 1890 930 034 (0,08 EUR/Min., (peak)) (0,06 EUR/Min., (off peak)) E-Mail: hoyer@lidl.ie Service Malta Tel.: 80062230 E-Mail: hoyer@lidl.com.mt Service Cyprus Tel.: 8009 4409 E-Mail: hoyer@lidl.com.cy IAN: 311427 Supplier Please note that the following address is no service address.
- Seite 86 Inhalt 1. Übersicht ............85 2. Bestimmungsgemäßer Gebrauch ....87 3. Sicherheitshinweise ........87 4. Lieferumfang ..........93 5. Aufladen ............94 6. Bedienen ............95 Transportsicherung .........95 Wechseln der Schneidaufsätze ......96 Wechseln der Kammaufsätze ......96 Haare schneiden ..........97 Bart schneiden ..........98 Konturen schneiden ........99 Rasieren ............99 Nasen- und Ohrhaare schneiden ......99...
-
Seite 87: Übersicht
1. Übersicht Variabel (3, 4, 5, 6 mm) einstellbarer Kammaufsatz für den Bartschneideaufsatz Kammaufsätze für Haarschneideaufsatz: 3, 6, 9, 12 mm Rasieraufsatz (nur für das Rasieren von Konturen geeignet) Präzisionstrimmer-Aufsatz Haar- und Bartschneider mit Anschluss für Steckernetzteilka- bel/Ladestation Schalter mit Schnittlängen-Feineinstellung 1: 0,8 mm / 2: 1,3 mm / 3: 1,8 mm Ein-/Ausschalter Batteriesymbol... - Seite 88 Ohne Abbildung: 15 Schere 16 Scheröl 17 Reinigungspinsel 18 Kamm 19 Aufbewahrungsbeutel (für Haar- und Bartschneider und Zubehör) Herzlichen Dank für Ihr Vertrauen! Wir gratulieren Ihnen zu Ihrem neuen Haar- und Bartschneider 5in1. Für einen sicheren Umgang mit dem Gerät und um den ganzen Leistungsumfang kennenzulernen: •...
-
Seite 89: Bestimmungsgemäßer Gebrauch
2. Bestimmungsgemäßer Gebrauch Der Haar- und Bartschneider 5in1 ist ausschließlich zum Schnei- den von menschlichen Haaren vorgesehen. Verwenden Sie das Gerät nur für trockene Haare. Das Gerät ist für den privaten Haushalt konzipiert und darf nicht für gewerbliche Zwecke eingesetzt werden. Das Gerät darf nur in Innenräumen benutzt werden. -
Seite 90: Anweisungen Für Den Sicheren Betrieb
Anweisungen für den sicheren Betrieb Dieses Gerät kann von Kindern ab 8 Jahren und von Personen mit reduzierten physischen, senso- rischen oder mentalen Fähigkeiten oder Mangel an Erfahrung und/oder Wissen benutzt werden, wenn sie beaufsichtigt oder bezüglich des siche- ren Gebrauches des Gerätes unterwiesen wur- den und die daraus resultierenden Gefahren verstanden haben. -
Seite 91: Gefahr Für Und Durch Haus- Und Nutztiere
GEFAHR für und durch Haus- und Nutztiere Von Elektrogeräten können Gefahren für Haus- und Nutztiere ausgehen. Des Weiteren können Tiere auch einen Schaden am Gerät verursachen. Halten Sie deshalb Tiere grundsätz- lich von Elektrogeräten fern. GEFAHR von Stromschlag durch Feuchtigkeit Schützen Sie das Gerät vor Feuchtigkeit, Tropf- oder Spritzwasser. -
Seite 92: Gefahr Durch Stromschlag
GEFAHR durch Stromschlag Nehmen Sie das Gerät nicht in Betrieb, wenn das Gerät, die Ladestation oder das Kabel sichtbare Schäden aufweist oder wenn das Gerät zuvor fallen gelassen wurde. Stecken Sie das Netzteil erst dann in eine Steckdose, wenn das Kabel mit dem Gerät/der Ladestation verbunden ist. Schließen Sie das Netzteil nur an eine ordnungsgemäß... -
Seite 93: Warnung Vor Verletzungen Durch Schneiden
GEFAHR durch Akkus Schützen Sie den Akku vor mechanischen Beschädigungen. Brandgefahr! Setzen Sie das Gerät nicht direkter Sonne oder Hitze aus. Die Umgebungstemperatur soll -10 °C nicht unter- und +40 °C nicht überschreiten. Die Ladekontakte am Gerät dürfen nicht durch metallische Gegenstände verbunden werden. -
Seite 94: Warnung Vor Verletzungen
WARNUNG vor Verletzungen Legen Sie das Kabel so, dass niemand darüber stolpert oder darauf tritt. Drücken Sie den Nasen-/Ohrhaartrimmer-Aufsatz nicht zu tief in das Nasenloch bzw. in die Ohrmuschel. Benutzen Sie das Gerät nicht bei offenen Wunden, Schnitt- wunden, Sonnenbrand oder Blasen. WARNUNG vor Sachschäden Die Ladestation ist mit rutschfesten Silikonfüßen ausgestattet. -
Seite 95: Lieferumfang
4. Lieferumfang 1 Haar- und Bartschneider 5in1 5 1 Netzteil 10 1 Ladestation 11 5 auswechselbare Schneideaufsätze: Haarschneideaufsatz 13 Bartschneideaufsatz 14 Präzisionstrimmer-Aufsatz 4 Nasen-/Ohrhaartrimmer-Aufsatz 12 Rasieraufsatz 3 4 Kammaufsätze 2 für Haarschneideaufsatz: 3, 6, 9, 12 mm 1 variabel (3, 4, 5, 6 mm) einstellbarer Kammaufsatz 1 für den Bartschneideaufsatz 14 1 Kamm 18 1 Schere 15... -
Seite 96: Aufladen
5. Aufladen HINWEISE: • Laden Sie vor der Erstanwendung (ohne Kabel) sowie für die folgenden Ladevorgänge den Haar- und Bartschneider 5 ca. 90 Minuten auf. • Wenn die Akkus nahezu leer sind, blinkt das Steckersymbol 9 rot. Das Gerät ist dann nur noch kurze Zeit netzunabhängig betriebsbereit. -
Seite 97: Bedienen
6. Bedienen Sie können den Haar- und Bartschneider 5in1 unabhängig vom La- dezustand des Akkus jederzeit im Netzbetrieb verwenden. 1. Für den Netzbetrieb stellen Sie sicher, dass der Haar- und Bartschneider 5 ausgeschaltet ist. 2. Verbinden Sie das Netzteil 10 mit dem Anschluss am Haar- und Bartschneider 5. -
Seite 98: Wechseln Der Schneidaufsätze
6.2 Wechseln der Schneidaufsätze WARNUNG vor Verletzung! Schalten Sie den Haar- und Bartschneider 5 aus, bevor Sie die Aufsätze aufstecken oder abnehmen. • Bild A: Zum Abnehmen der Aufsätze 3, 4, 12, 13, 14 drücken Sie den Aufsatz mit dem Daumen nach hinten vom Haar- und Bartschneider 5 ab. -
Seite 99: Haare Schneiden
6.4 Haare schneiden Haarschneideaufsatz HINWEISE: • Das zu frisierende Haar muss trocken sein. • Die Schnittlänge kann abhängig vom Schnittwinkel abwei- chen. • Legen Sie ein Tuch oder einen Umhang um Hals und Nacken, um zu vermeiden, dass Haarreste in den Kragen fallen. •... -
Seite 100: Bart Schneiden
6.5 Bart schneiden Bartschneideaufsatz HINWEIS: Bitte beachten Sie, dass die entsprechenden Schnitt- längen nur dann zustande kommen, wenn der Schalter für die Schnittlängen-Feineinstellung 6 sich auf Position 1 befindet und der Haar- und Bartschneider 5 im rechten Winkel zur Hautober- fläche gehalten wird. -
Seite 101: Konturen Schneiden
6.6 Konturen schneiden Präzisionstrimmer-Aufsatz • Benutzen Sie den Präzisionstrimmer-Aufsatz 4, um Schnurr- bart, Backenbärte, Koteletten oder Augenbrauen zu kürzen und zu formen. • Legen Sie die Kante des Aufsatzes an der gewünschten Höhe des Haaransatzes an und bewegen Sie den Haar- und Bartschneider 5 nach unten. -
Seite 102: Reinigen Und Pflege
7. Reinigen und Pflege GEFAHR durch Stromschlag! Ziehen Sie das Netzteil 10 aus der Steckdose, bevor Sie den Haar- und Bartschneider 5 und die Ladestation 11 reini- gen. WARNUNG vor Verletzung! Schalten Sie vor jeder Reinigung den Haar- und Bartschnei- der 5 aus. -
Seite 103: Rasieraufsatz
2. Entfernen Sie Haarreste mit dem mitgelieferten Reini- gungspinsel 17 vom Aufsatz. 3. Tragen Sie wenige Tropfen Scheröl 16 auf die Schnittkante des Aufsatzes auf. Wischen Sie ggf. überschüssiges Öl mit einem weichen Tuch ab. Verwenden Sie nur säurefreies Öl, wie z. -
Seite 104: Aufbewahren
4. Reinigen Sie die Scherfolie im Scherfolienrahmen unter flie- ßendem Wasser und lassen Sie diese vollständig trocknen, bevor Sie sie wieder auf den Rasieraufsatz 3 setzen. 5. Setzen Sie den Scherfolienrahmen wieder auf den Rasierauf- satz 3. Achten Sie beim Aufsetzen darauf, dass die Befesti- gungslaschen am Scherfolienrahmen in die entsprechenden Aussparungen am Rasieraufsatz passen, und drücken Sie den Scherfolienrahmen leicht herunter, bis er hörbar einrastet. -
Seite 105: Teile Nachbestellen
9. Teile nachbestellen Sie können den Rasieraufsatz 3 nachbestellen. Bestellung online shop.hoyerhandel.com 1. Scannen Sie den QR-Code mit Ihrem Smartphone/Tablet. 2. Mit dem QR-Code gelangen Sie auf eine Webseite, wo Sie die Nachbestellung vornehmen können. -
Seite 106: Entsorgen
10. Entsorgen Der in diesem Gerät integrierte Akku darf nicht in den Hausmüll. Das Gerät muss mit dem eingebau- ten Akku fachgerecht entsorgt werden. Bei der Entsorgung des Gerätes ist an der zuständigen Entsorgungsstelle darauf hinzuweisen, dass das Li-Ionen Gerät einen integrierten Akku enthält. Dieses Produkt unterliegt der europäischen Richtlinie 2012/19/EU. -
Seite 107: Problemlösungen
11. Problemlösungen Sollte Ihr Gerät einmal nicht wie gewünscht funktionieren, gehen Sie bitte erst diese Checkliste durch. Vielleicht ist es nur ein kleines Problem, das Sie selbst beheben können. GEFAHR durch Stromschlag! Versuchen Sie auf keinen Fall, das Gerät selbstständig zu reparieren. -
Seite 108: Technische Daten
12. Technische Daten Modell: SHBS 3.7 C2 Haar- und Bartschneider / Eingang: 5 V Ladestation: 1000 mA Netzteil: Eingang: 100–240 V ~ New Wise International 50/60 Hz, 0,2 A max. Holdings Limited Ausgang: 5 V (Model SW-050100EU) 1000 mA Schutzklasse des Netzteils:... -
Seite 109: Verwendete Symbole
Verwendete Symbole Schutzisolierung Geprüfte Sicherheit. Geräte müssen den allgemein anerkann- ten Regeln der Technik genügen und gehen mit dem Produkt- sicherheitsgesetz (ProdSG) konform. Mit der CE-Kennzeichnung erklärt die HOYER Handel GmbH die EU-Konformität. Geräte mit diesem Zeichen dürfen nur im Haus betrieben (tro- ckene Umgebung) werden. -
Seite 110: Garantie Der Hoyer Handel Gmbh
13.Garantie der HOYER Handel GmbH Sehr geehrte Kundin, sehr geehrter Kunde, Sie erhalten auf dieses Gerät 3 Jahre Garantie ab Kaufdatum. Im Falle von Mängeln dieses Produkts stehen Ihnen gegen den Verkäufer des Pro- dukts gesetzliche Rechte zu. Diese gesetzlichen Rechte werden durch un- sere im Folgenden dargestellte Garantie nicht eingeschränkt. - Seite 111 Diese Garantie verfällt, wenn das Produkt beschädigt, nicht sachgemäß be- nutzt oder gewartet wurde. Für eine sachgemäße Benutzung des Produkts sind alle in der Bedienungsanleitung aufgeführten Anweisungen genau einzu- halten. Verwendungszwecke und Handlungen, von denen in der Bedienungs- anleitung abgeraten oder vor denen gewarnt wird, sind unbedingt zu vermeiden.
- Seite 112 Service-Center Service Deutschland Tel.: 0800 5435 111 (kostenfrei) E-Mail: hoyer@lidl.de Service Österreich Tel.: 0820 201 222 (0,15 EUR/Min.) E-Mail: hoyer@lidl.at Service Schweiz Tel.: 0842 665566 (0,08 CHF/Min., Mobilfunk max. 0,40 CHF/Min.) E-Mail: hoyer@lidl.ch IAN: 311427 Lieferant Bitte beachten Sie, dass die folgende Anschrift keine Service- anschrift ist.