Silvercrest SDBK 2400 E4 Bedienungsanleitung
Vorschau ausblenden
Andere Handbücher für SDBK 2400 E4:
- Bedienungsanleitung (86 Seiten) ,
- Bedienungsanleitung (49 Seiten) ,
- Bedienungsanleitung (61 Seiten)
Inhaltsverzeichnis
Werbung
Verfügbare Sprachen
Verfügbare Sprachen
Quicklinks
STEAM IRON SDBK 2400 E4
STEAM IRON
Operating instructions
FIER DE CĂLCAT CU ABURI
Instrucţiuni de utilizare
ΑΤΜΟΣΙΔΕΡΟ
Οδηγία χρήσης
IAN 279757
Nas279757_Dampfbügeleisen_Cover_LB7.indd 2
PARNO GLAČALO
Upute za korištenje
ПАРНА ЮТИЯ
Pъководство за обслужване
DAMPFBÜGELEISEN
Bedienungsanleitung
19.07.16 14:00
Werbung
Kapitel
Inhaltsverzeichnis

Verwandte Anleitungen für Silvercrest SDBK 2400 E4


Inhaltszusammenfassung für Silvercrest SDBK 2400 E4
- Seite 1 STEAM IRON SDBK 2400 E4 STEAM IRON PARNO GLAČALO Operating instructions Upute za korištenje FIER DE CĂLCAT CU ABURI ПАРНА ЮТИЯ Pъководство за обслужване Instrucţiuni de utilizare ΑΤΜΟΣΙΔΕΡΟ DAMPFBÜGELEISEN Οδηγία χρήσης Bedienungsanleitung IAN 279757 Nas279757_Dampfbügeleisen_Cover_LB7.indd 2 19.07.16 14:00...
- Seite 2 English..................2 Hrvatski ................14 Român ................. 26 ................40 ................54 Deutsch ................. 68...
- Seite 3 Overview / Pregled / Privire de ansamblu / / Übersicht...
-
Seite 4: Inhaltsverzeichnis
Contents 1. Overview ..................3 2. Intended purpose ................4 3. Safety information ................4 4. Items supplied ................. 7 5. Normal or cable-free ironing ............7 6. Before using for the first time ............7 7. Operation ..................8 Filling the water tank ................ -
Seite 5: Overview
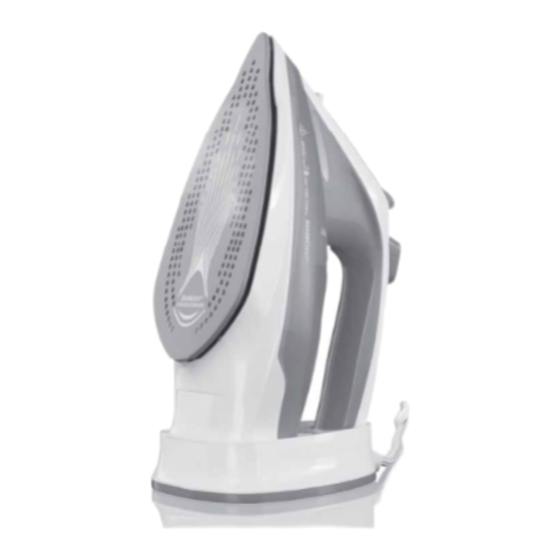
1. Overview Spray nozzle Lid (of the water tank) Steam flow rate controller: from no steam to a lot of steam Steam jet button Spray button Handle Stand Moving protective sleeve for power cable Power cable with mains plug Cable spool Switch on stand Electrical contacts Lock opening... -
Seite 6: Intended Purpose
Thank you for your trust! Symbols on your device This symbol warns you against touching the hot sur- Congratulations on your new cable-free face. steam iron. VERTICAL Vertical steam ironing is For a safe handling of the product and in or- possible der to get to know the entire scope of fea- DRIP STOP... -
Seite 7: Instructions For Safe Operation
Instructions for safe operation This device can be used by children from the age of 8 and peo- ple with restricted physical, sensory or intellectual abilities or people without adequate experience and/or understanding, if they are supervised or instructed on how to use this device safely and if they are aware of the resulting risks. - Seite 8 If liquid gets into the device (except in the water tank), pull out the mains plug DANGER! Fire hazard! immediately. Have the device checked Use the device on a stable, level and before reusing. heat-resistant surface. If the device (steam iron or stand) never- Even during short interruptions, always theless falls into water, pull out the pow- place the steam iron in the stand and...
-
Seite 9: Items Supplied
4. Items supplied NOTE: 1 steam iron • If you want to work with a great many 1 stand 7 bursts of steam in quick succession, ironing 1 measuring beaker 21 with the cable is recommended. This is bet- 1 set of operating instructions ter because the sole plate 20 may fall be- low the set temperature faster than normal as a result of the many steam bursts. -
Seite 10: Operation
7. Operation 7.1 Filling the water tank DANGER! DANGER! Pull the mains plug out of the socket be- The sole plate 20 becomes very hot fore you fill up the water tank 15. during operation. During operation touch only the handle 6 and the control •... -
Seite 11: Spray Function
- MIN the device is not getting hot 6. Start ironing as soon as the ironing tem- ÷ perature has been reached and the tem- temperature: up to perature control lamp 14 goes out. approx. 110 °C 7. Finish ironing, set the temperature con- (synthetic materials) ÷÷... -
Seite 12: Steam Jet Function
7. Finish ironing, set the temperature con- Cleaning the device troller 17 to MIN, set the steam flow • For cleaning the device, use a soft, rate controller 3 to and pull out the moistened cloth. mains plug. • Dirt can be removed from the sole 8. -
Seite 13: Storage
9. Repeat steps 1 to 8 until no more resi- ucts identified with this symbol may not be dues are coming out. discarded with normal household waste, but 10.Pull out the mains plug, allow the device must be taken to a collection point for recy- to cool down, and pour off any remain- cling electric and electronic appliances. -
Seite 14: Technical Specifications
12. Technical ranty presented in the following. specifications Warranty conditions Model: SDBK 2400 E4 The warranty period starts with the purchase Mains voltage: 220-240 V ~50/60 Hz date. Please keep the original purchase re- ceipt in a safe place. This document is re- Protection class: I quired to verify the purchase. -
Seite 15: Service Centre
Excluded from the warranty are wear parts subject to normal wear Service Centre and damages to fragile parts, e.g. switches, batteries, lamps or other Service Great Britain parts manufactured from glass. Tel.: 0871 5000 720 (£ 0.10/Min.) E-Mail: hoyer@lidl.co.uk This warranty expires if the product is dam- aged, not used as intended or not serviced. - Seite 16 Sadržaj 1. Pregled ..................15 2. Predvi ena uporaba ..............16 3. Sigurnosne upute ................16 4. Opseg isporuke ................18 5. Normalno gla anje ili bez kabela ..........19 6. Prije prve uporabe ................. 19 7. Rukovanje ..................19 Punjenje spremnika za vodu..............
-
Seite 17: Pregled
1. Pregled Mlaznica Poklopac (spremnika za vodu) Regulator koli ine pare: razina bez pare do razine s mnogo pare Tipka za mlaz pare Tipka za raspršivanje Ru ka Postolje Pomi na zaštitna ahura priklju nog kabela Priklju ni vod s mrežnim utika em Namata kabela Prekida postolja Elektri ni kontakti... -
Seite 18: Zahvaljujemo Vam Na Povjerenju
Zahvaljujemo vam na Simboli na ure aju povjerenju! Ovaj simbol upozorava vas da ne dodirujete vru u povr- šinu. Drago nam je da ste postali vlasnik novog gla ala na paru. VERTICAL Okomito parno gla anje mogu e Kako biste omogu ili sigurno korištenje pro- DRIP STOP Zaustavljanje kapanja izvoda te se upoznali sa svim njegovim rad-... -
Seite 19: Upute Za Siguran Rad
Upute za siguran rad Ure aj smiju koristiti djeca od 8 godina i starija te osobe s ogra- ni enim psihi kim, senzornim ili mentalnim sposobnostima ili osobe bez iskustva i/ili znanja samo ako ih nadzire osoba zadu- žena za njihovu sigurnost ili ako su od takve osobe dobili upute za korištenje ure aja te su razumjeli mogu e opasnosti. -
Seite 20: Opseg Isporuke
nemojte više koristiti ure aj, ve ga daj- porna na toplinu. U slu aju duljeg te na provjeru servisnoj službi. prekida gla anja ili ako napuštate pro- Spremnik za vodu nemojte puniti vo- storiju u kojoj gla ate, izvucite mrežni dom iznad oznake za maksimalno pu- utika iz uti nice. -
Seite 21: Normalno Gla Anje Ili Bez Kabela
5. Normalno gla anje 6. Prije prve uporabe ili bez kabela 1. Uvjerite se da je mrežni utika izvu en iz uti nice. Gla alo na paru može se koristiti bez 2. Prekida 11 se nalazi u položaju kabela. Zbog toga je gla alo na paru nešto Uzmite parno gla alo s postolja 7. -
Seite 22: Punjenje Spremnika Za Vodu
ure aju. Pobrinite se za dovoljno proz- 1. Izvucite mrežni utika iz uti nice. ra ivanje. 2. Regulator koli ine pare stavite 3 na 3. Prekida 11 se nalazi u položaju Stopalo gla ala 20 blago se rashla uje tije- Uzmite parno gla alo s postolja 7. -
Seite 23: Gla Anje Bez Pare
peraturi. Pritom spremnik za vodu 15 mora 4. Mrežni utika utaknite u uti nicu. biti napunjen najmanje etvrtinu. 5. Regulatorom temperature 17 podesite • Više puta pritisnite tipku za željenu temperaturu (najmanje raspršivanje 5 Kontrolna lampica temperature 14 po- Držite pritom parno gla alo vodoravno inje svijetliti. -
Seite 24: Iš Enje
Samo iš enje NAPOMENA: • Za gla anje obješenih odjevnih pred- OPREZ: meta paru možete izbacivati i okomito. Ne ulijevajte ocat, sredstvo protiv ka- menca ni druge dodatke u spremnik za vodu 15. Dodaci mogu oštetiti gla alo. iš enje Ako upotrebljavate vodu iz slavine, izvršite samo iš... -
Seite 25: Pohranjivanje
9. Pohranjivanje Ambalaža Za zbrinjavanje ambalaže obratite pažnju na odgovaraju e propise za okoliš u Vašoj zemlji. OPASNOST! Parno gla alo uvajte izvan dohvata dje- 11. Rješenje problema 1. Regulator temperature 17 stavite na Ako ure aj ne radi na željeni na in, najprije MIN. -
Seite 26: Tehni Ki Podaci
12. Tehni ki podaci 13. Jamstvo tvrtke HOYER Handel GmbH Model: SDBK 2400 E4 Poštovani korisnici, Mrežni napon: 220-240 V ~ 50/60 Hz Na ovaj ure aj možete ostvariti 3 godine Klasa zaštite: jamstva koje vrijedi od datuma kupnje. U... - Seite 27 Jamstvo se odnosi na greške u materijalu ili Na www.lidl-service.com možete izradi. preuzimati ove i mnoge druge pri- ru nike, videozapise o proizvodi- Iz jamstva su isklju eni svi potrošni ma i softvere. dijelovi, koji su izloženi uobi aje- nom trošenju i ošte enja lomljivih di- jelova, npr.
- Seite 28 Cuprins 1. Privire de ansamblu ............... 27 2. Utilizare corespunz toare ............... 28 3. Instruc iuni de siguran ..............28 4. Con inutul livr rii ................31 5. C lcat normal sau f r cablu ............31 6. Înainte de prima utilizare..............31 7.
-
Seite 29: Privire De Ansamblu
1. Privire de ansamblu Duz de stropire Capac (pentru rezervorul pentru ap ) Sistem de reglare pentru cantitatea de abur: de la f r abur la mult abur Butonul pentru aburi Butonul de stropire cu ap Mâner Suport de oprire Man on de protec ie mobil pentru cablul de alimentare Cablu de alimentare cu techer de la re ea Tambur pentru cablu... -
Seite 30: Utilizare Corespunz Toare
V mul umim pentru Simboluri de pe aparat încrederea Acest simbol v avertizeaz cu privire la atingerea supra- dumneavoastr ! fe elor fierbin i. V felicit m c a i achizi ionat noul dumnea- VERTICAL C lcarea vertical cu voastr fier de c lcat cu abur. aburi este posibil DRIP STOP Oprirea picur rii... - Seite 31 Instruc iuni pentru o func ionare sigur Acest aparat poate fi utilizat de copii peste 8 ani i de persoane cu abilit i fizice, senzoriale sau mentale reduse sau de c tre persoane f r experien i/sau f r cuno tin e speciale, numai în cazurile în care aceste persoane sunt supravegheate sau dac ace tia au primit instruc iunile necesare pentru utilizarea în sigu- a aparatului i au în eles riscurile la care se expun.
- Seite 32 Nu introduce i în ap sau în alt lichid … în momentul în care nu folosi i apara- aparatul, cablul de alimentare i teche- tul, rul. … înainte s cur a i aparatul i În cazul în care p trunde lichid în apa- …...
-
Seite 33: Con Inutul Livr Rii
Nu folosi i substan e de cur are causti- ce sau care zgârie. OBSERVA IE: Nu c lca i suprafe e cum ar fi fermoare, • Dac dori i s lucra i cu foarte multe jeturi nasturi metalici sau aplice ce pot deteri- de abur consecutive, c lcatul cu cablu este ora talpa fierului de c lcat. -
Seite 34: Utilizare
7. Utilizare 7.1 Umplerea rezervorului pentru ap PERICOL! Talpa fierului 20 devine foarte fierbinte PERICOL! în timpul func ion rii. Atinge i fierul de Scoate i fi a din priz atunci când c lcat cu abur numai pe mâner 6 i pe reumple i rezervorul pentru ap 15. -
Seite 35: Reglarea Temperaturii De C Lcat
7.2 Reglarea temperaturii de 7.4 C lcatul f r abur c lcat Materialele delicate se calc la temperaturi reduse i f r abur. Pentru umezire v st la dispozi ie func ia de pulverizare. OBSERVA IE: • Pentru a se înc lzi, fierul de c lcat tre- 1. -
Seite 36: Func Ia Pentru Aburi
5. Ajusta i sistemul de reglare a temperatu- 7.6 Func ia pentru aburi rii 17 la temperatura dorit (cel pu in Func ia pentru aburi necesit o temperatur ). Indicatorul luminos de control al ridicat . Selecta i o treapt de temperatur temperaturii 14 se aprinde. -
Seite 37: P Strare
9. P strare Autocur area ATEN IE: Nu umple i rezervorul pentru ap 15 cu PERICOL! o et, substan e de decalcifiere sau al i Nu depozita i fierul de c lcat cu abur la în- aditivi. Aditivii pot deteriora aparatul. demâna copiilor. -
Seite 38: Eliminarea
În cazul în care aparatul nu func ioneaz în mod corespunz tor, parcurge i mai întâi Model: SDBK 2400 E4 aceast list . Poate este doar o mic pro- Tensiunea re elei: 220-240 V ~ 50/60 Hz blem pe care o pute i solu iona dumnea- Clasa de voastr . -
Seite 39: Garantat De Hoyer Handel Gmbh
13. Garantat de Domeniul de aplicare a garan iei Aparatul a fost produs cu grij , cu respectarea HOYER Handel GmbH strict a directivelor privind calitatea, i a fost Stimat client , stimate client, testat con tiincios înainte de livrare. Pentru acest aparat primi i o garan ie de Garan ia se aplic pentru defec iuni ale mate- 3 ani de la data cump r rii. - Seite 40 • Un produs înregistrat astfel ca fiind de- fect poate fi apoi transmis împreun cu dovada achizi iei (bonul de cas ) i in- forma iile cu privire la defec iune i mo- mentul apari iei acesteia, la adresa Centrului de Service pus la dispozi ia dumneavoastr , cu taxare la destina ie.
- Seite 46 –...
- Seite 49 ÷ ÷÷ ÷÷÷...
- Seite 53 HOYER Handel GmbH...
- Seite 54 279757 279757...
- Seite 63 ÷ ÷÷ ÷÷÷...
- Seite 67 HOYER Handel GmbH...
- Seite 68 279757 279757...
- Seite 70 Inhalt 1. Übersicht ..................69 2. Bestimmungsgemäßer Gebrauch ............ 70 3. Sicherheitshinweise ............... 70 4. Lieferumfang ................. 73 5. Normal oder kabellos bügeln ............73 6. Vor dem ersten Gebrauch .............. 74 7. Bedienung ..................74 Wassertank füllen ................75 Bügeltemperatur einstellen ..............
-
Seite 71: Übersicht
1. Übersicht Spritzdüse Deckel (des Wassertanks) Dampfmengenregler: von kein Dampf bis viel Dampf Dampfstoß-Taste Sprüh-Taste Griff Abstellvorrichtung bewegliche Schutzhülse für Anschlussleitung Anschlussleitung mit Netzstecker Kabelaufwicklung Schalter der Abstellvorrichtung Elektrokontakte Verriegelungsöffnung Temperatur-Kontrollleuchte Wassertank Positionsmarke zum Einstellen des Temperaturreglers Temperaturregler 18 SELF CLEAN Selbstreinigungs-Taste 19 max Markierung für maximale Füllhöhe des Wassertanks... -
Seite 72: Bestimmungsgemäßer Gebrauch
Herzlichen Dank für Ihr Symbole am Gerät Vertrauen! Dieses Symbol warnt Sie vor dem Berühren der heißen Oberfläche. Wir gratulieren Ihnen zu Ihrem neuen kabel- losen Dampfbügeleisen. VERTICAL Vertikales Dampfbügeln möglich Für einen sicheren Umgang mit dem Produkt DRIP STOP Tropfstopp und um den ganzen Leistungsumfang ken- nenzulernen:... -
Seite 73: Anweisungen Für Den Sicheren Betrieb
Anweisungen für den sicheren Betrieb Dieses Gerät kann von Kindern ab 8 Jahren und von Personen mit reduzierten physischen, sensorischen oder mentalen Fähigkei- ten oder Mangel an Erfahrung und/oder Wissen benutzt wer- den, wenn sie beaufsichtigt oder bezüglich des sicheren Gebrauches des Gerätes unterwiesen wurden und die daraus re- sultierenden Gefahren verstanden haben. - Seite 74 GEFAHR für Kinder GEFAHR durch Stromschlag Verpackungsmaterial ist kein Kinder- Verlegen Sie die Anschlussleitung so, dass spielzeug. Kinder dürfen nicht mit den niemand auf diese treten, daran hängen Kunststoffbeuteln spielen. Es besteht Er- bleiben oder darüber stolpern kann. stickungsgefahr. Schließen Sie den Netzstecker nur an eine ordnungsgemäß...
-
Seite 75: Lieferumfang
4. Lieferumfang GEFAHR von Verletzungen durch Verbrennen 1 Dampfbügeleisen Berühren Sie nicht die heißen Oberflä- 1 Abstellvorrichtung 7 chen des Gerätes. 1 Messbecher 21 Lassen Sie das Gerät vollständig abküh- 1 Bedienungsanleitung len, bevor Sie es reinigen oder wegräu- men. Gefahr durch stoßartige Verdampfung. -
Seite 76: Vor Dem Ersten Gebrauch
7. Bedienung HINWEIS: • Wenn Sie mit sehr vielen Dampfstößen hin- tereinander arbeiten wollen, empfiehlt sich GEFAHR! das Bügeln mit Kabel. Das ist besser, da Die Bügelsohle 20 wird durch den Be- die Bügelsohle 20 durch die Dampfstöße trieb sehr heiß. Berühren Sie das schneller als normal unter die eingestellte Dampfbügeleisen im Betrieb nur am Temperatur absinken könnte. -
Seite 77: Wassertank Füllen
7.1 Wassertank füllen 7.2 Bügeltemperatur einstellen GEFAHR! HINWEIS: Ziehen Sie den Netzstecker aus der • Das Dampfbügeleisen muss zum Aufhei- Steckdose, wenn Sie den Wasser- zen mit der Abstellvorrichtung 7 verbun- tank 15 auffüllen. den sein. • Verwenden Sie sauberes Leitungswasser 1. -
Seite 78: Bügeln Ohne Dampf
7.4 Bügeln ohne Dampf 5. Stellen Sie am Temperaturregler 17 die gewünschte Temperatur (mindestens Empfindliche Stoffe werden mit niedrigeren ) ein. Die Temperatur-Kontrollleuch- Temperaturen und ohne Dampf gebügelt. te 14 leuchtet auf. Zum Befeuchten steht Ihnen die Sprühfunktion 6. Sobald die Bügeltemperatur erreicht ist zur Verfügung. -
Seite 79: Dampfstoßfunktion
8. Reinigen 7.6 Dampfstoßfunktion Die Dampfstoßfunktion erfordert eine hohe Temperatur. Wählen Sie eine Temperaturstu- fe zwischen und MAX. Dafür muss der GEFAHR! Wassertank 15 mindestens zu einem Viertel Ziehen Sie den Netzstecker aus der gefüllt sein. Der Dampfmengenregler 3 steht Steckdose, bevor Sie das Dampfbügel- links auf dem Symbol eisen reinigen. -
Seite 80: Aufbewahren
4. Stellen Sie den Dampfmengenregler 3 7. Stellen Sie das Bügeleisen auf die Ab- und den Temperaturregler 17 stellvorrichtung 7 und stellen Sie den auf MAX. Schalter 11 in die Position 5. Warten Sie, bis die Temperatur-Kon- 8. BILD D: Wickeln Sie die Anschlusslei- trollleuchte 14 erlischt. -
Seite 81: Problemlösung
11. Problemlösung 12. Technische Daten Sollte Ihr Gerät einmal nicht wie gewünscht Modell: SDBK 2400 E4 funktionieren, gehen Sie bitte erst diese Netzspannung: 220-240 V ~ 50/60 Hz Checkliste durch. Vielleicht ist es nur ein klei- Schutzklasse: nes Problem, das Sie selbst beheben können. -
Seite 82: Garantie Der Hoyer Handel Gmbh
13. Garantie der Die Garantieleistung gilt für Material- oder Fabrikationsfehler. HOYER Handel GmbH Von der Garantie ausgeschlossen Sehr geehrte Kundin, sehr geehrter Kunde, sind Verschleißteile, die normaler Sie erhalten auf dieses Gerät 3 Jahre Ga- Abnutzung ausgesetzt sind und Be- rantie ab Kaufdatum. -
Seite 83: Service-Center
• Ein als defekt erfasstes Produkt können Sie dann unter Beifügung des Kaufbe- legs (Kassenbon) und der Angabe, wor- in der Mangel besteht und wann er aufgetreten ist, für Sie portofrei an die Ihnen mitgeteilte Service Anschrift über- senden. Auf www.lidl-service.com können Sie diese und viele weitere Handbü- cher, Produktvideos und Software herunterladen. - Seite 86 HOYER HANDEL GMBH Tasköprüstraße 3 22761 Hamburg Germany Status of information · Stanje informacija · Data reviziei · Дата на информацията · Ημερομηνία έκδοσης πληροφοριών · Stand der Informationen: 07/2016 · Ident.-Nr.: SDBK 2400 E4 IAN 279757 Nas279757_Dampfbügeleisen_Cover_LB7.indd 1 19.07.16 14:00...