
Verwandte Anleitungen für Zanussi ZOB65701XU


Inhaltszusammenfassung für Zanussi ZOB65701XU
- Seite 1 User Manual GETTING STARTED? EASY. ZOB65701XU EN User Manual Oven DE Benutzerinformation Backofen...
- Seite 1 User Manual GETTING STARTED? EASY. ZOB65701XU EN User Manual Oven DE Benutzerinformation Backofen...
-
Seite 2: Safety Information
SAFETY INFORMATION Before the installation and use of the appliance, carefully read the supplied instructions. The manufacturer is not responsible for any injuries or damages that are the result of incorrect installation or usage. Always keep the instructions in a safe and accessible location for future reference. -
Seite 3: Safety Instructions
Ensure that the appliance is switched off before replacing the • lamp to avoid the possibility of electric shock. Do not use a steam cleaner to clean the appliance. • Do not use harsh abrasive cleaners or sharp metal scrapers to •... -
Seite 3: Safety Instructions
Ensure that the appliance is switched off before replacing the • lamp to avoid the possibility of electric shock. Do not use a steam cleaner to clean the appliance. • Do not use harsh abrasive cleaners or sharp metal scrapers to •... -
Seite 4: Internal Light
to the appliance, the housing unit or the floor. Do not close the furniture panel until the WARNING! Risk of injury, burns and appliance has cooled down completely after electrical shock or explosion. use. • This appliance is for household use only. CARE AND CLEANING •... -
Seite 4: Internal Light
to the appliance, the housing unit or the floor. Do not close the furniture panel until the WARNING! Risk of injury, burns and appliance has cooled down completely after electrical shock or explosion. use. • This appliance is for household use only. CARE AND CLEANING •... -
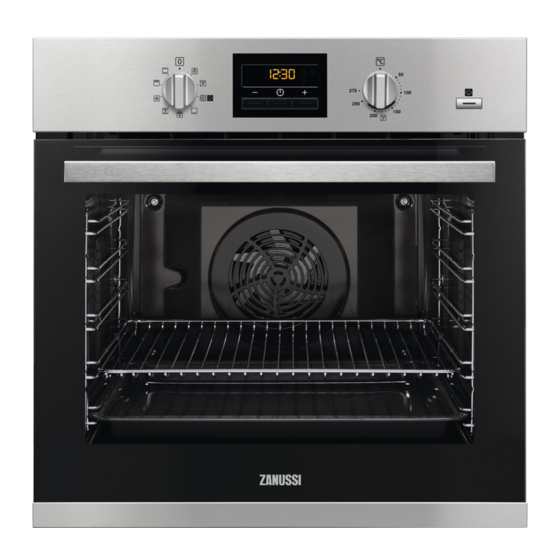
Seite 5: Product Description
• Use original spare parts only. PRODUCT DESCRIPTION GENERAL OVERVIEW Control panel Knob for the oven functions Power lamp / symbol Electronic programmer Knob for the temperature Temperature indicator / symbol Plus Steam button Heating element Lamp Cavity embossment Shelf support, removable Shelf positions ACCESSORIES For cakes and biscuits. -
Seite 6: Daily Use
DAILY USE 1. Turn the knob for the oven functions to select WARNING! Refer to Safety chapters. an oven function. 2. Turn the knob for the temperature to select a temperature. 3. To deactivate the appliance, turn the knobs for ACTIVATING AND DEACTIVATING THE the oven functions and temperature to the off APPLIANCE... -
Seite 6: Daily Use
DAILY USE 1. Turn the knob for the oven functions to select WARNING! Refer to Safety chapters. an oven function. 2. Turn the knob for the temperature to select a temperature. 3. To deactivate the appliance, turn the knobs for ACTIVATING AND DEACTIVATING THE the oven functions and temperature to the off APPLIANCE... - Seite 7 Oven function Application Pizza Setting To bake food on one shelf position for a more intensive browning and a crispy bottom. Set the temperature 20 - 40 °C lower than for Top / Bottom Heat. Defrost This function can be used for defrosting frozen foods, such as vegetables and fruits.
- Seite 7 Oven function Application Pizza Setting To bake food on one shelf position for a more intensive browning and a crispy bottom. Set the temperature 20 - 40 °C lower than for Top / Bottom Heat. Defrost This function can be used for defrosting frozen foods, such as vegetables and fruits.
-
Seite 8: Clock Functions
DISPLAY A. Function indicators B. Time display C. Function indicator BUTTONS Button Function Description MINUS To set the time. CLOCK To set a clock function. PLUS To set the time. Plus Steam To activate the function: True Fan Cooking PLUS. CLOCK FUNCTIONS CLOCK FUNCTIONS TABLE Clock function... -
Seite 9: Using The Accessories
2. Press again and again until starts to 4. Press flash. 5. Press to set the time for END. 3. Press to set the DURATION time. 6. Press to confirm. The display shows Appliance turns on automatically later on, works for the set DURATION time and stops at the set END 4. -
Seite 10: Additional Functions
Wire shelf and deep pan together: Push the deep pan between the guide bars of the Small indentation at the top increase shelf support and the wire shelf on the guide bars safety. The indentations are also anti- above. tip devices. The high rim around the shelf prevents cookware from slipping of the shelf. -
Seite 11: Cooking Times
COOKING TIMES TRUE FAN COOKING PLUS Cooking times depend on the type of food, its Before preheating fill the cavity consistency, and volume. embossment with water only when the Initially, monitor the performance when you cook. oven is cold. Find the best settings (heat setting, cooking time, etc.) for your cookware, recipes and quantities Refer to "Activating the True Fan Cooking PLUS when you use this appliance. -
Seite 12: Baking And Roasting Table
Food regeneration Water in the cavity Food Temperature (°C) Time (min) Shelf position embossment (ml) Bread 15 - 25 Bread rolls 10 - 20 Homestyle pizza 15 - 25 Focaccia 15 - 25 Vegetables 15 - 25 Rice 15 - 25 Pasta 15 - 25 Meat... -
Seite 12: Baking And Roasting Table
Food regeneration Water in the cavity Food Temperature (°C) Time (min) Shelf position embossment (ml) Bread 15 - 25 Bread rolls 10 - 20 Homestyle pizza 15 - 25 Focaccia 15 - 25 Vegetables 15 - 25 Rice 15 - 25 Pasta 15 - 25 Meat... - Seite 13 Top / Bottom Heat True Fan Cooking Food Time (min) Comments Temperature Shelf posi- Temperature Shelf posi- (°C) tion (°C) tion Apple 2 (left and 80 - 100 In two 20 cake (Ap- right) cm cake moulds on ple pie) a wire shelf Strudel 60 - 80...
- Seite 13 Top / Bottom Heat True Fan Cooking Food Time (min) Comments Temperature Shelf posi- Temperature Shelf posi- (°C) tion (°C) tion Apple 2 (left and 80 - 100 In two 20 cake (Ap- right) cm cake moulds on ple pie) a wire shelf Strudel 60 - 80...
- Seite 14 Top / Bottom Heat True Fan Cooking Food Time (min) Comments Temperature Shelf posi- Temperature Shelf posi- (°C) tion (°C) tion Biscuits / 140 - 150 1, 3 and 5 35 - 45 In a baking pastry tray stripes - three lev- Meringues 80 - 100...
- Seite 15 Top / Bottom Heat True Fan Cooking Food Time (min) Comments Temperature Shelf posi- Temperature Shelf posi- (°C) tion (°C) tion Rye bread 30 - 45 In a bread Bread 2 (2 and 25 - 40 6 - 8 rolls in a baking rolls tray...
- Seite 16 Meat Top / Bottom Heat True Fan Cooking Food Time (min) Comments Temperature Shelf posi- Temperature Shelf posi- (°C) tion (°C) tion Beef 50 - 70 On a wire shelf Pork 90 - 120 On a wire shelf Veal 90 - 120 On a wire shelf English...
- Seite 17 Fish Top / Bottom Heat True Fan Cooking Food Time (min) Comments Temperature Shelf posi- Temperature Shelf posi- (°C) tion (°C) tion Trout / 40 - 55 3 - 4 fish Sea bream Tuna fish / 35 - 60 4 - 6 fillets Salmon GRILLING Preheat the empty oven for 3 minutes...
- Seite 18 TURBO GRILLING Beef Food Quantity Temperature (°C) Time (min) Shelf position Roast beef or fillet, per cm of thick- 190 - 200 5 - 6 1 or 2 ness rare Roast beef or fillet, per cm of thick- 180 - 190 6 - 8 1 or 2 ness...
- Seite 19 Poultry Food Quantity (kg) Temperature (°C) Time (min) Shelf position Poultry portions 0.2 - 0.25 each 200 - 220 30 - 50 1 or 2 Chicken, half 0.4 - 0.5 each 190 - 210 35 - 50 1 or 2 Chicken, poulard 1 - 1.5 190 - 210...
- Seite 20 DEFROST Defrosting time Further defrosting Food Quantity (g) Comments (min) time (min) Chicken 1000 100 - 140 20 - 30 Place the chicken on an upturned saucer placed on a large plate. Turn halfway through. Meat 1000 100 - 140 20 - 30 Turn halfway through.
-
Seite 21: Care And Cleaning
Fruit Shelf position Food Temperature (°C) Time (h) 1 position 2 positions Plums 60 - 70 8 - 10 1 / 4 Apricots 60 - 70 8 - 10 1 / 4 Apple slices 60 - 70 6 - 8 1 / 4 Pears 60 - 70... -
Seite 22: Aqua Clean
2. Pull the rear end of the shelf support away from the side wall and remove it. 2. Lift and turn the levers on the two hinges. Install the removed accessories in the opposite sequence. AQUA CLEAN This cleaning procedure uses humidity to help remove remaining fat and food particles from the oven. -
Seite 23: Replacing The Lamp
5. Hold the door trim (B) on the top edge of the Make sure that you install the internal glass panel in door at the two sides and push inwards to the seats correctly. release the clip seal. REPLACING THE LAMP Put a cloth on the bottom of the interior of the appliance. -
Seite 24: Service Data
Problem Possible cause Remedy The oven does not heat up. The fuse is blown. Make sure that the fuse is the cause of the malfunction. If the fuse is blown again and again, contact a qualified electrician. The lamp does not operate. The lamp is defective. -
Seite 25: Electrical Installation
We recommend that you write the data here: Model (MOD.) ......... Product number (PNC) ......... Serial number (S.N.) ......... INSTALLATION SECURING THE APPLIANCE TO THE WARNING! Refer to Safety chapters. CABINET BUILDING IN min. 550 min. 560 595 +/-1 ELECTRICAL INSTALLATION The manufacturer is not responsible if you do not follow the safety precautions from the Safety chapters. -
Seite 26: Energy Efficiency
(blue and brown cables). ENERGY EFFICIENCY PRODUCT FICHE AND INFORMATION ACCORDING TO EU 65-66/2014 Supplier's name Zanussi Model identification ZOB65701XU Energy Efficiency Index 81.2 Energy efficiency class Energy consumption with a standard load, conventional 0.93 kWh/cycle mode Energy consumption with a standard load, fan-forced mode 0.69 kWh/cycle... - Seite 27 Return the product to your local recycling facility or contact your municipal office.
-
Seite 28: Sicherheitshinweise
SICHERHEITSHINWEISE Lesen Sie vor der Montage und dem Gebrauch des Geräts zuerst die Gebrauchsanleitung. Bei Verletzungen oder Schäden infolge nicht ordnungsgemäßer Montage oder Verwendung des Geräts übernimmt der Hersteller keine Haftung. Bewahren Sie die Anleitung immer an einem sicheren und zugänglichen Ort zum späteren Nachschlagen auf. -
Seite 29: Sicherheitsanweisungen
8 Jahren vom Gerät fern, wenn sie nicht ständig beaufsichtigt werden. Verwenden Sie zum Anfassen des Zubehörs und der Töpfe • wärmeisolierende Handschuhe. Ziehen Sie bitte vor jeder Wartungsmaßnahme immer den • Netzstecker aus der Steckdose. Vergewissern Sie sich, dass das Gerät ausgeschaltet ist, bevor •... - Seite 30 • Schließen Sie das Gerät unbedingt an eine • Bedienen Sie das Gerät nicht mit feuchten oder ordnungsgemäß installierte nassen Händen oder wenn es mit Wasser in Schutzkontaktsteckdose an. Kontakt gekommen ist. • Verwenden Sie keine Mehrfachsteckdosen oder • Üben Sie keinen Druck auf die geöffnete Verlängerungskabel.
-
Seite 31: Backofenbeleuchtung
REINIGUNG UND PFLEGE • Die Leuchtmittel in diesem Gerät sind nur für Haushaltsgeräte geeignet. Benutzen Sie diese WARNUNG! Verletzungs-, nicht für die Raumbeleuchtung. Brandgefahr sowie Risiko von • Trennen Sie das Gerät von der Schäden am Gerät. Stromversorgung, bevor Sie die Lampe austauschen. -
Seite 32: Gerätebeschreibung
GERÄTEBESCHREIBUNG GESAMTANSICHT Bedienfeld Backofen-Einstellknopf Betriebskontrolllampe/-symbol Elektronischer Programmspeicher Temperaturwahlknopf Temperaturanzeige/-symbol Plus Dampf-Taste Heizelement Backofenbeleuchtung Ventilator Garraumvertiefung Einhängegitter, herausnehmbar Einschubebenen ZUBEHÖR Für Kuchen und Plätzchen. Zum Backen und Braten oder zum Auffangen von austretendem • Kombirost Fett. Für Kochgeschirr, Kuchenformen, Braten. • Universalblech VOR DER ERSTEN INBETRIEBNAHME WARNUNG! Siehe Kapitel... -
Seite 33: Täglicher Gebrauch
TÄGLICHER GEBRAUCH 1. Drehen Sie den Backofen-Einstellknopf auf die WARNUNG! Siehe Kapitel gewünschte Ofenfunktion. Sicherheitshinweise. 2. Drehen Sie den Temperaturwahlknopf auf die gewünschte Temperatur. 3. Zum Ausschalten des Geräts drehen Sie den EIN- UND AUSSCHALTEN DES GERÄTS Backofen-Einstellknopf und den Je nach Modell besitzt Ihr Gerät Temperaturwahlknopf auf Aus. -
Seite 34: Einschalten Der Funktion Heissluft Mit Dampf
Ofenfunktion Anwendung Pizzastufe Zum Backen auf einer Ebene für Gerichte mit einer intensive- ren Bräunung und einem knusprigen Boden. Stellen Sie eine 20 - 40 °C niedrigere Backofentemperatur als bei Ober-/ Unterhitze ein. Auftauen Diese Funktion kann zum Auftauen von Tiefkühlgerichten wie z. - Seite 35 DISPLAY A. Funktionsanzeigen B. Zeitanzeige C. Funktionsanzeige TASTEN Taste Funktion Beschreibung MINUS Einstellen der Zeit. Einstellen einer Uhrfunktion. PLUS Einstellen der Zeit. Plus Dampf Einschalten der Funktion: Heißluft mit Dampf. UHRFUNKTIONEN TABELLE DER UHRFUNKTIONEN Uhrfunktion Anwendung TAGESZEIT Einstellen, Ändern oder Abfragen der Tageszeit. DAUER Einstellen der Einschaltdauer für das Gerät.
-
Seite 36: Verwendung Des Zubehörs
Drücken Sie zum Ändern der Uhrzeit mehrmals die 2. Drücken Sie wiederholt, bis anfängt zu Taste , bis anfängt zu blinken. blinken. 3. Die DAUER wird mit oder eingestellt. EINSTELLEN DER DAUER 4. Drücken Sie 1. Stellen Sie eine Ofenfunktion und die Temperatur ein. -
Seite 37: Sicherheitsthermostat
Kombirost und tiefes Blech zusammen: Schieben Sie das tiefe Blech zwischen die Führungsschienen der Einhängegitter und den Kombirost in die Führungsschienen darüber. Tiefes Blech: Schieben Sie das tiefe Blech zwischen die Führungsschienen der Einhängegitter. Die kleine Einkerbung auf der Oberseite erhöht die Sicherheit. Diese Einkerbungen dienen auch als Kippsicherung. -
Seite 38: Backen Von Kuchen
• Es kann sich Feuchtigkeit im Gerät oder an den • Um die Rauchentwicklung beim Braten zu Glastüren niederschlagen. Das ist normal. vermindern, geben Sie etwas Wasser in das Stehen Sie beim Öffnen der Tür während des tiefe Blech. Um die Kondensierung des Rauchs Betriebs stets in sicherer Entfernung zum Gerät. - Seite 39 Wassermenge Temperatur Gargut in der Vertie- Dauer (Min.) Ebene Bemerkungen (°C) fung (ml) Pflaumenku- 100 - 150 160 - 180 30 - 60 Kuchenform ver- chen, Apfel- wenden. kuchen, Zimtschn- ecken 1) Den leeren Backofen 5 Minuten vorheizen. Gefroren in den Backofen geben Wassermenge in der Gargut Temperatur (°C)
-
Seite 40: Back- Und Brattabelle
Braten Wassermenge Temperatur Gargut in der Vertie- Dauer (Min.) Ebene Bemerkungen (°C) fung (ml) Schweine- 65 - 80 Backform aus Glas braten Roastbeef 50 - 60 Backform aus Glas Hähnchen 60 - 80 Backform aus Glas BACK- UND BRATTABELLE Kuchen Heißluft mit Ringheizkör- Ober-/Unterhitze Bemerkun-... - Seite 41 Heißluft mit Ringheizkör- Ober-/Unterhitze Bemerkun- Gargut Dauer (Min.) Temperatur Temperatur Ebene Ebene (°C) (°C) Stollen/ 90 - 120 In einer Üppiger Kuchen- Früchte- form (20 kuchen Rosinen- 50 - 60 In einer Brotform kuchen Kleine Ku- 140 - 150 20 - 30 Auf dem chen - ei- Backblech...
- Seite 42 Heißluft mit Ringheizkör- Ober-/Unterhitze Bemerkun- Gargut Dauer (Min.) Temperatur Temperatur Ebene Ebene (°C) (°C) Blätterteig 25 - 35 Auf dem – eine Backblech Ebene Blätterteig 2 und 4 35 - 45 Auf dem – zwei Backblech Ebenen Törtchen 45 - 70 In einer Kuchen- form (20...
- Seite 43 Heißluft mit Ringheizkör- Ober-/Unterhitze Bemerkun- Gargut Dauer (Min.) Temperatur Temperatur Ebene Ebene (°C) (°C) 230 - 250 230 - 250 10 - 20 Backblech Pizza oder tiefes Blech 10 - 20 Auf dem Scones Backblech 1) Backofen 10 Min. vorheizen. Pudding Heißluft mit Ringheizkör- Ober-/Unterhitze...
- Seite 44 Fleisch Heißluft mit Ringheizkör- Ober-/Unterhitze Bemerkun- Gargut Dauer (Min.) Temperatur Temperatur Ebene Ebene (°C) (°C) Rindfleisch 50 - 70 Kombirost Schweine- 90 - 120 Kombirost fleisch Kalb 90 - 120 Kombirost Roastbeef, 50 - 60 Kombirost englisch Roastbeef, 60 - 70 Kombirost medium Roastbeef,...
- Seite 45 Fisch Heißluft mit Ringheizkör- Ober-/Unterhitze Bemerkun- Gargut Dauer (Min.) Temperatur Temperatur Ebene Ebene (°C) (°C) Forelle/ 40 - 55 3 - 4 Fi- Seebrasse sche Thunfisch/ 35 - 60 4 - 6 Filets Lachs GRILLSTUFE 1 Leeren Backofen 3 Minuten vorheizen. Menge Dauer (Min.) Temperatur...
- Seite 46 HEISSLUFTGRILLEN Rindfleisch Gargut Menge Temperatur (°C) Dauer (Min.) Ebene Roastbeef oder Filet, je cm Dicke 190 - 200 5 - 6 1 oder 2 englisch Roastbeef oder Filet, je cm Dicke 180 - 190 6 - 8 1 oder 2 medium Roastbeef oder Filet, je cm Dicke...
-
Seite 47: Feuchte Heissluft
Geflügel Gargut Menge (kg) Temperatur (°C) Dauer (Min.) Ebene Geflügelteile je 0,2 - 0,25 200 - 220 30 - 50 1 oder 2 Hähnchenhälften je 0,4 - 0,5 190 - 210 35 - 50 1 oder 2 Hähnchen, Pou- 1 - 1.5 190 - 210 50 - 70 1 oder 2... -
Seite 48: Dörren - Heissluft Mit Ringheizkörper
AUFTAUEN Auftauzeit Zusätzliche Auftau- Gargut Menge (g) Bemerkungen (Min.) zeit (Min.) Hähnchen 1000 100 - 140 20 - 30 Legen Sie zunächst eine umgedrehte Untertasse auf einen großen Teller, und le- gen Sie dann das Hähn- chen darauf. Nach der Hälfte der Zeit wenden. -
Seite 49: Reinigung Und Pflege
Obst Ebene Gargut Temperatur (°C) Dauer (Std.) 1 Ebene 2 Ebenen Pflaumen 60 - 70 8 - 10 1 / 4 Aprikosen 60 - 70 8 - 10 1 / 4 Apfelscheiben 60 - 70 6 - 8 1 / 4 Birnen 60 - 70 6 - 9... -
Seite 50: Entfernen Der Einhängegitter
beschädigt ist. Wenden Sie sich an den WARNUNG! Vergewissern Sie Kundendienst. sich, dass der Backofen abgekühlt • Lesen Sie in den allgemeinen Informationen zur ist, bevor Sie ihn anfassen. Es Reinigung nach, was bei der Reinigung der besteht Verbrennungsgefahr. Türdichtung beachtet werden muss. REINIGEN DER BACKOFENTÜR ENTFERNEN DER EINHÄNGEGITTER Die Backofentür hat zwei Glasscheiben. -
Seite 51: Austauschen Der Lampe
3. Schließen Sie die Backofentür halb bis zur 8. Reinigen Sie die Glasscheibe mit Wasser und ersten Raststellung. Anschließend ziehen Sie Spülmittel. Trocknen Sie die Glasscheibe sie nach vorn aus der Halterung heraus. sorgfältig ab. Nach der Reinigung müssen die Glasscheibe und die Backofentür wieder eingebaut werden. -
Seite 52: Fehlersuche
FEHLERSUCHE WARNUNG! Siehe Kapitel Sicherheitshinweise. WAS TUN, WENN ... Störung Mögliche Ursache Abhilfe Der Backofen heizt nicht. Der Backofen ist ausgeschal- Schalten Sie den Backofen tet. ein. Der Backofen heizt nicht. Die Uhr ist nicht eingestellt. Stellen Sie die Uhr ein. Der Backofen heizt nicht. -
Seite 53: Montage
Störung Mögliche Ursache Abhilfe Das Wasser in der Garraum- Die Temperatur ist zu niedrig. Stellen Sie die Temperatur auf vertiefung kocht nicht. mindestens 110 °C ein. Siehe Kapitel „Tipps und Hin- weise“. Das Wasser tritt aus der Gar- Es befindet sich zu viel Wasser Schalten Sie den Backofen raumvertiefung aus. -
Seite 54: Befestigung Des Geräts Im Möbel
Schäden, die aufgrund der Nichtbeachtung der in den Sicherheitshinweisen beschriebenen Sicherheitsvorkehrungen entstehen. ENERGIEEFFIZIENZ PRODUKTDATENBLATT UND INFORMATIONEN GEMÄSS EU 65-66/2014 Herstellername Zanussi Modellidentifikation ZOB65701XU Energieeffizienzindex 81.2 Energieeffizienzklasse Energieverbrauch bei Standardbeladung, Ober-/Unterhitze 0.93 kWh/Programm Energieverbrauch bei Standardbeladung, Umluft 0.69 kWh/Programm Anzahl der Garräume... - Seite 55 Wärmequelle Strom Fassungsvermögen 72 l Backofentyp Einbau-Backofen Gewicht 29.0 kg EN 60350-1 - Elektrische Kochgeräte für den Minuten vor Ablauf des Garvorgangs auf die Hausgebrauch - Teil 1: Herde, Backöfen, Mindesttemperatur. Durch die Restwärme des Dampfgarer und Grillgeräte - Verfahren zur Backofens werden die Speisen weiter gegart.
- Seite 56 WWW.ZANUSSI.COM/SHOP...