Werbung
Quicklinks
6
A
C1 (FL+RL)
B
C2 (FR+RR)
5a (FL+RR)
3
5b (FR+RL)
4
1
10
2
6
7
14a (FL)
8
14b (FR)
14c (RL)
9
14d (RR)
11
8
Ate ra G mb H
I m He rra c h 1
D - 8 8 2 9 9 Le u tk irc h
I n te rn e t: www.a te ra .de
SI NO
Mercedes Benz
B-Klasse (W247) 02/2019–
7
nur bei Art.Nr.: 047 364
1- 9945700090
only for part no.: 047 364
2- 9919700062
A- 9919700163
3- 9945700105
B- 9945700222
4- 9912700051
C1- 8828700062
5a- 9918700526
C2- 8828700063
5b- 9918700527
6- 9918700250
7- 9918700249
8- 9910700004
9- 9908700231
10- 9912700100
11- 9908700356
12- 9908700010
13- 9918700243
14a- 9949701851
14b- 9949701852
14c- 9949701853
12
13
14d- 9949701854
9936700185
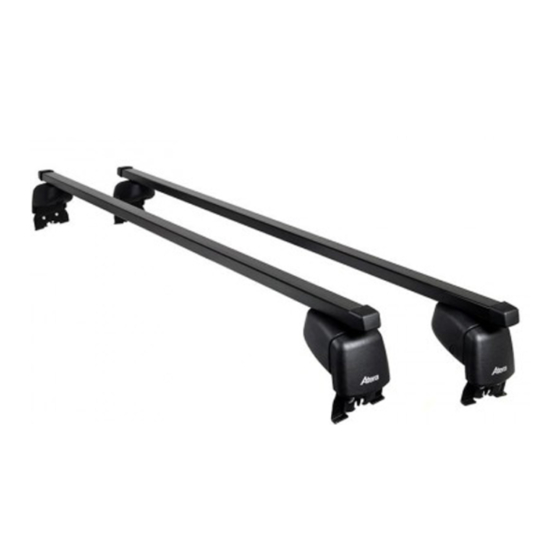
Art.-Nr. / Part-No. : 044 364
044 364
(Stahl)
(Steel)
047 364
(Alu-
minium)
9904700387
(TX30)
Mercedes Benz
SIGNO
Achtung • Attention •
Attention • Attenzione
Art.no.: 9936700185 (1x)
D
Wichtige Verwendungs- und Warnhinweise
D
W ic h tig e V e rw e n d u n g s - u n d W a r n h in w e is e
SIGNO
Achtung • Attention •
Attention • Attenzione
Art.no.: 9936700185 (1x)
xxxxxxxxxx
E
F
G B
Im p o rta n t u s a g e n o te s a n d w a r n in g s
N L
I
1
(A) onto the mounting bracket (B) at the end of
one of the roof bars. Carefully position the moun-
of the other roof bar (E and F) in the same way.
ting bracket with foot guard on top of the gutter
tom of the moulding.
2. Now fit the other mounting bracket (D). Next
remove the foot guard (A) again and fit mounting
bracket (B).
3. Use the foot guard to fit the mounting brackets
1. When fitting the roof bars, push the foot guard
protector (C), aligning it as indicated on the bot-
brücke (E und F) in gleicher Weise anwenden.
Using of foot guard
der entfernen und Dachträgerfuß (B) montieren.
3. Aufsetzschutz für die Füße der anderen Träger-
2. Montieren Sie dann zunächst den anderen
Dachträgerfuß (D). Dann Aufsetzschutz (A) wie-
tungsvorgabe auf der Unterseite des Profils auf
die Dachkanalschoner (C).
zen Sie den Dachträgerfuß mit dem Aufsetzschutz
auf einer Seite vorsichtig gemäß der Ausrich-
zum Schutz des Daches den Aufsetzschutz (A)
auf einen der beiden Dachträgerfüße (B) auf. Set-
1. Beim Aufsetzen des Dachträgers schieben Sie
Montage Aufsetzschutz
GB
D
xxx (xxx)
xx/xxxx–
D
R O
S K
D K
F IN
C Z
P L
2
I
barra portatuto (D). Quindi rimuovere la protezione
pied (B).
3. Utilisez de la même façon la protection d'appui
2. Montez ensuite le pied (D) de la galerie de toit.
Puis retirez la protection d'appui (A) et montez le
sur les protège-gouttière (C) en suivant bien la
direction indiquée sur la face inférieure du profil.
le pied (B) de la galerie de toit. Posez alors déli-
catement le pied équipé de la protection d'appui
galerie, faites glisser la protection d'appui (A) sur
1. Afin de protéger le toit lors de la pose de la
Montage de la protection d´appui
pour les pieds de l'autre traverse (E et F).
Montaggio della protezione dei piedini
(B). Porre con cautela il piedino della barra porta-
tatutto (B).
3. Utilizzare nello stesso modo la protezione dei
di direzione.
dei piedini (A) e montare il piedino della barra por-
2. Montare poi innanzitutto l'altro piedino della
parte inferiore del profilo nella protezione della sca-
nalatura (C) prestando attenzione alle indicazioni
F
tutto con la protezione inserita da un lato sulla
(A) su uno dei due piedini della barra portatutto
proteggere il tetto, inserire la protezione dei piedini
1. Nel posizionamento delle barre portatutto, per
Art.-Nr. / Part-No. : 000 000
Art.-Nr. / Part-No. : 000 000
GB
Important usage notes and warnings
Montage Aufsetzschutz
() *+ /1 2 + 3 6 7 8 9 : 2 2 ; < 2 3 ; < = > @ < A ) + 2 C 2 ; 7 1 E 8 ; 7 1 *E ) CF2 1 8 9 ) @ ) + 2 G
R U S
3
piedini per l'altra barra portatutto (E e F).
1. Beim Aufsetzen des Dachträgers schieben Sie
zum Schutz des Daches den Aufsetzschutz (A)
zen Sie den Dachträgerfuß mit dem Aufsetzschutz
auf einen der beiden Dachträgerfüße (B) auf. Set-
F
Instructions et mises en garde importantes
mpor
auf einer Seite vorsichtig gemäß der Ausrich-
tungsvorgabe auf der Unterseite des Profils auf
B-Klasse (W247)
die Dachkanalschoner (C).
2. Montieren Sie dann zunächst den anderen
der entfernen und Dachträgerfuß (B) montieren.
Dachträgerfuß (D). Dann Aufsetzschutz (A) wie-
NL
Belangrijke aanwijzingen voor gebruik en ter waarschuwing
voor gebruik en t
brücke (E und F) in gleicher Weise anwenden.
3. Aufsetzschutz für die Füße der anderen Träger-
GB
I
Importanti istruzioni per l'uso e avvertenze generali
per l'uso
vver
nze gene
1
1. When fitting the roof bars, push the foot guard
Using of foot guard
(A) onto the mounting bracket (B) at the end of
one of the roof bars. Carefully position the moun-
ting bracket with foot guard on top of the gutter
protector (C), aligning it as indicated on the bot-
E
Indicaciones de uso y advertencias importantes
e uso y ad
cias im
tes
tom of the moulding.
2. Now fit the other mounting bracket (D). Next
Art.-Nr. / Part-No.:
bracket (B).
remove the foot guard (A) again and fit mounting
000 000 (AERO Aluminium)
of the other roof bar (E and F) in the same way.
3. Use the foot guard to fit the mounting brackets
CZ
Důležité pokyny pro používání a upozornění
oky
k ny pr
upoz
F
1. Afin de protéger le toit lors de la pose de la
Montage de la protection d´appui
PL
Ważne wskazówki dotyczące stosowania produktu i ostrzeżenia
e wska
k zó
osowa
wa
w
zeżenia
le pied (B) de la galerie de toit. Posez alors déli-
galerie, faites glisser la protection d'appui (A) sur
catement le pied équipé de la protection d'appui
sur les protège-gouttière (C) en suivant bien la
Art.-Nr. / Part-No. : 044 364
2. Montez ensuite le pied (D) de la galerie de toit.
direction indiquée sur la face inférieure du profil.
RO
nstrucţiuni generale de utilizare şi avertismente
Instrucţiuni generale de utilizare şi avertismente
2
pied (B).
Puis retirez la protection d'appui (A) et montez le
3. Utilisez de la même façon la protection d'appui
pour les pieds de l'autre traverse (E et F).
Art.-Nr. / Part-No. : 000 000
I
000 000
max. kg?
SK
Dôležité pokyny na použitie a upozornenia
(Stahl)
(Steel)
x,x kg
50 kg
max.
KG
KG
KG
1. Nel posizionamento delle barre portatutto, per
Montaggio della protezione dei piedini
max.
50 kg
KG
KG
KG
KG
KG
KG
(A) su uno dei due piedini della barra portatutto
proteggere il tetto, inserire la protezione dei piedini
000 000
minium)
(Alu-
x,x kg
DK
Vigtige anvendelses- og advarselshenvisninger
tutto con la protezione inserita da un lato sulla
(B). Porre con cautela il piedino della barra porta-
Art.-Nr. / Part-No. : 047 364
nalatura (C) prestando attenzione alle indicazioni
parte inferiore del profilo nella protezione della sca-
2. Montare poi innanzitutto l'altro piedino della
di direzione.
FIN
Tärkeitä käyttöohjeita ja varoituksia
barra portatuto (D). Quindi rimuovere la protezione
dei piedini (A) e montare il piedino della barra por-
tatutto (B).
3. Utilizzare nello stesso modo la protezione dei
3
piedini per l'altra barra portatutto (E e F).
RUS
( )* +/ 1 2+36789:22 ;< 23;<=>@<A)+2C 2 ;71E8;71* E)C F 21 89)@)+2G
max.
4,5 kg
50 kg
max.
50 kg
4,0 kg
02/2019–
Art.-Nr. / Part-No.:
047 364 (AERO Aluminium)
max. kg?
KG
KG
KG
KG
KG
KG
KG
KG
KG
Werbung

Verwandte Anleitungen für Atera SIGNO 044 364


Inhaltszusammenfassung für Atera SIGNO 044 364
- Seite 1 SI NO Mercedes Benz B-Klasse (W247) 02/2019– Mercedes Benz SIGNO Achtung • Attention • Attention • Attenzione Art.no.: 9936700185 (1x) Wichtige Verwendungs- und Warnhinweise SIGNO W ic h tig e V e rw e n d u n g s - u n d W a r n h in w e is e Achtung •...
- Seite 2 SI NO SI NO Mercedes Benz Mercedes Benz B-Klasse (W247) 02/2019– B-Klasse (W247) 02/2019– TX 30 (Part.No. 9904700387) FL= Nr.9949701851 FR= Nr.9949701852 RL= Nr.9949701853 RR= Nr.9949701854 ca. 2 x TX 30 (Part.No. 9904700387) A1 = A2 F L = 9 9 4 9 7 0 1 8 5 1 F R = 9 9 4 9 7 0 1 8 5 2 ca.