Inhaltsverzeichnis
Fehlerbehebung

Verwandte Anleitungen für Electrolux KOIHH00K


Inhaltszusammenfassung für Electrolux KOIHH00K
- Seite 1 User Manual Oven Notice d'utilisation FR 20 KOIHH00K Four KOIHH00X Benutzerinformation DE 40 Backofen Istruzioni per l’uso Forno Manual de instrucciones ES 80 Horno electrolux.com/register...
-
Seite 2: Inhaltsverzeichnis
WE’RE THINKING OF YOU Thank you for purchasing an Electrolux appliance. You’ve chosen a product that brings with it decades of professional experience and innovation. Ingenious and stylish, it has been designed with you in mind. So whenever you use it, you can be safe in the knowledge that you’ll get great results every time. -
Seite 3: Children And Vulnerable People Safety
for any injuries or damage that are the result of incorrect installation or usage. Always keep the instructions in a safe and accessible location for future reference. 1.1 Children and vulnerable people safety This appliance can be used by children aged from 8 years •... -
Seite 4: Safety Instructions
Do not use the appliance before installing it in the built-in • structure. Do not use a steam cleaner to clean the appliance. • Do not use harsh abrasive cleaners or sharp metal scrapers • to clean the glass door since they can scratch the surface, which may result in shattering of the glass. - Seite 5 • Do not let mains cables touch or come • Do not change the specification of this near the appliance door or the niche appliance. below the appliance, especially when it • Make sure that the ventilation openings operates or the door is hot. are not blocked.
-
Seite 6: Internal Lighting
• Remove the door catch to prevent children or pets from becoming trapped in WARNING! the appliance. Risk of electric shock. 3. INSTALLATION 3.1 Building in WARNING! Refer to Safety chapters. www.youtube.com/electrolux www.youtube.com/aeg How to install your AEG/Electrolux Oven - Column installation ENGLISH... - Seite 7 (*mm) min. 550 min. 560 ±1 (*mm) min. 550 min. 560 ±1 3.2 Securing the oven to the cabinet ENGLISH...
-
Seite 8: Product Description
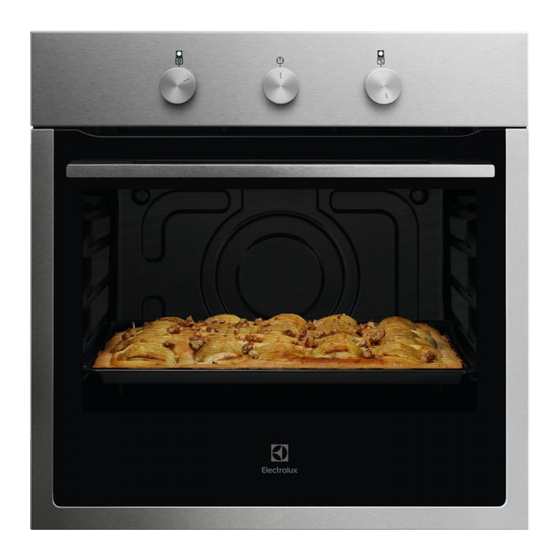
4. PRODUCT DESCRIPTION 4.1 General overview Control panel Power lamp / symbol Knob for the heating functions Knob for the timer Control knob (for the temperature) Temperature indicator / symbol Heating element Lamp Cavity embossment - Aqua cleaning container Shelf positions 4.2 Accessories •... -
Seite 9: Daily Use
6. DAILY USE WARNING! Step 2 Turn the control knob to select the tem‐ Refer to Safety chapters. perature. Step 3 When the cooking ends, turn the knobs 6.1 How to set: Heating function to the off position to turn off the oven. Step 1 Turn the knob for the heating functions to select a heating function. -
Seite 10: Using The Accessories
Step 1 Set the oven function and the temperature. Step 2 Turn the knob for the timer to its full range. Step 3 Turn the knob for the timer to set the switch-off time. When the set time ends, the signal sounds and the oven turns off. Step 4 Turn the knob for the oven functions and the knob for the temperature to the off position. -
Seite 11: Hints And Tips
10. HINTS AND TIPS Leave the meat for approximately 15 minutes Refer to Safety chapters. before carving so that the juice does not seep out. To prevent too much smoke in the oven 10.1 Cooking recommendations during roasting, add some water into the The oven has five shelf positions. - Seite 12 CAKES (°C) (min) Meringues, two levels, pre‐ 80 - 100 Baking tray heat the empty oven Buns, preheat the empty 12 - 20 Baking tray oven Eclairs 25 - 35 Baking tray Eclairs, two levels 35 - 45 Baking tray Plate tarts 45 - 70 Cake mould, Ø...
- Seite 13 MEAT MEAT (°C) (min) (°C) (min) English roast beef, 50 - 60 Whole turkey 210 - 240 rare Whole duck 120 - 150 English roast beef, 60 - 70 Whole goose 150 - 200 medium Rabbit, cut in pieces 60 - 80 English roast beef, 70 - 75 well done...
- Seite 14 10.4 Conventional Baking - recommended accessories Use the dark and non-reflective tins and containers. They have better heat absorption than the light colour and reflective dishes. Ramekins Pizza pan Baking dish Flan base tin Ceramic Dark, non-reflective Dark, non-reflective Dark, non-reflective 8 cm diameter, 5 28 cm diameter 26 cm diameter...
-
Seite 15: Care And Cleaning
(°C) (min) Short crust biscuits, baking tray or dripping pan 40 - 50 20 pieces Tartlets, 8 pieces baking tray or dripping pan 30 - 40 Vegetables, poached, baking tray or dripping pan 35 - 45 0.4 kg Vegetarian omelette pizza pan on wire shelf 35 - 45 Mediterranean vege‐... - Seite 16 11.1 Notes on cleaning Clean the front of the oven with a soft cloth with warm water and a mild detergent. Clean and check the door gasket around the frame of the cavity. Use a cleaning solution to clean metal surfaces. Clean stains with a mild detergent.
- Seite 17 Step 3 Close the oven door halfway to the first opening position. Then lift and pull forward and remove the door from its seat. Step 4 Put the door on a soft cloth on a stable sur‐ face. Step 5 Hold the door trim (B) on the top edge of the door at the two sides and push inwards to re‐...
-
Seite 18: Troubleshooting
We recommend that you write the data here: Model (MOD.) ......... Product number (PNC) ......... Serial number (S.N.) ......... 13. ENERGY EFFICIENCY 13.1 Product Information and Product Information Sheet* Supplier's name Electrolux ENGLISH... -
Seite 19: Energy Saving
KOIHH00K 949496730 Model identification KOIHH00X 949496731 Energy Efficiency Index 95.3 Energy efficiency class Energy consumption with a standard load, conventional mode 0.82 kWh/cycle Number of cavities Heat source Electricity Volume 73 l Type of oven Built-In Oven KOIHH00K 24.0 kg... -
Seite 20: Information Sur La Sécurité
NOUS PENSONS À VOUS Merci d'avoir acheté un appareil Electrolux. Vous avez choisi un produit qui bénéficie de décennies d'expérience professionnelle et d'innovation. Ingénieux et élégant, cet appareil a été conçu pour vous. C'est la raison pour laquelle vous pouvez avoir la certitude d'obtenir d'excellents résultats à... -
Seite 21: Sécurité Des Enfants Et Des Personnes Vulnérables
responsable des blessures et dégâts résultant d'une mauvaise installation ou utilisation. Conservez toujours les instructions dans un lieu sûr et accessible pour vous y référer ultérieurement. 1.1 Sécurité des enfants et des personnes vulnérables Cet appareil peut être utilisé par des enfants âgés d'au •... -
Seite 22: Consignes De Sécurité
Avant d'effectuer une opération de maintenance, • débranchez l'appareil de la prise secteur. AVERTISSEMENT : Assurez-vous que l'appareil est éteint • et débranché avant de remplacer l'éclairage afin d'éviter tout risque de choc électrique. N'utilisez pas l'appareil avant de l'avoir installé dans la •... -
Seite 23: Raccordement Électrique
• L'installation électrique doit comporter un dispositif d'isolation qui vous permet de Longueur du câble d’ali‐ 1500 mm déconnecter l'appareil du secteur à tous mentation secteur. Le câ‐ ble est placé dans le coin les pôles. Le dispositif d'isolement doit droit de la face arrière avoir une largeur d'ouverture de contact de 3 mm minimum. -
Seite 24: Éclairage Intérieur
2.4 Entretien et Nettoyage • N'exercez jamais de pression sur la porte ouverte. • N'utilisez jamais l'appareil comme plan de AVERTISSEMENT! travail ou comme plan de stockage. Risque de blessure, d'incendie • Ouvrez prudemment la porte de l'appareil. ou de dommages matériels sur Si vous utilisez des ingrédients contenant l'appareil. -
Seite 25: Mise Au Rebut
• Débranchez l'appareil de l'alimentation électrique. 3. INSTALLATION 3.1 Encastrement AVERTISSEMENT! Reportez-vous aux chapitres concernant la sécurité. www.youtube.com/electrolux www.youtube.com/aeg How to install your AEG/Electrolux Oven - Column installation (*mm) min. 550 min. 560 ±1 FRANÇAIS... -
Seite 26: Fixation Du Four Au Meuble
(*mm) min. 550 min. 560 ±1 3.2 Fixation du four au meuble 4. DESCRIPTION DE L'APPAREIL 4.1 Présentation générale Bandeau de commande Voyant / symbole de mise sous tension Manette de sélection des modes de cuisson Manette du minuteur Thermostat Indicateur / symbole de température Élément chauffant Éclairage... -
Seite 27: Avant La Première Utilisation
Position des grilles 4.2 Accessoires • Plat à rôtir/gril Pour cuire et griller ou à utiliser comme • Grille métallique plat pour recueillir la graisse. Pour les plats à rôti, à gratin et les moules à gâteau/pâtisserie. 5. AVANT LA PREMIÈRE UTILISATION AVERTISSEMENT! Reportez-vous aux chapitres concernant la sécurité. -
Seite 28: Modes De Cuisson
6.2 Modes de cuisson Mode de cuisson Application Position Arrêt Le four est éteint. Cuisson de sole Pour cuire des gâteaux à fond croustillant et pour stériliser des ali‐ ments. Gril Pour faire griller des aliments peu épais et du pain. Gril rapide Pour faire griller des aliments peu épais en grandes quantités et pour faire griller du pain. -
Seite 29: Utilisation Des Accessoires
Étape 4 Tournez la manette de sélection des fonctions du four et celle du thermostat sur la position Arrêt. Pour sélectionner un mode de cuisson sans durée de cuisson définie, tournez la manette du minuteur sur la position initiale. 8. UTILISATION DES ACCESSOIRES 8.1 Insertion des accessoires AVERTISSEMENT! Reportez-vous aux chapitres... -
Seite 30: Conseils Et Astuces
10. CONSEILS ET ASTUCES Avant de couper la viande, laissez-la reposer Reportez-vous aux chapitres pendant environ 15 minutes afin d'éviter que concernant la sécurité. le jus ne s'écoule. Pour éviter qu'une trop grande quantité de 10.1 Conseils de cuisson fumée ne se forme dans le four, ajoutez de Le four dispose de cinq niveaux de grille. - Seite 31 GÂTEAUX (°C) (min) Biscuits, trois niveaux 35 - 45 Plateau de cuisson Meringues 80 - 100 Plateau de cuisson Meringues, deux niveaux, 80 - 100 Plateau de cuisson préchauffer le four à vide Petits pains, préchauffer le 12 - 20 Plateau de cuisson four à...
- Seite 32 Utilisez le deuxième niveau de la grille. Utilisez la grille métallique. VIANDE (°C) (min) VIANDE Gigot d’agneau 110 - 130 (°C) (min) Poulet entier 70 - 85 Bœuf 50 - 70 Dinde entière 210 - 240 Porc 90 - 120 Canard entier 120 - 150 Veau...
- Seite 33 GRIL (kg) (min) (min) 1ère face 2e face Hamburgers, 6 20 - 30 Filet de poisson, 4 morceaux 12 - 14 10 - 12 Sandwiches toastés, 4 - 6 5 - 7 Toasts, 4 - 6 2 - 4 2 - 3 10.4 Convection naturel.
- Seite 34 (°C) (min) Fond de tarte en gé‐ moule à tarte sur une grille 35 - 45 noise métallique Génoise Victoria Plat de cuisson sur la grille 35 - 50 métallique Poisson poché, 0,3 Plateau de cuisson ou plat à 35 - 45 rôtir Poisson entier, 0,2 kg Plateau de cuisson ou plat à...
-
Seite 35: Entretien Et Nettoyage
(°C) (min) Petits gâ‐ Chauffage Plateau de 20 - 30 teaux, 20 Haut/ Bas cuisson par plateau Tourte aux Chauffage Grille métal‐ 70 - 90 pommes, Haut/ Bas lique 2 moules Ø20 cm Génoise, Chauffage Grille métal‐ 40 - 50 Préchauffez le four moule à... - Seite 36 Après chaque utilisation, lavez tous les accessoires et séchez-les. Utilisez un chiffon doux avec de l’eau tiède et un détergent doux. Ne lavez pas les accessoires au lave-vaisselle. Ne nettoyez pas les accessoires antiadhésifs avec un produit nettoyant abrasif ou des objets tranchants.
- Seite 37 Étape 5 Tenez la garniture de porte (B) sur le bord supérieur de la porte des deux côtés et poussez vers l'intérieur pour libérer le joint du clip. Étape 6 Tirez la garniture de porte vers l'avant pour la déposer. Étape 7 Prenez le panneau de verre de la porte par son bord supérieur et tirez-le doucement.
-
Seite 38: Dépannage
Nous vous recommandons de noter ces informations ici : Modèle (MOD.) ......... Référence du produit (PNC) ......... Numéro de série (S.N.) ......... 13. RENDEMENT ÉNERGÉTIQUE 13.1 Informations produit et Fiche d’informations produit* Nom du fournisseur Electrolux KOIHH00K 949496730 Identification du modèle KOIHH00X 949496731 Index d'efficacité énergétique 95.3 FRANÇAIS... -
Seite 39: Économie D'énergie
Source de chaleur Électricité Volume 73 l Type de four Four encastrable KOIHH00K 24.0 kg Masse KOIHH00X 24.0 kg * Pour l’Union européenne conformément aux Règlements UE 65/2014 et 66/2014. Pour la République de Biélorussie conformément à STB 2478-2017, Annexe G ; STB 2477-2017, Annexes A et Pour l’Ukraine conformément à... -
Seite 40: Reparatur- Und Kundendienst
WIR DENKEN AN SIE Vielen Dank, dass Sie sich für ein Gerät von Electrolux entschieden haben. Sie haben ein Produkt gewählt, hinter dem jahrzehntelange professionelle Erfahrung und Innovation stehen. Bei der Entwicklung dieses großartigen und eleganten Geräts haben wir an Sie gedacht. -
Seite 41: Sicherheitshinweise
SICHERHEITSHINWEISE Lesen Sie vor der Montage und dem Gebrauch des Geräts zuerst die Bedienungsanleitung. Bei Verletzungen oder Schäden infolge nicht ordnungsgemäßer Montage oder Verwendung übernimmt der Hersteller keine Haftung. Bewahren Sie die Anleitung zum Nachschlagen an einem sicheren und zugänglichen Ort auf. 1.1 Sicherheit von Kindern und schutzbedürftigen Personen Das Gerät kann von Kindern ab 8 Jahren und Personen mit... -
Seite 42: Sicherheitsanweisungen
WARNUNG: Das Gerät und die zugänglichen Geräteteile • werden während des Betriebs heiß. Seien Sie vorsichtig und berühren Sie niemals die Heizelemente. Verwenden Sie zum Anfassen des Zubehörs und der Töpfe • wärmeisolierende Handschuhe. Ziehen Sie bitte vor jeder Wartungsmaßnahme den •... -
Seite 43: Elektroanschluss
müssen so befestigt werden, dass sie nicht ohne Werkzeug entfernt werden Schranktiefe 550 (550) mm können. Höhe der Gerätevordersei‐ 589 mm • Stecken Sie den Netzstecker erst nach Abschluss der Montage in die Steckdose. Stellen Sie sicher, dass der Netzstecker Höhe der Geräterückseite 571 mm nach der Montage noch zugänglich ist. - Seite 44 2.3 Gebrauch – Gehen Sie beim Herausnehmen oder Einsetzen des Zubehörs sorgfältig vor. WARNUNG! • Verfärbungen der Email- oder Verletzungs-, Verbrennungs-, Edelstahlbeschichtung haben keine Stromschlag- oder Auswirkung auf die Leistung des Geräts. Explosionsgefahr. • Dieses Gerät ist nur zum Kochen •...
-
Seite 45: Innenbeleuchtung
• Verwenden Sie nur Lampen mit der gleichen Leistung . 2.6 Service • Wenden Sie sich zur Reparatur des Geräts an den autorisierten Kundendienst. 3. MONTAGE 3.1 Montage WARNUNG! Siehe Kapitel Sicherheitshinweise. www.youtube.com/electrolux www.youtube.com/aeg How to install your AEG/Electrolux Oven - Column installation DEUTSCH... -
Seite 46: Befestigung Des Ofens Am Möbel
(*mm) min. 550 min. 560 ±1 (*mm) min. 550 min. 560 ±1 3.2 Befestigung des Ofens am Möbel DEUTSCH... -
Seite 47: Gerätebeschreibung
4. GERÄTEBESCHREIBUNG 4.1 Gesamtansicht Bedienblende Betriebskontrolllampe/-symbol Einstellknopf für die Ofenfunktionen Timer-Einstellknopf Einstellknopf (für die Temperatur) Temperaturanzeige/-symbol Heizelement Lampe Garraumvertiefung – Behälter für die Aqua-Reinigungsfunktion Einschubebenen 4.2 Zubehör Zum Backen und Braten oder zum Auffangen von abtropfendem Fett. • Kombirost Für Kochgeschirr, Kuchenformen, Braten. •... -
Seite 48: Täglicher Gebrauch
6. TÄGLICHER GEBRAUCH WARNUNG! Schritt 2 Drehen Sie den Wahlknopf, um die Siehe Kapitel Temperatur auszuwählen. Sicherheitshinweise. Schritt 3 Drehen Sie nach Beendigung des Gar‐ vorgangs die Knöpfe in die Aus-Positi‐ 6.1 Einstellung: Ofenfunktion on, um den Backofen auszuschalten. Schritt 1 Drehen Sie den Backofen-Einstellknopf auf eine Ofenfunktion. -
Seite 49: Uhrfunktionen
7. UHRFUNKTIONEN 7.1 Einstellen von: Garzeitende Zum Einstellen der Abschaltzeit für Ofenfunktionen. Schritt 1 Stellen Sie die Ofenfunktion und Temperatur ein. Schritt 2 Drehen Sie den Timer-Einstellknopf auf den höchsten Wert. Schritt 3 Stellen Sie die Ausschaltzeit durch Drehen des Timer-Einstellknopfs ein. Wenn die eingestellte Zeit abgelaufen ist, ertönt der Signalton und der Backofen wird ausgeschal‐... -
Seite 50: Zusatzfunktionen
9. ZUSATZFUNKTIONEN 9.1 Kühlgebläse gefährlichen Überhitzung führen. Um dies zu verhindern, ist der Backofen mit einem Wenn der Backofen in Betrieb ist, wird das Sicherheitsthermostat ausgestattet, der die Kühlgebläse automatisch eingeschaltet, um Stromzufuhr unterbrechen kann. Die die Ofenoberflächen zu kühlen. Wenn Sie Wiedereinschaltung des Backofens erfolgt den Backofen ausschalten kann das automatisch bei Temperaturabfall. - Seite 51 KUCHEN (°C) (Min.) Rührteig 45 – 60 Kuchenform Mürbeteig 20 – 30 Kuchenform Buttermilch-Käsekuchen 60 – 80 Kuchenform, Ø 26 cm Strudel/Stollen 60 – 80 Backblech Marmeladentorte 30 – 40 Kuchenform, Ø 26 cm Christstollen, Heizen Sie 90 – 120 Kuchenform, Ø...
- Seite 52 Nutzen Sie die zweite Einschubebene, sofern nicht anders angegeben. Verwenden Sie die Kuchenform. FLEISCH (°C) (Min.) Roastbeef, englisch, 70 – 75 OBST‐ durch KUCHEN (°C) (Min.) Nutzen Sie die zweite Einschubebene. Nudelauflauf, Vor‐ 40 – 50 heizen ist nicht er‐ forderlich FLEISCH Gemüseauflauf, Vor‐...
-
Seite 53: Ober-/Unterhitze - Empfohlenes Zubehör
GRILL (kg) (Min.) (Min.) Erste Seite Zweite Seite Filetsteaks, 4 Stück 12 - 15 12 - 14 Rindersteak, 4 Stück 10 - 12 6 - 8 Würstchen, 8 12 - 15 10 - 12 Schweinekoteletts, 4 Stück 12 - 16 12 - 14 Hähnchen, halbiert, 2 30 - 35... -
Seite 54: Informationen Für Prüfinstitute
(°C) (Min.) Pizza, gefroren, 0,35 Kombirost 45 - 55 Biskuitrolle Backblech oder tiefes Blech 30 - 40 Brownie Backblech oder tiefes Blech 45 - 50 Soufflé, 6 Stück Keramikförmchen auf Kombi‐ 45 - 55 rost Biskuitboden Biskuitform auf Kombirost 35 - 45 Englischer Sandwich‐... -
Seite 55: Reinigung Und Pflege
(°C) (Min.) Apfelku‐ Ober-/Unterhit‐ Kombirost 70 - 90 chen, 2 For‐ men à Ø 20 Biskuit, Ku‐ Ober-/Unterhit‐ Kombirost 40 - 50 Backofen 10 Min. vor‐ chenform Ø heizen. 26 cm Mürbeteig‐ Ober-/Unterhit‐ Backblech 140 - 25 - 45 gebäck Toast, 4 - 6 Grill Kombirost... -
Seite 56: Verwendung: Aqua Reinigung
Reinigen Sie alle Zubehörteile nach jedem Gebrauch und lassen Sie sie trocknen. Feuchten Sie ein weiches Tuch mit warmem Wasser und einem milden Reinigungsmittel an. Reinigen Sie die Zubehörteile nicht im Geschirrspüler. Reinigen Sie das Zubehör mit Antihaftbeschichtung nicht mit Scheuermitteln oder scharfkan‐ tigen Gegenständen. -
Seite 57: Austausch: Lampe
Schritt 5 Fassen Sie die Türabdeckung (B) an der Oberkante der Tür an beiden Seiten an. Drü‐ cken Sie sie nach innen, um den Klippver‐ schluss zu lösen. Schritt 6 Ziehen Sie die Türabdeckung nach vorn, um sie abzunehmen. Schritt 7 Halten Sie die Oberkante der Türglasscheibe fest und ziehen Sie vorsichtig heraus. -
Seite 58: Fehlersuche
Typenschild nicht vom Garraum. Wir empfehlen, hier folgende Daten zu notieren: Modell (MOD.) ......... Produktnummer (PNC) ......... Seriennummer (S.N.) ......... 13. ENERGIEEFFIZIENZ 13.1 Produktinformationen und Produktdatenblatt* Herstellername Electrolux KOIHH00K 949496730 Modellidentifikation KOIHH00X 949496731 Energieeffizienzindex 95.3 Energieeffizienzklasse Energieverbrauch bei Standardbeladung, Ober-/Unterhitze 0.82 kWh/Programm DEUTSCH... -
Seite 59: Energie Sparen
Anzahl der Garräume Wärmequelle Strom Fassungsvermögen 73 l Backofentyp Einbau-Backofen KOIHH00K 24.0 kg Gewicht KOIHH00X 24.0 kg * Für die Europäische Union gemäß EU-Richtlinien 65/2014 und 66/2014. Für die Republik Weißrussland gemäß STB 2478-2017, Anhang G; STB 2477-2017, Anlagen A und B. -
Seite 60: Informazioni Di Sicurezza
PENSATI PER VOI Grazie per aver acquistato un'apparecchiatura Electrolux. Avete scelto un prodotto che ha alle spalle decenni di esperienza professionale e innovazione. Ingegnoso ed elegante, è stato progettato pensando a voi. Quindi, in qualsiasi momento desiderate utilizzarlo, potete esser certi di ottenere sempre i migliori risultati. -
Seite 61: Avvertenze Di Sicurezza Generali
di eventuali lesioni o danni derivanti da un'installazione o un uso scorretti. Conservare sempre le istruzioni in un luogo sicuro e accessibile per poterle consultare in futuro. 1.1 Sicurezza di bambini e persone vulnerabili Questa apparecchiatura può essere usata da bambini a •... -
Seite 62: Istruzioni Di Sicurezza
AVVERTENZA: Assicurarsi che l’apparecchiatura sia • spenta prima di sostituire la lampadina per evitare la possibilità di scosse elettriche. Non usare l'apparecchiatura prima di installarla nella • struttura a incasso. Non usare una pulitrice a vapore per pulire • l'apparecchiatura. Non utilizzare detergenti abrasivi o raschietti di metallo per •... -
Seite 63: Collegamento Elettrico
• L'impianto elettrico deve essere dotato di un dispositivo di isolamento che consenta Lunghezza del cavo di ali‐ 1500 mm di scollegare l'apparecchiatura dalla presa mentazione. Il cavo è collo‐ cato nell'angolo destro del di corrente a tutti i poli. Il dispositivo di lato posteriore. -
Seite 64: Illuminazione Interna
• Non esercitare pressione sulla porta l’uso non chiudere il pannello dell'armadio aperta. finché l'apparecchiatura non si è • Non utilizzare l'apparecchiatura come completamente raffreddata. superficie di lavoro o come piano di 2.4 Pulizia e cura appoggio. • Aprire la porta dell'apparecchiatura con cautela. -
Seite 65: Assistenza Tecnica
2.7 Smaltimento AVVERTENZA! Rischio di lesioni o soffocamento. 3. INSTALLAZIONE 3.1 Incasso AVVERTENZA! Fare riferimento ai capitoli sulla sicurezza. www.youtube.com/electrolux www.youtube.com/aeg How to install your AEG/Electrolux Oven - Column installation (*mm) min. 550 min. 560 ±1 ITALIANO... -
Seite 66: Descrizione Del Prodotto
(*mm) min. 550 min. 560 ±1 3.2 Fissaggio nel mobile 4. DESCRIZIONE DEL PRODOTTO 4.1 Panoramica Pannello di controllo Lampadina/simbolo alimentazione Manopola di regolazione delle funzioni di riscaldamento Manopola del timer Manopola di regolazione (per la temperatura) Indicatore della temperatura / simbolo Resistenza Lampadina ITALIANO... -
Seite 67: Prima Di Utilizzare L'elettrodomestico
Incavo cavità - Contenitore della pulizia Posizioni dei ripiani dell'acqua 4.2 Accessori Per cuocere al forno, arrostire o come recipiente per raccogliere i grassi. • Griglia Per pentole, stampi per dolci, arrosti. • Leccarda 5. PRIMA DI UTILIZZARE L'ELETTRODOMESTICO AVVERTENZA! Fare riferimento ai capitoli sulla sicurezza. -
Seite 68: Funzioni Del Timer
6.2 Heating functions Heating function Application Posizione di spento Il forno è spento. Resistenza inferiore Per cuocere torte dal fondo croccante e conservare gli alimenti. Grill Per grigliare pezzi sottili e tostare il pane. Griglia rapida Per grigliare in grandi quantità pezzi sottili di cibo e per tostare il pa‐ Cottura convenziona‐... -
Seite 69: Utilizzo Degli Accessori
Per impostare una funzione di riscaldamento senza un tempo di cottura impostato, ruotare la manopola del timer sulla posizione iniziale. 8. UTILIZZO DEGLI ACCESSORI 8.1 Inserimento di accessori AVVERTENZA! Fare riferimento ai capitoli sulla sicurezza. Griglia: Spingere il ripiano fra le guide del supporto e veri‐ ficare che i piedini siano rivolti verso il basso. -
Seite 70: Consigli E Suggerimenti Utili
10. CONSIGLI E SUGGERIMENTI UTILI forno si formino macchie che non possono Fare riferimento ai capitoli sulla più essere rimosse. sicurezza. Lasciare riposare la carne per circa 15 minuti prima di tagliarla, in modo da non perdere il 10.1 Consigli di cottura sughetto. - Seite 71 TORTE (°C) (min) Meringhe 80 - 100 Lamiera dolci Meringhe, due livelli, preri‐ 80 - 100 Lamiera dolci scaldare il forno vuoto Focaccine, preriscaldare il 12 - 20 Lamiera dolci forno vuoto Eclair 25 - 35 Lamiera dolci Eclair, due livelli 35 - 45 Lamiera dolci Crostatine...
- Seite 72 CARNE CARNE (°C) (min) (°C) (min) Vitello 90 - 120 Pollo intero 70 - 85 Roastbeef inglese, al 50 - 60 Tacchino intero 210 - 240 sangue Anatra intera 120 - 150 Roastbeef inglese, 60 - 70 Oca intera 150 - 200 cottura media Coniglio, in pezzi 60 - 80...
- Seite 73 GRILL (kg) (min) (min) Primo lato Secondo lato Toast, 4 - 6 2 - 4 2 - 3 10.4 Cottura convenzionale umida - accessori consigliati Usare scatole e contenitori scuri e non riflettenti. Assorbono meglio il calore rispetto al colore chiaro e ai piatti riflettenti.
- Seite 74 (°C) (min.) Filetto di pesce, 0,3 teglia per pizza su griglia 30 - 40 Carne al vapore, 0,25 vassoio di cottura o leccarda 35 - 45 Shashlik, 0,5 kg vassoio di cottura o leccarda 40 - 50 Cookie, 16 pezzi vassoio di cottura o leccarda 30 - 45 Macarons, 20 pezzi...
-
Seite 75: Pulizia E Cura
(°C) (min) Toast, 4 - 6 Grill Ripiano a fi‐ max. 2 - 3 minuti sul pri‐ Preriscaldare il forno pezzi mo lato; 2 - 3 mi‐ per 3 minuti. nuti sul secondo lato Burger di Grill Ripiano me‐ max. 20 - 30 Mettere il ripiano me‐... - Seite 76 Fase 3 Impostare la temperatura su 90 °C. Fase 5 Spegnere il forno. Fase 4 Lasciare in funzione il forno per 30 mi‐ Fase 6 Attendere che il forno sia freddo. Asciu‐ nuti. gare la cavità con un panno morbido. 11.3 Come rimuovere e installare? Porta La porta del forno è...
-
Seite 77: Risoluzione Dei Problemi
Fase 8 Pulire il pannello di vetro con dell'acqua sa‐ ponata. Asciugare i pannelli di vetro facendo attenzione. Non pulire i pannelli in vetro in la‐ vastoviglie. Fase 9 Al termine della pulizia, installare il pannello in vetro e la porta del forno. Accertarsi che la serigrafia sia sul lato interno della porta. -
Seite 78: Efficienza Energetica
Numero di serie (S.N.) ......... 13. EFFICIENZA ENERGETICA 13.1 Informazioni sul prodotto e Scheda informativa sul prodotto* Nome fornitore Electrolux KOIHH00K 949496730 Identificativo modello KOIHH00X 949496731 Indice di efficienza energetica 95.3 Classe di efficienza energetica Consumo di energia con un carico standard, in modalità tradiziona‐... -
Seite 79: Risparmio Energetico
13.2 Risparmio energetico Calore residuo Quando la durata di cottura è superiore ai 30 minuti, ridurre la temperatura del forno al Il forno è dotato di funzioni che minimo 3-10 minuti prima della fine del consentono di aiutarvi a processo di cottura. Il calore residuo risparmiare energia durante le all'interno del forno proseguirà... -
Seite 80: Información Sobre Seguridad
PENSAMOS EN USTED Gracias por adquirir un aparato Electrolux. Ha escogido un producto que contiene décadas de experiencia e innovación profesionales. Ingenioso y elegante, se ha diseñado pensando en usted. Así pues, siempre que lo utilice, puede tener la seguridad de que conseguirá... -
Seite 81: Seguridad De Niños Y Personas Vulnerables
responsable de lesiones o daños producidos como resultado de una instalación o un uso incorrectos. Conserve siempre estas instrucciones en lugar seguro y accesible para futuras consultas. 1.1 Seguridad de niños y personas vulnerables Este aparato puede ser utilizado por niños de 8 años en •... -
Seite 82: Instrucciones De Seguridad
ADVERTENCIA: Asegúrese de que el aparato está • desconectado antes de reemplazar la lámpara con el fin de impedir que se produzca una descarga eléctrica. No utilice el aparato antes de instalarlo en la estructura • empotrada. No utilice un limpiador a vapor para limpiar el aparato. •... -
Seite 83: Conexión Eléctrica
2.2 Conexión eléctrica • El aparato solo se suministra con un cable de alimentación. ADVERTENCIA! Riesgo de incendios y Tipos de cables aplicables para su instala‐ descargas eléctricas. ción o cambio para Europa: H07 RN-F, H05 RN-F, H05 RRF, H05 VV-F, H05 •... - Seite 84 • Procure que no haya chispas ni fuego • Asegúrese de que el aparato esté frío. encendido cerca cuando se abra la puerta Los paneles de cristal pueden romperse. del aparato. • Cambie inmediatamente los paneles de • No coloque productos inflamables ni cristal de la puerta que estén dañados.
-
Seite 85: Instalación
3. INSTALACIÓN 3.1 Empotrado ADVERTENCIA! Consulte los capítulos sobre seguridad. www.youtube.com/electrolux www.youtube.com/aeg How to install your AEG/Electrolux Oven - Column installation (*mm) min. 550 min. 560 ±1 (*mm) min. 550 min. 560 ±1... -
Seite 86: Descripción Del Producto
3.2 Fijación del horno al mueble 4. DESCRIPCIÓN DEL PRODUCTO 4.1 Descripción general Panel de control Piloto/símbolo de alimentación Mando de las funciones de cocción Mando del temporizador Mando de en control (de la temperatura) Indicador/símbolo de temperatura Resistencia Bombilla Relieve de la cavidad - Contenedor de limpieza con agua Posiciones de los estantes... -
Seite 87: Uso Diario
Paso 1 Paso 2 Limpie el horno Precaliente el horno vacío Retire todos los accesorios del horno. Seleccione la temperatura máxima para la función: Limpie el horno y los accesorios con un paño sua‐ ve humedecido en agua templada y jabón neutro. Tiempo: 1 h. -
Seite 88: Funciones Del Reloj
6.3 Notas sobre: Horneado húmedo Cuando se utiliza esta función, la bombilla se apaga automáticamente. tradicional Para las instrucciones de cocción, consulte Esta función se utilizaba para cumplir con los el capítulo "Consejos", Horneado húmedo requisitos de categoría de eficiencia tradicional. -
Seite 89: Funciones Adicionales
Bandeja honda: Introduzca la bandeja entre las guías del carril de apoyo. 9. FUNCIONES ADICIONALES 9.1 Ventilador de enfriamiento sobrecalentamientos peligrosos. Para evitarlo, el horno dispone de un termostato Cuando el horno funciona, el ventilador de de seguridad que interrumpe la alimentación. enfriamiento se pone en marcha El horno se vuelve a encender automáticamente para mantener frías las... -
Seite 90: Horneado Y Asado
10.2 Horneado y asado recipientes, recetas y cantidades cuando utilice este horno. Use la función: Cocción convencional. REPOSTERÍA (°C) (min) Masas batidas 45 - 60 Molde de pastel Masa con mantequilla 20 - 30 Molde de pastel Tarta de queso (con suero) 60 - 80 Molde de pastel, Ø... - Seite 91 Precaliente el horno vacío. Use el segundo nivel salvo que se indique otro. CARNE (°C) (min) Use el molde de repostería. Rosbif muy hecho 70 - 75 Use el segundo nivel. FLA‐ (°C) (min) Pudin de pasta, no 40 - 50 CARNE se necesita preca‐...
- Seite 92 GRILL (kg) (min) (min) 1ª cara 2ª cara Filetes de solomillo, 4 piezas 12 - 15 12 - 14 Bistec de vaca, 4 piezas 10 - 12 6 - 8 Salchichas, 8 12 - 15 10 - 12 Chuletas de cerdo, 4 piezas 12 - 16 12 - 14 Pollo, medio, 2...
- Seite 93 (°C) (min) Pizza congelada, parrilla 45 - 55 0,35 kg Brazo de gitano bandeja o bandeja honda 30 - 40 Brownie bandeja o bandeja honda 45 - 50 Soufflé, 6 piezas ramekin cerámico sobre parri‐ 45 - 55 Base de masa brisé molde de base sobre parrilla 35 - 45 Tarta Victoria...
-
Seite 94: Mantenimiento Y Limpieza
(°C) (min) Pastelillos, Cocción con‐ Bandeja de 20 - 30 20 unidades vencional cocción por bandeja Tarta de Cocción con‐ Parrilla 70 - 90 manzana, 2 vencional moldes, Ø 20 cm Bizcocho, Cocción con‐ Parrilla 40 - 50 Precaliente el horno 10 molde de re‐... - Seite 95 Limpie todos los accesorios después de cada uso y déjelos secar. Use un paño suave hu‐ medecido en agua caliente y detergente suave. No lave los accesorios en el lavavajillas No limpie los accesorios no adherentes utilizando un limpiador abrasivo ni objetos afilados. Accesorios 11.2 Instrucciones de uso: Limpieza con agua...
- Seite 96 Paso 5 Sujete por ambos lados el acabado de la puerta (B), situado en el borde superior de ésta, y empuje hacia dentro para soltar el sello de resorte. Paso 6 Tire del borde de la puerta hacia delante pa‐ ra desengancharla.
-
Seite 97: Solución De Problemas
Número de producto (PNC) ......... Número de serie (S.N.) ......... 13. EFICACIA ENERGÉTICA 13.1 Información del producto y Hoja de información del producto* Nombre del proveedor Electrolux KOIHH00K 949496730 Identificación del modelo KOIHH00X 949496731 Índice de eficiencia energética 95.3 ESPAÑOL... -
Seite 98: Ahorro De Energía
Fuente de calor Electricidad Volumen 73 l Tipo de horno Horno empotrado KOIHH00K 24.0 kg Masa KOIHH00X 24.0 kg * Para la Unión Europea según los Reglamentos de la UE 65/2014 y 66/2014. Para la República de Bielorrusia según STB 2478-2017, apéndice G; STB 2477-2017, anexos A y B. - Seite 100 electrolux.com...