Siemens Acuris Bedienungsanleitung
Vorschau ausblenden
Andere Handbücher für Acuris:
- Bedienungsanleitung (172 Seiten) ,
- Bedienungsanleitung (232 Seiten)
Kapitel
Inhaltsverzeichnis
Fehlerbehebung

Verwandte Anleitungen für Siemens Acuris


Inhaltszusammenfassung für Siemens Acuris
- Seite 1 English Magyar Română Français Deutsch ﻋﺮﺑﻲ BTE Products User Guide • Használati utasítás • Instrucţiuni de utilizare • Manuel d’utilisation • Bedienungs anleitung • ﺗﻌﻠﻴﻤﺎت اﻻﺳﺘﺨﺪام...
- Seite 2 English Magyar Română Français Deutsch ﻋﺮﺑﻲ...
-
Seite 3: Inhaltsverzeichnis
Content Content Your BTE hearing instruments Intended use General notes on safety Handling batteries Locking and unlocking the battery compartment Inserting and removing the hearing instrument Turning your hearing instrument on and off Changing the hearing program Adjusting the volume Audio input Functionalities Maintenance and care... -
Seite 4: Your Bte Hearing Instruments
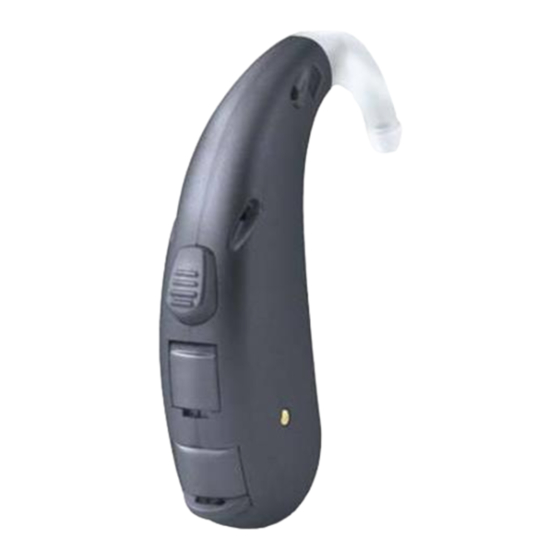
Your BTE hearing instruments Your BTE hearing instruments Life Life optional with optional with optional with earhook earhook LifeTube (battery type: 312) (battery type: 312) (battery type: 13) ① LifeTube ⑥ Microphone openings ② LifeTip ⑦ Cover for programming socket ③... - Seite 5 Your BTE hearing instruments S/M/DM S VC/M VC/ DM VC optional with optional with optional with S-LifeTube S-LifeTube S-LifeTube (battery type: 13) (battery type: 13) (battery type: 13) ① Earhook ⑤ Battery compartment ② Push button ⑥ Cover for programming socket ③...
- Seite 6 Your BTE hearing instruments P/HP/DP (battery type: 13) (battery type: 675) ① Earhook ⑤ Battery compartment ② Push button ⑥ Cover for programming socket ③ Volume control ⑦ Audio input ④ Microphone openings...
- Seite 7 Your BTE hearing instruments Phoenix (battery type: 13) (battery type: 675) (battery type: 13/675*) ① Earhook ⑥ Microphone openings ② Push button ⑦ Battery compartment ③ Rocker switch ⑧ Cover for programming socket ④ MTO switch ⑨ Cover for fitting controls ⑤...
- Seite 8 Your BTE hearing instruments Explorer 500 P Explorer 500 M Prisma 2K optional with optional with S-LifeTube S-LifeTube (battery type: 13) (battery type: 13) (battery type: 312) ① Earhook ⑥ Battery compartment ② Push button ⑦ Cover for programming socket ③...
-
Seite 9: Intended Use
Intended use Intended use Hearing instruments are intended to improve the hearing of hearing impaired persons. Diagnosis and prescription of a hearing instrument must be performed by hearing health specialists, e.g. acousticians, audiologists or ENT doctors. Read and follow the instructions of this user guide to avoid injuries and to protect the hearing instruments from damage. -
Seite 10: General Notes On Safety
General notes on safety General notes on safety WARNING Choking hazard! Your hearing instruments contain small parts which can be swallowed. Ensure adequate supervision if infants, small children or mentally disabled persons need to wear hearing instruments. Check the completeness of the hearing ... - Seite 11 General notes on safety WARNING Note that any unauthorized changes to the product may cause damage to the product or cause injury. Use only approved parts and accessories. Ask your Hearing Care Professional for support. WARNING A Hearing Care Professional should advise a prospective hearing instrument user to consult a licensed physician before using the hearing instrument if the Hearing Care Professional...
- Seite 12 General notes on safety WARNING Consult a Hearing Care Professional if you experience any unusual side effects like skin irritation, excessive accumulation of ear wax, dizziness, change in your hearing, or if you think there may be a foreign object in your ear canal. WARNING Risk of impairing the residual hearing of the user.
- Seite 13 General notes on safety WARNING Risk of injury! Do not use obviously damaged devices and return them to point of sale. WARNING Risk of explosion! Do not use your hearing instruments in explosive atmospheres (e. g. in mining areas). NOTICE Your hearing instruments are sensitive to extreme heat, high humidity, strong magnetic fields...
- Seite 14 General notes on safety NOTICE Only use zinc-air batteries or nickel-metal hydride (NiMH) rechargeable batteries. Do not use e.g. silver-zinc or lithium-ion rechargeable batteries. NOTICE Leaking batteries damage the hearing instruments. Turn the hearing instruments off when not in use to preserve the battery.
- Seite 15 General notes on safety CAUTION Risk of injury! Always wear the tube with an ear piece. Make sure that the ear piece is completely attached. CAUTION Risk of injury! Insert the ear piece carefully and not too deeply ...
-
Seite 16: Handling Batteries
Handling batteries Handling batteries original size Always use the right size of batteries. Charge the rechargeable batteries before first use. Remove the tab on standard batteries only when you are ready to use them. The positive (+) side of the batteries is always ... - Seite 17 Handling batteries Open the battery compartment completely. Remove the empty battery. Insert the proper size battery. Make sure that the "+" symbol on the battery points up as shown in the picture. Close the battery compartment. ...
-
Seite 18: Locking And Unlocking The Battery Compartment
Locking and unlocking the battery compartment Locking and unlocking the battery compartment Option 1 Locking Push the small slide to the right. Unlocking Push the small slide to the left. Option 2 Locking Push the small slide to the bottom. ... - Seite 19 Locking and unlocking the battery compartment Option 3 Locking Push the slide to the right with a suitable pointed tool. Unlocking Push the slide to the left with a suitable pointed tool. Close the battery compartment completely.
-
Seite 20: Inserting And Removing The Hearing Instrument
Inserting and removing the hearing instrument Inserting and removing the hearing instrument Handle the hearing instrument by holding the earmold. Do not pull the Tube. Inserting Insert the LifeTube/earmold. Place the hearing instrument behind the ear. Removing Remove the hearing instrument. -
Seite 21: Turning Your Hearing Instrument On And Off
Turning your hearing instrument on and off Turning your hearing instrument on and off Via battery compartment Close the battery compartment. Open the battery compartment. Via push button Press the push button for 2 seconds. Press the push button ... - Seite 22 Turning your hearing instrument on and off Via MTO switch Switch to M (microphone) or T (telecoil). Switch to O (off). Via volume control Rotate the volume control upwards. Rotate the volume control completely down. Via remote control Refer to the remote control user guide.
-
Seite 23: Changing The Hearing Program
Changing the hearing program Changing the hearing program Via push button Press the push button to switch to the next program. Via MTO switch Switch to M (microphone) or T (telecoil). Via remote control Refer to the remote control user guide. ... -
Seite 24: Adjusting The Volume
Adjusting the volume Adjusting the volume Volume control Rotate the volume control up to increase the volume. Rotate the volume control down to decrease the volume. Rocker switch Press up to increase the volume. Press down to decrease ... -
Seite 25: Audio Input
Audio input Audio input An audio input enables the connection between the hearing instrument and an external device e.g. an FM system, mp3 player, television or an infrared device. Audio input via an audio shoe Refer to the audio shoe user guide on how to ... -
Seite 26: Functionalities
Functionalities Functionalities Your Hearing Care Professional can activate the following functionalities. e2e wireless Allows the use of a remote control. ■ Automatically adjusts both hearing instruments ■ simultaneously to change the instrument settings, e.g. volume or program. NOTICE Your hearing instruments are designed to comply with international standards on electromagnetic compatibility but interference with nearby electronic devices... - Seite 27 Functionalities Checking the hearing instruments' status The LED is continuously lit. ■ The hearing instruments are switched ON. The LED is off. ■ The hearing instruments are switched OFF. Rechargeable hearing instruments Rechargeable hearing instruments allow the use of standard or rechargeable batteries. Charge rechargeable batteries before first use.
- Seite 28 (*) AutoPhone magnet accessory Not all telephones produce a magnetic field strong enough to activate the AutoPhone function. In this case, you can use the Siemens AutoPhone magnet, which is available as an accessory, and attach it to the telephone receiver.
- Seite 29 Functionalities NOTICE See the AutoPhone magnet user guide for instructions on how to position the magnet. Use the approved AutoPhone magnet only. Ask your Hearing Care Professional for this accessory. NOTICE Magnets can disturb electrical devices and delete stored data.
-
Seite 30: Maintenance And Care
Maintenance and care Maintenance and care Your hearing instruments are highly sensitive systems. Proper care and handling will ensure the best possible performance. Clean instruments regularly to prevent damage to the hearing instruments and to avoid health problems. NOTICE Do not put your hearing instruments ... - Seite 31 Maintenance and care For instruments with LifeTube Regulary clean LifeTubes with a cleaning wire. Ask your Hearing Care Professional to exchange LifeTubes and LifeTips approximately every 3 to 6 months or as needed. For information on hearing, hearing loss and hearing instruments for children, please visit our Pediatric Website at: http://www.bestsound-technology.com...
-
Seite 32: Troubleshooting
Troubleshooting Troubleshooting Use these tips to resolve simple issues. Problem Possible solution Sound is weak. Replace empty battery. Clean earmold. Increase volume. Hearing instrument Reinsert the earmold until it fits emits whistling securely. sounds. Decrease volume. Clean earmold. Sound is distorted. Decrease volume. -
Seite 33: Disposal Information
Disposal information Disposal information Within the European Union, the marked equipment is covered by "Directive 2002/96/EC of the European Parliament and of the Council of 27 January 2003 on waste electrical and electronical equipment." Amended by "Directive 2003/108/EC" (WEEE). NOTICE Recycle hearing instruments, accessories and ... -
Seite 34: Technical Information
Technical information Technical information Siemens Acuris, Artis 2, Centra, Cielo 2 IC: 267AB-WL001 Siemens Explorer 500 P, Motion 300 BTE, Motion 500 BTE, Motion 700 BTE, Motion 501 DP, Motion 701 DP, Motion 701 DM, Motion 501 DM VC, Motion 701 DM VC,... - Seite 35 Technical information Operation is subject to the following conditions: this device may not cause harmful interference, and ■ this device must accept any interference received, ■ including interference that may cause undesired operation. This equipment has been tested and found to comply with the limits for a Class B digital device, pursuant to Part 15 of the FCC Rules.
- Seite 37 Tartalom Tartalom A BTE fülmögötti hallókészülék Felhasználási terület Általános, biztonsággal kapcsolatos megjegyzések Az elemek kezelése Az elemtartó lezárása és kioldása A hallókészülék behelyezése és eltávolítása A hallókészülék be- és kikapcsolása A hallóprogram módosítása A hangerő beállítása Audiobemenet Funkciók Karbantartás és ápolás Hibaelhárítás Hulladékelhelyezési tudnivalók...
-
Seite 38: A Bte Fülmögötti Hallókészülék
A BTE fülmögötti hallókészülék A BTE fülmögötti hallókészülék Life Life opcionálisan opcionálisan opcionálisan könyökkel is könyökkel is LifeTube-bal is elérhető elérhető elérhető (elemtípus: 312) (elemtípus: 312) (elemtípus: 13) ① LifeTube ⑦ A programozófoglalat ② LifeTip burkolata ③ LifeTip adapter ⑧ Elemtartó rekesz ④... - Seite 39 A BTE fülmögötti hallókészülék S/M/DM S VC/M VC/ DM VC opcionálisan opcionálisan opcionálisan S-LifeTube-bal is S-LifeTube-bal is S-LifeTube-bal kapható kapható is kapható (elemtípus: 13) (elemtípus: 13) (elemtípus: 13) ① Könyök ⑥ A programozófoglalat ② Nyomógomb burkolata ③ Hangerő-szabályozó ⑦ Audiobemenet ④...
- Seite 40 A BTE fülmögötti hallókészülék P/HP/DP (elemtípus: 13) (elemtípus: 675) ① Könyök ⑤ Elemtartó rekesz ② Nyomógomb ⑥ A programozófoglalat burkolata ③ Hangerő-szabályozó ⑦ Audiobemenet ④ Mikrofonnyílások...
- Seite 41 A BTE fülmögötti hallókészülék Phoenix (elemtípus: 13) (elemtípus: 675) (elemtípus: 13/675*) ① Könyök ⑦ Elemtartó rekesz ② Nyomógomb ⑧ A programozófoglalat burkolata ③ Billenőkapcsoló ⑨ A vezérlőelemek rögzíté- ④ MTO kapcsoló sére szolgáló burkolat ⑤ Hangerő-szabályozó ⑩ Audiobemenet ⑥ Mikrofonnyílások * Kérdezze ez ügyben hallókészülék-akusztikusát.
- Seite 42 A BTE fülmögötti hallókészülék Explorer 500 P Explorer 500 M Prisma 2K opcionálisan opcionálisan S-LifeTube-bal is S-LifeTube-bal is kapható kapható (elemtípus: 13) (elemtípus: 13) (elemtípus: 312) ① Könyök ⑥ Elemtartó rekesz ② Nyomógomb ⑦ A programozófoglalat burkolata ③ Hangerő-szabályozó ⑧ Audiobemenet ④...
-
Seite 43: Felhasználási Terület
Felhasználási terület Felhasználási terület A hallókészülék célja, hogy a halláskárosodottaknak jobb hallást biztosítson. A diagnózis felállítását és a hallókészülék felírását fülspecialistának, pl. fül-orr- gégésznek, fülész szakorvosnak vagy akusztikusnak kell végeznie. A sérülések és a hallókészülék károsodásának elkerülése érdekében olvassa el és kövesse a jelen használati útmutató... -
Seite 44: Általános, Biztonsággal Kapcsolatos Megjegyzések
Általános, biztonsággal kapcsolatos megjegyzések Általános, biztonsággal kapcsolatos megjegyzések VIGYÁZAT Fulladásveszély! A hallókészülék olyan kis méretű alkatrészeket tartalmaz, amelyek könnyen lenyelhetők. Gondoskodjon megfelelő felügyeletről, ha csecsemő, kisgyermek vagy szellemi fogyatékos személy kényszerül a hallókészülék viselésére. Rendszeresen ellenőrizze a hallókészülék épségét. - Seite 45 Általános, biztonsággal kapcsolatos megjegyzések VIGYÁZAT Vegye figyelembe, hogy a termék bármilyen illetéktelen módosítása károsíthatja a terméket és sérülést okozhat. Kizárólag csak engedélyezett alkatrészeket és tartozékokat használjon. Kérje hallókészülék-specialistája segítségét. VIGYÁZAT A hallókészülék használata előtt a hallókészülék- specialistának javasolnia kell a gyakorló orvossal való...
- Seite 46 Általános, biztonsággal kapcsolatos megjegyzések VIGYÁZAT Ha olyan váratlan mellékhatásokat tapasztal, mint bőrirritáció, megnövekedett fülzsír-termelődés, szédülés, változások a hallásában, vagy úgy érzi, hogy talán idegen tárgy lehet a hallójáratában, forduljon hallókészülék-specialistához. VIGYÁZAT A megmaradt hallása elvesztésének veszélye. Csak olyan hallókészüléket használjon, amelyet ...
- Seite 47 Általános, biztonsággal kapcsolatos megjegyzések VIGYÁZAT Sérülésveszély! Ne használja a nyilvánvalóan sérült készülékeket, és juttassa vissza őket a vásárlás helyére. VIGYÁZAT Robbanásveszély! Ne használja a hallókészüléket robbanásveszélyes környezetben (pl. bányában). FIGYELEM Sérülésveszély! A füldugót óvatosan és ne túl mélyre ...
- Seite 48 Általános, biztonsággal kapcsolatos megjegyzések MEGJEGYZÉS A hallókészülék érzékeny a nagy hőre, a magas páratartalomra, az erős mágneses mezőkre (> 0,1 T), a röntgensugarakra és a mechanikai behatásokra. Ne tegye ki a hallókészüléket szélsőséges hőmérséklet vagy magas páratartalom hatásának. Ne hagyja tűző napon. ...
- Seite 49 Általános, biztonsággal kapcsolatos megjegyzések MEGJEGYZÉS A szivárgó elemek károsíthatják a hallókészüléket. Az elemek kímélése céljából kapcsolja ki a hallókészüléket, ha használaton kívül van. Ha hosszabb ideig nem használja a készüléket, vegye ki belőle az elemeket. MEGJEGYZÉS A környezetszennyezés elkerülése érdekében ...
-
Seite 50: Az Elemek Kezelése
Az elemek kezelése Az elemek kezelése valós méret Mindig megfelelő méretű elemet használjon. Az első használat előtt töltse fel az újratölthető akkumulátort. A normál elemen található fület csak az elem használatba vétele előtt távolítsa el. Az elem pozitív (+) pólusa mindig a sima ... - Seite 51 Az elemek kezelése Teljesen nyissa ki az elemtartót. Vegye ki a lemerült elemet. Helyezzen be egy megfelelő méretű elemet. Ügyeljen arra, hogy az elemen található „+” jel felfelé álljon, a képen látható módon. Zárja be az elemtartót. ...
-
Seite 52: Az Elemtartó Lezárása És Kioldása
Az elemtartó lezárása és kioldása Az elemtartó lezárása és kioldása Választék 1 Lezárás Tolja el a kis csúsztatógombot jobbra. Kioldás Tolja el a kis csúsztatógombot balra. Választék 2 Lezárás Tolja el a kis csúsztatógombot az alsó állásba. Kioldás Tolja el a kis csúsztatógombot ... - Seite 53 Az elemtartó lezárása és kioldása Választék 3 Lezárás Tolja el a csúsztatógombot jobbra egy megfelelően hegyes toll segítségével. Kioldás Tolja el a csúsztatógombot balra egy megfelelően hegyes toll segítségével. Teljesen zárja be az elemtartót.
-
Seite 54: A Hallókészülék Behelyezése És Eltávolítása
A hallókészülék behelyezése és eltávolítása A hallókészülék behelyezése és eltávolítása A hallókészüléket a hallójárati egységnél fogva tartsa. Ne húzza meg a Tube csövet. Felhelyezés Helyezze fel a LifeTube/hallójárati egységet. Helyezze a hallókészüléket a fül mögé. Eltávolítás Távolítsa el a hallókészüléket. ... -
Seite 55: A Hallókészülék Be- És Kikapcsolása
A hallókészülék be- és kikapcsolása A hallókészülék be- és kikapcsolása Az elemtartóval Zárja be az elemtartót. Nyissa ki az elemtartót. A nyomógombbal Nyomja meg és tartsa lenyomva a gombot 2 másodpercig. Nyomja meg és tartsa lenyomva a gombot 2 másodpercig. - Seite 56 A hallókészülék be- és kikapcsolása Az MTO kapcsolóval Állítsa M (mikrofon) vagy T (telefontekercs) állásba). Állítsa O (ki) állásba). A hangerő-szabályozóval A készülék BEkapcsolásához forgassa el felfelé a hangerő-szabályozót. A készülék KIkapcsolásához teljesen forgassa el lefelé a hangerő-szabályozót. A távirányítóval Lásd a távirányító...
-
Seite 57: A Hallóprogram Módosítása
A hallóprogram módosítása A hallóprogram módosítása A nyomógombbal A következő programra váltáshoz nyomja meg a nyomógombot. Az MTO kapcsolóval Állítsa M (mikrofon) vagy T (telefontekercs) állásba. A távirányítóval Lásd a távirányító használati útmutatóját. Hallóprogram A hallóprogram leírása... -
Seite 58: A Hangerő Beállítása
A hangerő beállítása A hangerő beállítása Hangerő-szabályozó A hangerő növeléséhez tekerje felfelé a hangerő-szabályozót. A hangerő csökkentéséhez tekerje lefelé a hangerő-szabályozót. Billenőkapcsoló A hangerő növeléséhez nyomja felfelé. A hangerő csökkentéséhez nyomja lefelé. A távirányítóval Lásd a távirányító használati útmutatóját. ... -
Seite 59: Audiobemenet
Audiobemenet Audiobemenet Lehetőség van audiobemeneti kapcsolat létesítésére a hallókészülék és egy külső készülék, pl. FM-rádió, mp3-lejátszó, televízió vagy infraeszköz között. Audiobemenet hangszórósarun keresztül A hangszórósaru helyes csatlakoztatásával és eltávolításával kapcsolatban lásd a hangszórósaru használati útmutatóját. Az elemtartóba integrált audiobemenet Kérje meg hallókészülék-specialistáját, ... -
Seite 60: Funkciók
Funkciók Funkciók A hallókészülék-specialista a következő funkciókat engedélyezheti. e2e wireless Lehetővé teszi távvezérlő használatát. ■ Mindkét készülék beállításait egyszerre, ■ automatikusan módosítja, például a hangerő vagy a program módosításakor. MEGJEGYZÉS A hallókészülék megfelel a nemzetközi elektromágneses megfelelőségi szabványoknak, de előfordulhat, hogy a közelben lévő... - Seite 61 Funkciók A hallókészülék állapotának ellenőrzése A LED folyamatosan világít. ■ A hallókészülék BEkapcsolt állapotban van. A LED kikapcsol. ■ A hallókészülék KIkapcsolt állapotban van. Újratölthető hallókészülékek Az újratölthető hallókészülék mind száraz elemek, mind akkumulátorok használatát lehetővé teszi. Az első használat előtt töltse fel az újratölthető ...
- Seite 62 10 cm-nél nagyobb távolságból használja a távvezérlőt. (*) AutoPhone mágneses tartozék Nem minden telefon generál olyan mágneses teret, amely elég erős az AutoPhone funkció bekapcsolásához. Ilyen esetekben használja a tartozékként kapható, és a telefonkagylóra csatlakoztatható Siemens AutoPhone mágnest.
- Seite 63 Funkciók MEGJEGYZÉS A mágnes elhelyezésével kapcsolatban lásd az AutoPhone mágnes használati útmutatóját. Kizárólag engedéllyel rendelkező AutoPhone mágnest használjon. A tartozékot kérje hallókészülék-specialistájától. MEGJEGYZÉS A mágnesek megzavarhatják az elektronikus eszközök működését, és a tárolt adatok törlését okozhatják. Tartsa távol a mágnest számítógépektől, ...
-
Seite 64: Karbantartás És Ápolás
Karbantartás és ápolás Karbantartás és ápolás A hallókészülék rendkívül érzékeny rendszer. A megfelelő gondozás és kezelés biztosítja a lehető legjobb teljesítményt. A készülék károsodásának és az egészségügyi problémáknak az elkerülése érdekében rendszeresen tisztítsa a készüléket. MEGJEGYZÉS A hallókészüléket ne tegye vízbe. ... - Seite 65 Karbantartás és ápolás LifeTube-bal rendelkező készülékekhez Egy tisztítódróttal rendszeresen tisztítsa a LifeTube csöveket. Kérje hallókészülék-specialistájától a LifeTube csövek és a LifeTip fejek cseréjét körülbelül 3–6 havonta vagy szükség szerint. A hallással, halláskárosodással és a gyermekek számára kialakított hallókészülékekkel kapcsolatban tekintse meg gyermekgyógyászati webhelyünket: http://www.bestsound-technology.
-
Seite 66: Hibaelhárítás
Hibaelhárítás Hibaelhárítás Az egyszerű problémák megoldásához alkalmazza az alábbi, hibaelhárítással kapcsolatos tanácsokat. Probléma Lehetséges megoldás Gyenge hang. Cserélje ki a lemerült elemet. Tisztítsa meg a hallójárati egységet. Növelje a hangerőt. Az eszköz sípoló Próbálja meg újra felhelyezni a hangot ad ki. hallójárati egységet, amíg biztonságosan nem illeszkedik. -
Seite 67: Hulladékelhelyezési Tudnivalók
Hulladékelhelyezési tudnivalók Hulladékelhelyezési tudnivalók Az Európai Unión belül a jelzéssel ellátott készülékekre az „Európai Parlament és a Tanács 2002/96/EK jelű, 2003. január 27-én kiadott, elektromos és elektronikus készülékek hulladék-elhelyezésére vonatkozó, a 2003/108/EK jelű direktívával módosított irányelv” (WEEE) vonatkozik. MEGJEGYZÉS A hallókészüléket, a tartozékokat és a csoma- ... - Seite 69 Cuprins Cuprins Instrumentul dumneavoastră auditiv BTE Instructiuni de utilizare Note generale privind siguranţa Manevrarea bateriilor Blocarea şi deblocarea compartimentului bateriei Introducerea şi scoaterea instrumentului auditiv Pornirea si oprirea aparatului dumneavoastra auditiv Schimbarea programului auditiv Reglarea volumului Intrare audio Optiuni Întreţinere şi îngrijire Depanare Informaţii privind depunerea la deşeuri...
-
Seite 70: Instrumentul Dumneavoastră Auditiv Bte
Instrumentul dumneavoastră auditiv BTE Instrumentul dumneavoastră auditiv BTE Life Life optional cu cot optional cu cot optional cu pentru ureche pentru ureche tub Life (tip baterie: 312) (tip baterie: 312) (tip baterie: 13) ① Tub tip Life ⑦ Capac pentru racordul ②... - Seite 71 Instrumentul dumneavoastră auditiv BTE S/M/DM S VC/M VC/ DM VC optional cu tub optional cu tub optional cu tub S-Life S-Life S-Life (tip baterie: 13) (tip baterie: 13) (tip baterie: 13) ① Cot pentru ureche ⑥ Capac pentru racordul ② Buton pt programe de programare ③...
- Seite 72 Instrumentul dumneavoastră auditiv BTE P/HP/DP (tip baterie: 13) (tip baterie: 675) ① Cot pentru ureche ⑤ Compartimentul bateriei ② Buton pt programe ⑥ Capac pentru racordul de programare ③ Potentiometru volum ⑦ Intrare audio ④ Orificii microfon...
- Seite 73 Instrumentul dumneavoastră auditiv BTE Phoenix (tip baterie: 13) (tip baterie: 675) (tip baterie: 13/675*) ① Cot pentru ureche ⑦ Compartimentul bateriei ② Buton pt programe ⑧ Capac pentru racordul de programare ③ Potentiometru volum cu basculare ⑨ Capac pentru comenzile de ajustare ④...
- Seite 74 Instrumentul dumneavoastră auditiv BTE Explorer 500 P Explorer 500 M Prisma 2K optional cu tub optional cu tub S-Life S-Life (tip baterie: 13) (tip baterie: 13) (tip baterie: 312) ① Cot pentru ureche ⑥ Compartimentul bateriei ② Buton pt programe ⑦...
-
Seite 75: Instructiuni De Utilizare
Instructiuni de utilizare Instructiuni de utilizare Instrumentele auditive sunt concepute în scopul de a ajuta persoanele cu deficienţe de auz să audă mai bine. Diagnosticarea şi prescrierea unui instrument auditiv trebuie efectuate de specialişti în probleme auditive, de exemplu, medici specialişti în ORL, audiologi sau acusticieni. -
Seite 76: Note Generale Privind Siguranţa
Note generale privind siguranţa Note generale privind siguranţa AVERTISMENT Pericol de sufocare! Instrumentele auditive conţin componente mici care pot fi înghiţite. Asiguraţi o supraveghere adecvată în cazul în care bebeluşi, copii mici sau persoane cu dizabilităţi mintale trebuie să poarte instrumente auditive. - Seite 77 Note generale privind siguranţa AVERTISMENT Vă rugăm să ţineţi cont de faptul că modificările neautorizate ale produsului pot cauza daune ale acestuia sau răni. Utilizaţi doar componente şi accesorii aprobate. Solicitaţi asistenţă din partea audiologului dumneavoastră. AVERTISMENT Audiologul trebuie să sfătuiască potenţialul utilizator al aparatului auditiv să...
- Seite 78 Note generale privind siguranţa AVERTISMENT Consultaţi un audiolog dacă resimţiţi orice efecte secundare neobişnuite, precum iritaţii ale pielii, acumulare excesivă de ceară în ureche, ameţeală, modificări ale auzului, sau dacă aveţi senzaţia unui obiect străin în canalul urechii. AVERTISMENT Risc de afectare a auzului rezidual al utilizatorului. Utilizaţi doar aparate auditive adecvate ...
- Seite 79 Note generale privind siguranţa AVERTISMENT Risc de rănire! Nu utilizaţi dispozitive care sunt în mod evident defecte şi returnaţi-le la punctul de vânzare. AVERTISMENT Risc de explozie! Nu utilizaţi instrumentele auditive în atmosfere explozive (de. ex. în zone miniere). ATENŢIE Risc de rănire! În cazuri foarte rare, componenta pentru ureche...
- Seite 80 Note generale privind siguranţa NOTĂ Instrumentele dumneavoastră auditive sunt sensibile la căldură extremă, umiditate ridicată, câmpuri magnetice puternice (> 0,1 T), raze X şi efort mecanic. Nu expuneţi instrumentele auditive la temperaturi extreme sau umiditate ridicată. Nu le lăsaţi în lumina directă a soarelui. ...
- Seite 81 Note generale privind siguranţa NOTĂ Bateriile care curg pot deteriora aparatele auditive. Opriti aparatele auditive atunci când nu sunt utilizate pentru a economisi bateria. Scoateti bateriile când aparatele nu sunt utilizate pentru o perioada mai mare de timp. NOTĂ...
-
Seite 82: Manevrarea Bateriilor
Manevrarea bateriilor Manevrarea bateriilor dimensiune originală Utilizaţi întotdeauna baterii de mărimea potrivită. Încărcaţi bateriile reîncărcabile înainte de prima utilizare. Îndepărtaţi elementul de protecţie de pe bateriile standard doar înaintea utilizării acestora. Polul pozitiv (+) al bateriilor se află întotdeauna ... - Seite 83 Manevrarea bateriilor Deschideţi complet compartimentul bateriei. Scoateţi bateria descărcată. Introduceţi o baterie de dimensiune corespunzătoare. Asiguraţi-vă că simbolul "+" de pe baterie este orientat în sus, conform imaginii. Închideţi compartimentul bateriei. ...
-
Seite 84: Blocarea Şi Deblocarea Compartimentului Bateriei
Blocarea şi deblocarea compartimentului bateriei Blocarea şi deblocarea compartimentului bateriei Opţiune 1 Blocarea Apăsaţi glisorul mic spre dreapta. Deblocarea Apăsaţi glisorul mic spre stânga. Opţiune 2 Blocarea Împingeţi glisorul mic în jos. Deblocarea Împingeţi glisorul mic în sus. ... - Seite 85 Blocarea şi deblocarea compartimentului bateriei Opţiune 3 Blocarea Trageţi glisorul spre dreapta cu un instrument ascuţit adecvat. Deblocarea Trageţi glisorul spre stânga cu un instrument ascuţit adecvat. Închideţi complet compartimentul bateriei.
-
Seite 86: Introducerea Şi Scoaterea Instrumentului Auditiv
Introducerea şi scoaterea instrumentului auditiv Introducerea şi scoaterea instrumentului auditiv Manipulati instrumentul auditiv tinând de piesa pentru ureche. Nu trageti tubul. Inserare Introducerea tubului Life/piesei de ureche. Amplasati aparatul auditiv în spatele urechii. Detaşare Scoateti aparatul auditiv. ... -
Seite 87: Pornirea Si Oprirea Aparatului Dumneavoastra Auditiv
Pornirea si oprirea aparatului dumneavoastra auditiv Pornirea si oprirea aparatului dumneavoastra auditiv De la compartimentul bateriei On (Pornire) Închideţi compartimentul bateriei. Off (Oprire) Deschideţi compartimentul bateriei. - Seite 88 Pornirea si oprirea aparatului dumneavoastra auditiv De la butonul de comandă On (Pornire) Apăsaţi butonul de comandă timp de 2 secunde. Off (Oprire) Apăsaţi butonul de comandă timp de 2 secunde. Prin intermediul întrerupătorului MTO On (activare) Comutaţi la M (microfon) sau ...
- Seite 89 Pornirea si oprirea aparatului dumneavoastra auditiv Prin potentiometrul de volum On (activare) Rotiti potentiometrul de volum în sus pentr a porni aparatul auditiv. Off (dezactivare) Rotiti potentiometrul de volum complet în jos pentru a opri instrumentul auditiv. De la telecomandă Consultaţi ghidul utilizatorului telecomenzii.
-
Seite 90: Schimbarea Programului Auditiv
Schimbarea programului auditiv Schimbarea programului auditiv De la butonul de comandă Apăsaţi butonul pentru a trece la următorul program. Prin intermediul întrerupătorului MTO Comutaţi la M (microfon) sau T (telebobină). De la telecomandă Consultaţi ghidul utilizatorului telecomenzii. Program Descrierea programului auditiv auditiv... -
Seite 91: Reglarea Volumului
Reglarea volumului Reglarea volumului Potentiometru de volum Rotiţi potentiometrul de volum in sus pentru a mari volumul. Rotiti potentiometrul de volum in jos pentru a reduce volumul. Întrerupător rectangular Apăsaţi în sus pentru a mări volumul. Apăsaţi în jos pentru a reduce ... -
Seite 92: Intrare Audio
Intrare audio Intrare audio O intrare audio permite conectarea între aparatul auditiv şi un dispozitiv extern, de exemplu un sistem FM, un mp3 player, un televizor sau un dispozitiv cu infraroşii. Intrare audio prin intermediul unui adaptor audio Consultaţi ghidul de utilizare a adaptorului audio ... -
Seite 93: Optiuni
Optiuni Optiuni Audiologul dumneavoastră poate activa următoarele functii. e2e wireless Permite utilizarea unei telecomenzi. ■ Ajustează automat şi simultan ambele aparate ■ auditive pentru a modifica setarile aparatului, de exemplu volumul sau programul. NOTĂ Instrumentele dumneavoastră auditive sunt proiectate pentru a respecta standardele internaţionale de compatibilitate electromagnetică, însă... - Seite 94 Optiuni Verificarea stării instrumentelor auditive LED-ul este aprins continuu. ■ Aparatele auditive sunt pornite. LED-ul este stins. ■ Aparatele auditive sunt oprite. Aparatele auditive reîncărcabile Aparatele auditive reîncărcabile permit utilizarea bateriilor standard sau reîncărcabile. Încărcaţi bateriile reîncărcabile înainte de prima ...
- Seite 95 10 cm (4 inchi). (*) Accesoriu magnet AutoPhone Nu toate telefoanele produc un câmp magnetic suficient de puternic pentru a activa funcţia AutoPhone. În acest caz, puteţi utiliza magnetul Siemens AutoPhone, disponibil ca accesoriu, şi ataşaţi-l la receptorul telefonului.
- Seite 96 Optiuni NOTĂ Consultaţi ghidul utilizatorului magnetului AutoPhone pentru instrucţiuni privind modul de poziţionare a magnetului. Utilizaţi doar magnetul AutoPhone aprobat. Solicitaţi audiologului dumneavoastră acest accesoriu. NOTĂ Magneţii pot perturba dispozitivele electrice şi pot duce la ştergerea datelor stocate. Ţineţi magneţii la distanţă...
-
Seite 97: Întreţinere Şi Îngrijire
Întreţinere şi îngrijire Întreţinere şi îngrijire Aparatele auditive sunt sisteme extrem de sensibile. O îngrijire şi manipulare adecvate vor asigura cele mai bune performanţe posibile. Curăţaţi în mod regulat aparatele pentru a preveni deteriorarea aparatelor auditive şi a evita problemele de sănătate. - Seite 98 Întreţinere şi îngrijire Pentru instrumente cu LifeTube Curăţaţi în mod regulat tubul Life cu o sârmă curată. Solicitaţi audiologului dumneavoastră schimbarea tubului Life si domului Life la fi ecare 3 - 6 luni, sau după cum este necesar. Pentru informaţii privind auzul, pierderea auzului şi instrumentele auditive pentru copii, vă...
-
Seite 99: Depanare
Depanare Depanare Utilizaţi aceste instrucţiuni de depanare pentru a rezolva probleme simple. Problemă Soluţie de opţiuni Sunetul este slab. Înlocuiţi bateria descărcată. Curăţaţi piesa de ureche. Măriţi volumul. Instrumentele emit Încercaţi să reintroduceţi oliva până sunete şuierate. la fi xarea sigură a acestuia. Coborâţi volumul. -
Seite 100: Informaţii Privind Depunerea La Deşeuri
Informaţii privind depunerea la deşeuri Informaţii privind depunerea la deşeuri În Uniunea Europeană, echipamentele marcate intră sub incidenţa "Directivei 2002/96/CE a Parlamentului European şi a Consiliului, din 27 ianuarie 2003, privind deşeurile de echipamente electrice şi electronice". Modificată prin "Directiva 2003/108/CE" (DEEE). NOTĂ... - Seite 101 Sommaire Sommaire Votre aide auditive contour d'oreille Utilisation prévue Consignes générales de sécurité Manipulation des piles Verrouillage et déverrouillage du tiroir à pile Mise en place et retrait de votre aide auditive Mise en marche et arrêt de votre aide auditive Changement de programme d'écoute Réglage du volume Entrée audio...
-
Seite 102: Votre Aide Auditive Contour D'oreille
Votre aide auditive contour d'oreille Votre aide auditive contour d'oreille Life Life option coude option coude option LifeTube (pile: 312) (pile: 312) (pile: 13) ① LifeTube ⑦ Cache prise de ② LifeTip programmation ③ Adaptateur LifeTip ⑧ Compartiment à pile ④... - Seite 103 Votre aide auditive contour d'oreille S/M/DM S VC/ M VC/ DM VC option option option S-LifeTube S-LifeTube S-LifeTube (pile: 13) (pile: 13) (pile: 13) ① Coude ⑥ Cache prise de programmation ② Bouton-poussoir ⑦ Entrée audio ③ Contrôle du volume ⑧...
- Seite 104 Votre aide auditive contour d'oreille P/HP/DP (pile: 13) (pile: 675) ① Coude ⑤ Compartiment à pile ② Bouton-poussoir ⑥ Cache prise de programmation ③ Contrôle du volume ⑦ Entrée audio ④ Orifices du microphone...
- Seite 105 Votre aide auditive contour d'oreille Phoenix (pile: 13) (pile: 675) (pile: 13/675*) ① Coude ⑦ Compartiment à pile ② Bouton-poussoir ⑧ Cache prise de programmation ③ Interrupteur à bascule ⑨ Cache commandes ④ Commutateur MTO d'ajustement ⑤ Contrôle du volume ⑩...
- Seite 106 Votre aide auditive contour d'oreille Explorer 500 P Explorer 500 M Prisma 2K option S-LifeTube option S-LifeTube (pile: 13) (pile: 13) (pile: 312) ① Coude ⑥ Compartiment à pile ② Bouton-poussoir ⑦ Cache prise de programmation ③ Contrôle du volume ⑧...
-
Seite 107: Utilisation Prévue
Utilisation prévue Utilisation prévue Les aides auditives sont destinées à permettre aux personnes souffrant de pertes auditives de mieux entendre. Seuls des spécialistes de l’audition (par ex. : médecins ORL) sont habilités à établir un diagnostic et à prescrire le port d’une aide auditive. Lisez et observez les instructions de ce guide d'utilisation afin d'éviter tout risque de blessure ou d'endommagement de votre aide auditive. -
Seite 108: Consignes Générales De Sécurité
Consignes générales de sécurité Consignes générales de sécurité AVERTISSEMENT Risque d'étouffement. Vos aides auditives contiennent de petites pièces susceptibles d'être avalées. Le port des aides auditives par des nourrissons, des enfants en bas âge ou des personnes ayant une déficience intellectuelle doit s’effectuer dans le cadre d’une surveillance adaptée. - Seite 109 Consignes générales de sécurité AVERTISSEMENT Veuillez noter que toute modification non autorisée de ce produit peut l'endommager ou causer des blessures. N'utilisez que les pièces et accessoires agréés. Faites appel à votre audioprothésiste qui vous conseillera. AVERTISSEMENT Un audioprothésiste devrait conseiller à l'utilisateur potentiel d'une aide auditive de consulter un médecin diplômé...
- Seite 110 Consignes générales de sécurité AVERTISSEMENT Consultez un audioprothésiste si vous ressentez des effets secondaires inhabituels tels qu'irritation cutanée, accumulation excessive de cérumen, vertiges, modifications de l'audition, ou si vous pensez qu'il peut y avoir un objet étranger dans votre conduit auditif. AVERTISSEMENT Risque d'altération de la capacité...
- Seite 111 Consignes générales de sécurité AVERTISSEMENT Risque de blessure. Ne pas utiliser un appareil qui paraît endommagé et le renvoyer au point de vente. AVERTISSEMENT Risque d'explosion ! N'utilisez pas vos aides auditives dans des atmosphères explosives (par ex. sur des sites miniers).
- Seite 112 Consignes générales de sécurité REMARQUE Vos aides auditives sont sensibles à une chaleur extrême, à une forte humidité, à des champs magnétiques élevés (> 0,1 T), aux rayons X et à l'effort mécanique. N'exposez pas vos aides auditives à une ...
- Seite 113 Consignes générales de sécurité REMARQUE Si les piles présentent une fuite, elles risquent d'endommager vos aides auditives. Lorsque vous ne les utilisez pas, éteignez vos aides auditives afin de préserver la pile. Retirez les piles si vous n'utilisez pas vos aides ...
-
Seite 114: Manipulation Des Piles
Manipulation des piles Manipulation des piles grandeur nature Utilisez toujours la taille de pile appropriée. Chargez les piles rechargeables avant la première utilisation. Retirez la languette de protection des piles standard lorsque vous êtes prêt à les utiliser. La face positive (+) des piles est toujours ... - Seite 115 Manipulation des piles Ouvrez entièrement le tiroir pile. Retirez la pile déchargée. Introduisez une pile de taille appropriée. Veillez à ce que le symbole "+" de la pile soit dirigé vers le haut comme indiqué sur le schéma. Fermez le tiroir pile.
-
Seite 116: Verrouillage Et Déverrouillage Du Tiroir À Pile
Verrouillage et déverrouillage du tiroir à pile Verrouillage et déverrouillage du tiroir à pile Option 1 Verrouillage Poussez le petit loquet vers la droite. Déverrouillage Poussez le petit loquet vers la gauche. Option 2 Verrouillage Poussez le petit loquet vers ... - Seite 117 Verrouillage et déverrouillage du tiroir à pile Option 3 Verrouillage Poussez le petit loquet vers la droite à l'aide d'un objet pointu approprié. Déverrouillage Poussez le petit loquet vers la gauche à l'aide d'un objet pointu approprié. Fermez complètement ...
-
Seite 118: Mise En Place Et Retrait De Votre Aide Auditive
Mise en place et retrait de votre aide auditive Mise en place et retrait de votre aide auditive Pour manipuler l'aide auditive, tenez-la par l'embout auriculaire. Ne tirez pas sur le tube. Mise en place Introduisez le LifeTube/l'embout auriculaire. -
Seite 119: Mise En Marche Et Arrêt De Votre Aide Auditive
Mise en marche et arrêt de votre aide auditive Mise en marche et arrêt de votre aide auditive Par le tiroir pile Marche Fermez le tiroir pile. Arrêt Ouvrez le tiroir pile. Par le bouton-poussoir Marche Appuyez sur le bouton pendant ... - Seite 120 Mise en marche et arrêt de votre aide auditive Avec le commutateur MTO Mise en marche Commutez sur M (microphone) ou sur T (bobine téléphonique). Arrêt Commutez sur O (arrêt). Avec le contrôle du volume Mise en marche Tournez la roulette de contrôle du volume ...
-
Seite 121: Changement De Programme D'écoute
Changement de programme d'écoute Changement de programme d'écoute Par le bouton-poussoir Appuyez sur le bouton-poussoir pour passer au programme suivant. Avec le commutateur MTO Commutez sur M (microphone) ou sur T (bobine téléphonique). A l'aide de la télécommande Reportez-vous au guide d'utilisation ... -
Seite 122: Réglage Du Volume
Réglage du volume Réglage du volume Contrôle du volume Tournez la molette vers l’avant pour augmenter le volume. Tournez la molette vers l’arrière pour réduire le volume. Interrupteur à bascule Appuyez vers le haut pour augmenter le volume. Appuyez vers le bas pour ... -
Seite 123: Entrée Audio
Entrée audio Entrée audio L'entrée audio permet de connecter l'aide auditive à un appareil externe, par exemple, une radio, un baladeur mp3, une télévision ou un dispositif infrarouge. Entrée audio par un adaptateur audio Pour savoir comment mettre en place et retirer ... -
Seite 124: Fonctionnalités
Fonctionnalités Fonctionnalités Votre audioprothésiste peut activer les fonctionnalités suivantes. La fonction e2e wireless Cette fonction permet d‘utiliser une ■ télécommande. Cette fonction synchronise automatiquement ■ les réglages de vos deux aides auditives aux changements de réglage, par exemple volume ou programme. REMARQUE Vos aides auditives sont conçues en conformité... - Seite 125 Fonctionnalités Contrôle de l'état des aides auditives Le voyant est allumé en continu. ■ Les aides auditives sont en état de marche. Le voyant est éteint. ■ Les aides auditives sont en état d'arrêt. Aides auditives rechargeables Les aides auditives rechargeables peuvent être utilisées avec des piles standard ou rechargeables.
- Seite 126 Tous les téléphones ne produisent pas un champ magnétique suffisamment fort pour activer la fonction AutoPhone. Si c’est le cas, utilisez l’aimant Siemens AutoPhone fourni avec vos aides auditives, et attachez-le au récepteur de votre téléphone pour activer la fonction...
- Seite 127 Fonctionnalités REMARQUE Pour la mise en place de l'aimant, consultez le guide d'utilisation de l'aimant AutoPhone. Utilisez uniquement les aimants agréés AutoPhone. Procurez-vous cet accessoire auprès de votre audioprothésiste. REMARQUE Les aimants peuvent perturber les appareils électriques et supprimer des données enregistrées. Tenez les aimants éloignés des ordinateurs, ...
-
Seite 128: Maintenance Et Entretien
Maintenance et entretien Maintenance et entretien Votre aide auditive est un système très sensible. Un entretien et une manipulation adéquats assureront une perfomance optimale. Nettoyez régulièrement votre aide auditive afin d'éviter tout endommagement et tout risque d'irritation. REMARQUE Ne mettez pas l'aide auditive ... - Seite 129 Maintenance et entretien Pour les aides auditives avec LifeTube : Nettoyez régulièrement le LifeTube à l'aide d'un fil de nettoyage. Rendez-vous chez votre audioprothésiste pour faire remplacer le LifeTube et le LifeTip de vos aides auditives tous les 3 à 6 mois ou en cas de besoin. Pour plus d'informations sur l'audition, la perte auditive et les aides auditives pour enfants, consultez notre site Internet...
-
Seite 130: Dépannage
Dépannage Dépannage Pour résoudre des problèmes bénins, suivez les conseils de dépannage. Problème Solutions envisageables Le son est faible. Remplacez la pile. Nettoyez l'embout auriculaire. Augmentez le volume. L'aide auditive émet Essayez de réintroduire l'embout un sifflement. auriculaire jusqu'à ce qu'il soit correctement fixé. -
Seite 131: Informations Relatives À La Mise Au Rebut
Informations relatives à la mise au rebut Informations relatives à la mise au rebut Au sein de l'Union européenne, les équipements portant ce symbole relèvent de la "Directive 2002/96/CE du Parlement européen et du Conseil du 27 janvier 2003 relative aux déchets d'équipements électriques et électronique. -
Seite 132: Information Technique
Information technique Information technique Siemens Acuris, Artis 2, Centra, Cielo 2 IC: 267AB-WL001 Siemens Explorer 500 P, Motion 300 BTE, Motion 500 BTE, Motion 700 BTE, Motion 501 DP, Motion 701 DP, Motion 701 DM, Motion 501 DM VC, Motion 701 DM VC,... - Seite 133 Information technique Son fonctionnement est soumis aux conditions suivantes : cet appareil ne doit pas causer d'interférences ■ nuisibles, et cet appareil doit supporter toutes les interférences ■ reçues, y compris celles susceptibles de perturber son bon fonctionnement. Cet appareil a été testé et déclaré conforme aux valeurs limites d'un appareil numérique de classe B selon la partie 15 des règlements FCC.
- Seite 135 Inhaltsverzeichnis Inhaltsverzeichnis Ihr HdO-Hörsystem Bestimmungsgemäßer Gebrauch Allgemeine Sicherheitshinweise Handhabung der Batterien Verriegeln und Entriegeln des Batteriefachs Einsetzen und Entnehmen des Hörsystems Hörsysteme ein- und ausschalten Hörprogramm wechseln Lautstärke einstellen Audioeingang Funktionen Wartung und Pflege Fehlersuche Entsorgungshinweis...
-
Seite 136: Ihr Hdo-Hörsystem
Ihr HdO-Hörsystem Ihr HdO-Hörsystem Life Life optional mit optional mit optional mit Tragehaken Tragehaken LifeTube (Batterietyp: 312) (Batterietyp: 312) (Batterietyp: 13) ① LifeTube ⑦ Abdeckung für Programmierbuchse ② LifeTip ⑧ Batteriefach ③ LifeTip-Adapter ⑨ Mikrofonabdeckung ④ Tragehaken ⑩ Ladekontakte ⑤ Programmtaster (nur wiederaufladbare (optional)* Hörsysteme) - Seite 137 Ihr HdO-Hörsystem S/M/DM S VC/ M VC/ DM VC optional mit optional mit optional mit S-LifeTube S-LifeTube S-LifeTube (Batterietyp: 13) (Batterietyp: 13) (Batterietyp: 13) ① Tragehaken ⑥ Abdeckung für Programmierbuchse ② Programmtaster ⑦ Audioeingang ③ Lautstärkeregler ⑧ Ladekontakte ④ Mikrofonöffnungen (nur wiederaufladbare ⑤...
- Seite 138 Ihr HdO-Hörsystem P/HP/DP (Batterietyp: 13) (Batterietyp: 675) ① Tragehaken ⑤ Batteriefach ② Programmtaster ⑥ Abdeckung für Programmierbuchse ③ Lautstärkeregler ⑦ Audioeingang ④ Mikrofonöffnungen...
- Seite 139 Ihr HdO-Hörsystem Phoenix (Batterietyp: 13) (Batterietyp: 675) (Batterietyp: 13/675*) ① Tragehaken ⑥ Mikrofonöffnungen ② Programmtaster ⑦ Batteriefach ③ Wipptaster ⑧ Abdeckung für Programmierbuchse ④ MTO-Schalter ⑨ Abdeckung für Trimmer ⑤ Lautstärkeregler ⑩ Audioeingang * Fragen Sie Ihren Hörgeräteakustiker.
- Seite 140 Ihr HdO-Hörsystem Explorer 500 P Explorer 500 M Prisma 2K optional mit optional mit S-LifeTube S-LifeTube (Batterietyp: 13) (Batterietyp: 13) (Batterietyp: 312) ① Tragehaken ⑥ Batteriefach ② Programmtaster ⑦ Abdeckung für Programmierbuchse ③ Lautstärkeregler ⑧ Audioeingang ④ LED (optional)* ⑨ Batteriefachsicherung ⑤...
-
Seite 141: Bestimmungsgemäßer Gebrauch
Bestimmungsgemäßer Gebrauch Bestimmungsgemäßer Gebrauch Der bestimmungsgemäße Gebrauch von Hörsystemen ist es, das Hörvermögen von schwerhörigen Menschen zu verbessern. Diagnose und Verordnung von Hörsystemen müssen durch einen Hals-Nasen-Ohren-Arzt durchgeführt werden. Lesen und befolgen Sie diese Gebrauchsanweisung, um Verletzungen vorzubeugen und Beschädigungen der Hörsysteme zu vermeiden. -
Seite 142: Allgemeine Sicherheitshinweise
Allgemeine Sicherheitshinweise Allgemeine Sicherheitshinweise WARNUNG Erstickungsgefahr! Ihre Hörsysteme enthalten Kleinteile, die verschluckt werden können. Beaufsichtigen Sie Säuglinge, kleine Kinder oder geistig behinderte Personen, wenn diese Hörsysteme tragen. Überprüfen Sie regelmäßig, ob die Hörsysteme vollständig und intakt sind. Stellen Sie sicher, dass Ihr Kind das Hörsystem ... - Seite 143 Allgemeine Sicherheitshinweise WARNUNG Jegliche eigenmächtige Veränderung des Produkts kann Sachschäden oder Verletzungen verursachen. Verwenden Sie ausschließlich zugelassene Teile und zugelassenes Zubehör. Wenden Sie sich an Ihren Hörgeräteakustiker. WARNUNG Der Hörgeräteakustiker soll den künftigen Nutzer des Hörsystems anweisen, vor der Nutzung umgehend einen approbierten Arzt (vorzugsweise einen HNO-Arzt) aufzusuchen, wenn der Hörgeräteakustiker durch Nachfragen,...
- Seite 144 Allgemeine Sicherheitshinweise WARNUNG Suchen Sie umgehend einen Arzt auf, wenn Sie außergewöhnliche Nebenwirkungen bemerken, zum Beispiel bei Hautirritationen, übermäßiger Produktion von Ohrwachs, Schwindel, verändertem Hören oder wenn Sie das Gefühl haben, dass sich ein Fremdkörper im Gehörgang befindet. WARNUNG Mögliche Schädigung des Resthörvermögens. Tragen Sie nur Hörsysteme, die speziell für Sie ...
- Seite 145 Allgemeine Sicherheitshinweise WARNUNG Gefahr eines Stromschlags! Verwenden Sie keine offensichtlich beschädigten Geräte und geben Sie diese in der Verkaufsstelle zurück. WARNUNG Explosionsgefahr! Verwenden Sie Ihre Hörsysteme nicht in Umgebungen, in denen Explosionsgefahr besteht (z. B. im Bergbau). VORSICHT Verletzungsgefahr! Setzen Sie das Ohrstück vorsichtig und nicht ...
- Seite 146 Allgemeine Sicherheitshinweise HINWEIS Ihre Hörsysteme reagieren empfindlich auf extreme Hitze, hohe Luftfeuchtigkeit, starke magnetische Felder (> 0,1T), Röntgenstrahlen und mechanische Beanspruchung. Setzen Sie Ihre Hörsysteme nicht extremen Temperaturen oder starker Feuchtigkeit aus. Lassen Sie sie nicht in der Sonne liegen. ...
- Seite 147 Allgemeine Sicherheitshinweise HINWEIS Auslaufende Batterien beschädigen die Hörsysteme. Schalten Sie die Hörsysteme aus, wenn Sie sie nicht verwenden, um die Batterien zu schonen. Entnehmen Sie die Batterien, wenn Sie die Hörsysteme längere Zeit nicht nutzen. HINWEIS Entsorgen Sie Batterien nicht im Hausmüll, ...
-
Seite 148: Handhabung Der Batterien
Handhabung der Batterien Handhabung der Batterien Originalgröße Verwenden Sie ausschließlich Batterien der richtigen Batteriegröße. Laden Sie Akkus vor dem ersten Gebrauch. Entfernen Sie die Schutzfolie der Batterie erst, wenn Sie die Batterie benutzen wollen. Die Plus-Seite ist immer gekennzeichnet. ... - Seite 149 Handhabung der Batterien Öffnen Sie das Batteriefach vollständig. Entnehmen Sie die leere Batterie. Legen Sie eine passende Batterie ein. Achten Sie darauf, dass das "+"-Symbol auf der Batterie nach oben zeigt (s. Abbildung). Schließen Sie das Batteriefach. ...
-
Seite 150: Verriegeln Und Entriegeln Des Batteriefachs
Verriegeln und Entriegeln des Batteriefachs Verriegeln und Entriegeln des Batteriefachs Option 1 Verriegeln Drücken Sie den kleinen Schieber nach rechts. Entriegeln Drücken Sie den kleinen Schieber nach links. Option 2 Verriegeln Drücken Sie den kleinen Schieber nach oben. Entriegeln Drücken Sie den kleinen ... - Seite 151 Verriegeln und Entriegeln des Batteriefachs Option 3 Verriegeln Bewegen Sie den Schieber mit einem geeigneten spitzen Werkzeug nach rechts. Entriegeln Bewegen Sie den Schieber mit einem geeigneten spitzen Werkzeug nach links. Schließen Sie das Batteriefach vollständig.
-
Seite 152: Einsetzen Und Entnehmen Des Hörsystems
Einsetzen und Entnehmen des Hörsystems Einsetzen und Entnehmen des Hörsystems Halten Sie das Hörsystem am Ohrpassstück. Ziehen Sie nicht am Schlauch. Einsetzen Setzen Sie das LifeTube/Ohrpassstück ein. Platzieren Sie das Hörsystem hinter dem Ohr. Entnehmen Entnehmen Sie das Hörsystem. ... -
Seite 153: Hörsysteme Ein- Und Ausschalten
Hörsysteme ein- und ausschalten Hörsysteme ein- und ausschalten Mit Batteriefach Schließen Sie das Batteriefach. Öffnen Sie das Batteriefach. Mit Programmtaster Drücken Sie den Programmtaster 2 Sekunden lang. - Seite 154 Hörsysteme ein- und ausschalten Über MTO-Schalter Wechseln Sie zu M (Mikrofon) oder T (Telefonspule). Wechseln Sie zu O (Off). Über Lautstärkeregler Drehen Sie den Lautstärkeregler nach oben. Drehen Sie den Lautstärkeregler ganz nach unten. Mit Fernbedienung Siehe Gebrauchsanweisung der Fernbedienung.
-
Seite 155: Hörprogramm Wechseln
Hörprogramm wechseln Hörprogramm wechseln Über Programmtaster Drücken Sie den Taster, um in das nächste Programm zu wechseln. Über MTO-Schalter Wechseln Sie zu M (Mikrofon) oder T (Telefonspule). Mit Fernbedienung Siehe Gebrauchsanweisung der Fernbedienung. Hörprogramm Beschreibung des Hörprogramms... -
Seite 156: Lautstärke Einstellen
Lautstärke einstellen Lautstärke einstellen Lautstärkeregler Drehen Sie den Lautstärkeregler nach oben, um die Lautstärke zu erhöhen. Drehen Sie den Lautstärkeregler nach unten, um die Lautstärke zu verringern. Wipptaster Drücken Sie oben, um die Lautstärke zu erhöhen. Drücken Sie unten, um die ... -
Seite 157: Audioeingang
Audioeingang Audioeingang Ein Audioeingang ermöglicht die Verbindung zwischen dem Hörsystem und einem externen Gerät z. B. einem FM-System, MP3-Player, Fernseher oder Infrarotgerät. Audioeingang über einen Audioschuh Bei Fragen zum Anbringen und Abnehmen des Audioschuhs lesen Sie die Gebrauchsanweisung, die dem Audioschuh beiliegt. Audioeingang im Batteriefach integriert Fragen Sie Ihren Hörgeräteakustiker, ... -
Seite 158: Funktionen
Funktionen Funktionen Ihr Hörgeräteakustiker kann die folgenden Funktionalitäten aktivieren. e2e wireless Erlaubt die Verwendung einer Fernbedienung. ■ Stellt automatisch beide Hörsysteme gleichzeitig ■ ein, wenn Sie die Geräteeinstellungen ändern, z. B. Lautstärke oder Hörprogramm. HINWEIS Ihre Hörsysteme wurden gemäß internationaler Standards zur elektromagnetischen Verträglichkeit entwickelt. - Seite 159 Funktionen Prüfen des Status der Hörsysteme Die LED leuchtet konstant. ■ Die Hörsysteme sind eingeschaltet. Die LED leuchtet nicht. ■ Die Hörsysteme sind ausgeschaltet. Wiederaufladbare Hörsysteme Wiederaufladbare Hörsysteme ermöglichen die Verwendung von gewöhnlichen Akkubatterien. Laden Sie Akkubatterien vor dem erstmaligen ...
- Seite 160 Abstand von mindestens 10 cm. (*) AutoPhone-Magnet-Zubehör Nicht alle Telefone erzeugen ein Magnetfeld, das stark genug ist, um die AutoPhone-Funktion zu aktivieren. In diesem Fall verwenden Sie den Siemens AutoPhone-Magneten, der als Zubehör erhältlich ist, und befestigen ihn am Telefonhörer.
- Seite 161 Funktionen HINWEIS Bei Fragen zur Positionierung des Magneten lesen Sie die Benutzerhinweise für den AutoPhone-Magneten. Bei Fragen zur Positionierung des Magneten lesen Sie die Benutzerhinweise für den AutoPhone-Magneten. HINWEIS Magnete können elektrische Geräte stören und gespeicherte Daten löschen. Magnete nicht in die Nähe von Computern, ...
-
Seite 162: Wartung Und Pflege
Wartung und Pflege Wartung und Pflege Ihre Hörsysteme enthalten empfindliche Technik. Mit sachgemäßer Pflege und Handhabung erhalten Sie die Leistungsfähigkeit Ihrer Hörsysteme. Reinigen Sie Ihre Hörsysteme und Ohrpassstücke regelmäßig, um Beschädigungen an den Hörsystemen vorzubeugen und gesundheitliche Probleme zu vermeiden. HINWEIS Tauchen Sie Ihre Hörsysteme nicht in ... - Seite 163 Wartung und Pflege Für Hörsysteme mit LifeTubes: Reinigen Sie LifeTubes regelmäßig mit einem Reinigungsdraht. Bitten Sie Ihren Hörgeräteakustiker LifeTubes und LifeTips etwa alle 3 bis 6 Monate oder nach Bedarf auszutauschen. Weitere Informationen über Hören, Hörverlust und Hörsysteme für Kinder finden Sie im Bereich „Kinderversorgung"...
-
Seite 164: Fehlersuche
Fehlersuche Fehlersuche Verwenden Sie diese Tipps zur Fehlersuche, um einfache Probleme zu lösen. Problem Lösungsmöglichkeit Ton ist schwach. Ersetzen Sie die leere Batterie. Reinigen Sie das Ohrstück. Erhöhen Sie die Lautstärke. Pfeifender Ton ertönt Versuchen Sie das Ohrstück erneut aus dem Gerät. einzusetzen, bis es sicher sitzt. -
Seite 165: Entsorgungshinweis
Entsorgungshinweis Entsorgungshinweis Innerhalb der Europäischen Union entspricht das aufgeführte Zubehör der Richtlinie 2002/96/EG des Europäischen Parlaments und des Rates vom 27. Januar 2003 über Elektro- und Elektronik- Altgeräte. Zuletzt geändert durch Richtlinie 2003/108/EG (WEEE). HINWEIS Recyceln Sie Hörsysteme, Zubehör und ... - Seite 167 ﻣﻌﻠﻮﻣﺎت اﻟﺘﺨﻠﺺ ﻣﻦ اﻟﺠﻬﺎز ﻣﻌﻠﻮﻣﺎت اﻟﺘﺨﻠﺺ ﻣﻦ اﻟﺠﻬﺎز داﺧﻞ اﻻﺗﺤﺎد اﻷوروﺑﻲ، ﺗﻨﺪرج اﻟﻤﻌﺪات اﻟﻤﻤﻴﺰة ﺗﺤﺖ "اﻟﺘﻮﺟﻴﻪ اﻟﺼﺎدر ﻋﻦ اﻟﺒﺮﻟﻤﺎن اﻷوروﺑﻲ وﻟﺠﻨﺔEC/٩٦/٢٠٠٢ ٣٠٠٢ ﺣﻮل اﻟﻤﻌﺪات اﻟﻜﻬﺮﺑﺎﺋﻴﺔ واﻹﻟﻜﺘﺮوﻧﻴﺔJan ٢٧ ."اﻟﺘﻲ ﻳﺘﻢ اﻟﺘﺨﻠﺺ ﻣﻨﻬﺎ EC/١٠٨/٢٠٠٣ واﻟﻤﻌﺪل "ﺑﺎﻟﺘﻮﺟﻴﻪ .(WEEE) " اﻹﻧﺬار ﻗﻢ ﺑﺈﻋﺎدة ﺗﺪوﻳﺮ أﺟﻬﺰة اﻟﺴﻤﻊ واﻟﻤﻠﺤﻘﺎت واﻟﺤﺰﻣﺔ ...
- Seite 168 ﺣﻞ اﻟﻤﺸﺎﻛﻞ ﺣﻞ اﻟﻤﺸﺎﻛﻞ .اﺳﺘﺨﺪم ﻧﺼﺎﺋﺢ ﺣﻞ اﻟﻤﺸﺎﻛﻞ ﻫﺬه ﻟﺤﻞ اﻟﻤﺸﺎﻛﻞ اﻟﺒﺴﻴﻄﺔ اﻟﺤﻞ اﻟﻤﻤﻜﻦ اﻟﻤﺸﻜﻠﺔ .ﻗﻢ ﺑﺎﺳﺘﺒﺪال اﻟﺒﻄﺎرﻳﺔ اﻟﻔﺎرﻏﺔ .اﻟﺼﻮت ﺿﻌﻴﻒ .ﻧﻈﻒ ﻗﺎﻟﺐ اﻷذن .ﻗﻢ ﺑﺰﻳﺎدة ﻣﺴﺘﻮى اﻟﺼﻮت ﺣﺎول إﻋﺎدة إدﺧﺎل ﻗﺎﻟﺐ .ﻳﺼﺪر ﻋﻦ اﻟﺠﻬﺎز ﺻﻮت ﺻﻔﻴﺮ اﻷذن إﻟﻰ أن ﻳﺴﺘﻘﺮ ﻓﻲ ﻣﻜﺎﻧﻪ .ﺑﺸﻜﻞ...
- Seite 169 اﻟﺼﻴﺎﻧﺔ واﻟﻌﻨﺎﻳﺔ LifeTube ﻟﻸﺟﻬﺰة اﻟﺘﻲ ﺗﺤﺘﻮي ﻋﻠﻰ أﻧﺒﻮب ﺑﺎﻧﺘﻈﺎم ﺑﺎﺳﺘﺨﺪام ﺳﻠﻚLifeTube ﻗﻢ ﺑﺘﻨﻈﻴﻒ أﻧﺎﺑﻴﺐ .ﺗﻨﻈﻴﻒ اﻃﻠﺐ ﻣﻦ أﺧﺼﺎﺋﻲ رﻋﺎﻳﺔ اﻟﺴﻤﻊ اﻟﺨﺎص ﺑﻚ ﺗﺒﺪﻳﻞ أﻧﺎﺑﻴﺐ اﻟﺨﺎﺻﺔ ﺑﻬﺎ ﻛﻞ ٣ ﺷﻬﻮر إﻟﻰ ٦ ﺷﻬﻮرLifeTip وﻗﺒﺎبLifeTube .ﺗﻘﺮﻳ ﺒ ً ﺎ أو ﻋﻨﺪ اﻟﺤﺎﺟﺔ ...
- Seite 170 اﻟﺼﻴﺎﻧﺔ واﻟﻌﻨﺎﻳﺔ اﻟﺼﻴﺎﻧﺔ واﻟﻌﻨﺎﻳﺔ إن أﺟﻬﺰة اﻟﺴﻤﻊ اﻟﺨﺎﺻﺔ ﺑﻚ أﺟﻬﺰة ﺣﺴﺎﺳﺔ ﻟﻠﻐﺎﻳﺔ وﺗﻀﻤﻦ اﻟﻌﻨﺎﻳﺔ اﻟﺼﺤﻴﺤﺔ واﻟﺘﻌﺎﻣﻞ اﻟﺠﻴﺪ ﻣﻌﻬﺎ اﻟﺤﺼﻮل ﻋﻠﻰ أﻓﻀﻞ .ﻣﺴﺘﻮى أداء ﻣﻨﻬﺎ ﻗﻢ ﺑﺘﻨﻈﻴﻒ أﺟﻬﺰة اﻟﺴﻤﻊ ﺑﺎﻧﺘﻈﺎم ﻟﻤﻨﻊ ﺗﻌﺮﺿﻬﺎ ﻟﻠﺘﻠﻒ وﺗﺠﻨﺐ .ﺣﺪوث ﻣﺸﺎﻛﻞ ﺻﺤﻴﺔ اﻹﻧﺬار .ﻻ ﺗﻀﻊ أﺟﻬﺰة اﻟﺴﻤﻊ ﻓﻲ اﻟﻤﺎء ...
- Seite 171 اﻟﻮﻇﺎﺋﻒ AutoPhone )*( ﻣﻠﺤﻖ ﻣﻐﻨﺎﻃﻴﺲ ﻻ ﺗﻨﺘﺞ ﺟﻤﻴﻊ اﻟﻬﻮاﺗﻒ ﻣﺠﺎﻻ ﻣﻐﻨﺎﻃﻴﺴﻴﺎ ﻗﻮﻳﺎ ﺑﻤﺎ ﻳﻜﻔﻲ ﻟﺘﻔﻌﻴﻞ . ﻓﻲ ﻫﺬه اﻟﺤﺎﻟﺔ، ﻳﻤﻜﻨﻚ اﺳﺘﺨﺪام اﻟﻤﺠﺎلAutoPhone وﻇﻴﻔﺔ ، اﻟﻤﺘﻮاﻓﺮ ﻛﻤﻠﺤﻖ، وﻗﻢSiemens AutoPhone اﻟﻤﻐﻨﺎﻃﻴﺴﻲ .ﺑﺘﻮﺻﻴﻠﻪ ﺑﺠﻬﺎز اﺳﺘﻘﺒﺎل اﻟﻬﺎﺗﻒ اﻹﻧﺬار AutoPhone اﻧﻈﺮ دﻟﻴﻞ اﺳﺘﺨﺪام ﻣﻐﻨﺎﻃﻴﺲ ...
- Seite 172 اﻟﻮﻇﺎﺋﻒ أﺟﻬﺰة اﻟﺴﻤﻊ اﻟﻘﺎﺑﻠﺔ ﻹﻋﺎدة اﻟﺸﺤﻦ ﺗﺴﻤﺢ أﺟﻬﺰة اﻟﺴﻤﻊ اﻟﻘﺎﺑﻠﺔ ﻹﻋﺎدة اﻟﺸﺤﻦ ﺑﺎﺳﺘﺨﺪام .اﻟﺒﻄﺎرﻳﺎت اﻟﻌﺎدﻳﺔ أواﻟﺒﻄﺎرﻳﺎت اﻟﻘﺎﺑﻠﺔ ﻹﻋﺎدة اﻟﺸﺤﻦ ﻗﻢ ﺑﺸﺤﻦ اﻟﺒﻄﺎرﻳﺎت اﻟﻘﺎﺑﻠﺔ ﻹﻋﺎدة اﻟﺸﺤﻦ ﻗﺒﻞ .اﺳﺘﺨﺪاﻣﻬﺎ ﻷول ﻣﺮة .ﻻ ﺗﻘﻢ ﺑﺸﺤﻦ اﻟﺒﻄﺎرﻳﺎت اﻟﻌﺎدﻳﺔ راﺟﻊ دﻟﻴﻞ ﻣﺴﺘﺨﺪم ﺟﻬﺎز اﻟﺸﺤﻦ ﻟﻤﺰﻳﺪ ﻣﻦ ...
- Seite 173 اﻟﻮﻇﺎﺋﻒ اﻟﻮﻇﺎﺋﻒ ﻳﺴﺘﻄﻴﻊ أﺧﺼﺎﺋﻲ رﻋﺎﻳﺔ اﻟﺴﻤﻊ اﻟﺨﺎص ﺑﻚ ﺗﻔﻌﻴﻞ اﻟﻮﻇﺎﺋﻒ .اﻟﺘﺎﻟﻴﺔ e٢e wireless .ﻳﺴﻤﺢ ﺑﺎﺳﺘﺨﺪام ﺟﻬﺎز اﻟﺮﻳﻤﻮت ﻛﻨﺘﺮول ■ ﻳﻀﺒﻂ ﺗﻠﻘﺎﺋﻴﺎ ﺟﻬﺎزي اﻟﺴﻤﻊ ﻓﻲ ﻧﻔﺲ اﻟﻮﻗﺖ ﻟﺘﻐﻴﻴﺮ ■ .إﻋﺪادات اﻟﺠﻬﺎز، ﻣﺜﻞ ﻣﺴﺘﻮى اﻟﺼﻮت أو اﻟﺒﺮﻧﺎﻣﺞ اﻹﻧﺬار ﺗﻢ ﺗﺼﻤﻴﻢ أدوات اﻟﺴﻤﻊ اﻟﺨﺎﺻﺔ ﺑﻚ ﻟﺘﺘﻮاﻓﻖ ﻣﻊ اﻟﻤﻌﺎﻳﻴﺮ...
- Seite 174 إدﺧﺎل اﻟﺼﻮت إدﺧﺎل اﻟﺼﻮت إدﺧﺎل ﺻﻮت ﻳﺘﻴﺢ اﻻﺗﺼﺎل ﺑﻴﻦ ﺟﻬﺎز اﻟﺴﻤﻊ وﺟﻬﺎز ﺧﺎرﺟﻲ ﻣﺜﻞ أو ﺗﻠﻔﺰﻳﻮن أو ﺟﻬﺎز أﺷﻌﺔ ﺗﺤﺖmp٣ أو ﻣﺸﻐﻞFM ﻧﻈﺎم .اﻟﺤﻤﺮاء إدﺧﺎل اﻟﺼﻮت ﻣﻦ ﺧﻼل وﺻﻠﺔ اﻟﺼﻮت ارﺟﻊ إﻟﻰ دﻟﻴﻞ ﻣﺴﺘﺨﺪم وﺻﻠﺔ اﻟﺼﻮت ﻟﻤﻌﺮﻓﺔ ﻛﻴﻔﻴﺔ ...
- Seite 175 ﺿﺒﻂ ﻣﺴﺘﻮى اﻟﺼﻮت ﺿﺒﻂ ﻣﺴﺘﻮى اﻟﺼﻮت اﻟﺘﺤﻜﻢ ﻓﻲ ﻣﺴﺘﻮى اﻟﺼﻮت ﻗﻢ ﺑﺘﺪوﻳﺮ ذراع اﻟﺘﺤﻜﻢ ﻓﻲ اﻟﺼﻮت .ﻷﻋﻠﻰ ﻟﺰﻳﺎدة ﻣﺴﺘﻮى اﻟﺼﻮت ﻗﻢ ﺑﺘﺪوﻳﺮ ذراع اﻟﺘﺤﻜﻢ ﻓﻲ اﻟﺼﻮت .ﻷﺳﻔﻞ ﻟﺨﻔﺾ ﻣﺴﺘﻮى اﻟﺼﻮت ﻣﻔﺘﺎح ﻗﻼب .اﺿﻐﻂ ﻷﻋﻠﻰ ﻟﺰﻳﺎدة ﻣﺴﺘﻮى اﻟﺼﻮت .اﺿﻐﻂ...
- Seite 176 ﺗﻐﻴﻴﺮ ﺑﺮﻧﺎﻣﺞ اﻟﺴﻤﻊ ﺗﻐﻴﻴﺮ ﺑﺮﻧﺎﻣﺞ اﻟﺴﻤﻊ ﻣﻦ ﺧﻼل اﻟﺰر اﻟﻀﺎﻏﻂ اﺿﻐﻂ اﻟﺰر اﻟﻀﺎﻏﻂ ﻟﻠﺘﺤﻮل .ﻟﻠﺒﺮﻧﺎﻣﺞ اﻟﺘﺎﻟﻲ MTO ﻣﻦ ﺧﻼل ﻣﻔﺘﺎح )اﻟﻤﻴﻜﺮﻓﻮن( أوM ﺗﺤﻮل إﻟﻰ .(telecoil )ﻣﻠﻒ ﻣﻦ ﺧﻼل ﺟﻬﺎز اﻟﺮﻳﻤﻮت ﻛﻨﺘﺮول .راﺟﻊ دﻟﻴﻞ ﺟﻬﺎز اﻟﺮﻳﻤﻮت ﻛﻨﺘﺮول وﺻﻒ...
- Seite 177 ﺗﺸﻐﻴﻞ وإﻳﻘﺎف ﺟﻬﺎز اﻟﺴﻤﻊ اﻟﺨﺎص ﺑﻚ ﻣﻦ ﺧﻼل اﻟﺘﺤﻜﻢ ﻓﻲ ﻣﺴﺘﻮى اﻟﺼﻮت اﻟﺘﺸﻐﻴﻞ ﻗﻢ ﺑﺈدارة أداة اﻟﺘﺤﻜﻢ ﻓﻲ ﻣﺴﺘﻮى اﻟﺼﻮت ﻷﻋﻠﻰ .ﻟﺘﺸﻐﻴﻞ ﺟﻬﺎز اﻟﺴﻤﻊ اﻹﻳﻘﺎف ﻗﻢ ﺑﺈدارة أداة اﻟﺘﺤﻜﻢ ﻓﻲ ﻣﺴﺘﻮى اﻟﺼﻮت ﻷﺳﻔﻞ .ﻹﻳﻘﺎف ﺟﻬﺎز اﻟﺴﻤﻊ ﻣﻦ ﺧﻼل ﺟﻬﺎز اﻟﺮﻳﻤﻮت ﻛﻨﺘﺮول .راﺟﻊ...
- Seite 178 ﺗﺸﻐﻴﻞ وإﻳﻘﺎف ﺟﻬﺎز اﻟﺴﻤﻊ اﻟﺨﺎص ﺑﻚ ﻣﻦ ﺧﻼل اﻟﺰر اﻟﻀﺎﻏﻂ ﺗﺸﻐﻴﻞ .اﺿﻐﻂ اﻟﺰر اﻟﻀﺎﻏﻂ ﻟﻤﺪة ﺛﺎﻧﻴﺘﻴﻦ إﻳﻘﺎف .اﺿﻐﻂ اﻟﺰر اﻟﻀﺎﻏﻂ ﻟﻤﺪة ﺛﺎﻧﻴﺘﻴﻦ MTO ﻣﻦ ﺧﻼل ﻣﻔﺘﺎح اﻟﺘﺸﻐﻴﻞ T )اﻟﻤﻴﻜﺮﻓﻮن( أوM ﺗﺤﻮل إﻟﻰ .(telecoil )ﻣﻠﻒ اﻹﻳﻘﺎف .( )إﻳﻘﺎفO ﺗﺤﻮل إﻟﻰ ...
- Seite 179 ﺗﺸﻐﻴﻞ وإﻳﻘﺎف ﺟﻬﺎز اﻟﺴﻤﻊ اﻟﺨﺎص ﺑﻚ ﺗﺸﻐﻴﻞ وإﻳﻘﺎف ﺟﻬﺎز اﻟﺴﻤﻊ اﻟﺨﺎص ﺑﻚ ﻣﻦ ﺧﻼل ﺑﺎب اﻟﺒﻄﺎرﻳﺔ ﺗﺸﻐﻴﻞ .أﻏﻠﻖ ﺑﺎب اﻟﺒﻄﺎرﻳﺎت إﻳﻘﺎف .اﻓﺘﺢ ﺑﺎب اﻟﺒﻄﺎرﻳﻪ ١٧٩...
- Seite 180 إدﺧﺎل وإﺧﺮاج ﺟﻬﺎز اﻟﺴﻤﻊ إدﺧﺎل وإﺧﺮاج ﺟﻬﺎز اﻟﺴﻤﻊ ﺗﻌﺎﻣﻞ ﻣﻊ ﺟﻬﺎز اﻟﺴﻤﻊ ﺑﻤﺴﻚ ﻗﺎﻟﺐ اﻷذن. ﻻ ﺗﺴﺤﺐ .اﻷﻧﺒﻮب اﻹدﺧﺎل ./ﻗﺎﻟﺐ اﻷذنTubeLife أدﺧﻞ .ﺿﻊ ﺟﻬﺎز اﻟﺴﻤﻊ ﺧﻠﻒ اﻷذن اﻹﺧﺮاج .ﻗﻢ ﺑﺈﺧﺮاج ﺟﻬﺎز اﻟﺴﻤﻊ /ﻗﺎﻟﺐ اﻷذنTubeLife اﺳﺤﺐ .ﺑﺤﺮص...
- Seite 181 ﻗﻔﻞ وﻓﺘﺢ ﻋﻠﺒﺔ اﻟﺒﻄﺎرﻳﺔ ٣ ﺧﻴﺎر اﻟﻘﻔﻞ ادﻓﻊ اﻟﻤﻨﺰﻟﻖ ﻟﻠﻴﻤﻴﻦ ﺑﺄداة .ﻣﺪﺑﺒﺔ ﻣﻨﺎﺳﺒﺔ اﻟﻔﺘﺢ .ادﻓﻊ اﻟﻤﻨﺰﻟﻖ ﻟﻠﻴﺴﺎر ﺑﺄداة ﻣﺪﺑﺒﺔ ﻣﻨﺎﺳﺒﺔ . ً أﻏﻠﻖ ﺑﺎب اﻟﺒﻄﺎرﻳﺔ ﺗﻤﺎﻣﺎ ١٨١...
- Seite 182 ﻗﻔﻞ وﻓﺘﺢ ﻋﻠﺒﺔ اﻟﺒﻄﺎرﻳﺔ ﻗﻔﻞ وﻓﺘﺢ ﻋﻠﺒﺔ اﻟﺒﻄﺎرﻳﺔ ١ ﺧﻴﺎر اﻟﻘﻔﻞ .ادﻓﻊ اﻟﻤﻨﺰﻟﻖ اﻟﺼﻐﻴﺮ ﻟﻠﻴﻤﻴﻦ اﻟﻔﺘﺢ .ادﻓﻊ اﻟﻤﻨﺰﻟﻖ اﻟﺼﻐﻴﺮ ﻟﻠﻴﺴﺎر ٢ ﺧﻴﺎر اﻟﻘﻔﻞ .ادﻓﻊ اﻟﻤﻨﺰﻟﻖ اﻟﺼﻐﻴﺮ ﻷﺳﻔﻞ اﻟﻔﺘﺢ .اادﻓﻊ اﻟﻤﻨﺰﻟﻖ اﻟﺼﻐﻴﺮ ﻷﻋﻠﻰ ١٨٢...
- Seite 183 اﻟﺘﻌﺎﻣﻞ ﻣﻊ اﻟﺒﻄﺎرﻳﺎت .اﻓﺘﺢ ﺑﺎب اﻟﺒﻄﺎرﻳﺔ ﺑﺎﻟﻜﺎﻣﻞ .ﻗﻢ ﺑﺈﺧﺮاج اﻟﺒﻄﺎرﻳﺔ اﻟﻔﺎرﻏﺔ .أدﺧﻞ اﻟﻤﻘﺎس اﻟﺼﺤﻴﺢ ﻟﻠﺒﻄﺎرﻳﺔ ﺗﺄﻛﺪ ﻣﻦ أن رﻣﺰ "+" ﻓﻲ اﻟﺒﻄﺎرﻳﺔ ﻳﺸﻴﺮ .ﻷﻋﻠﻰ ﻛﻤﺎ ﻫﻮ ﻣﺒﻴﻦ ﻓﻲ اﻟﺼﻮرة .أﻏﻠﻖ ﺑﺎب اﻟﺒﻄﺎرﻳﺎت ١٨٣...
- Seite 184 اﻟﺘﻌﺎﻣﻞ ﻣﻊ اﻟﺒﻄﺎرﻳﺎت اﻟﺘﻌﺎﻣﻞ ﻣﻊ اﻟﺒﻄﺎرﻳﺎت اﻟﺤﺠﻢ اﻷﺻﻠﻲ .اﺳﺘﺨﺪم داﺋ ﻤ ً ﺎ اﻟﻤﻘﺎس اﻟﺼﺤﻴﺢ ﻟﻠﺒﻄﺎرﻳﺎت ﻗﻢ ﺑﺸﺤﻦ اﻟﺒﻄﺎرﻳﺎت اﻟﻘﺎﺑﻠﺔ ﻹﻋﺎدة اﻟﺸﺤﻦ ﻗﺒﻞ .اﺳﺘﺨﺪاﻣﻬﺎ ﻷول ﻣﺮة ﻻ ﺗﻘﻢ ﺑﺈزاﻟﺔ اﻟﺸﺮﻳﻂ ﻣﻦ ﻋﻠﻰ اﻟﺒﻄﺎرﻳﺔ اﻟﻌﺎدﻳﺔ إﻻ .ﻋﻨﺪﻣﺎ ﺗﻜﻮن ﺟﺎﻫﺰ ً ا ﻻﺳﺘﺨﺪاﻣﻬﺎ داﺋ...
- Seite 185 ﻣﻼﺣﻈﺎت ﻋﺎﻣﺔ ﻋﻦ اﻟﺴﻼﻣﺔ اﻟﺘﻨﺒﻴﻪ !ﺧﻄﺮ اﻹﺻﺎﺑﺔ ﻓﻲ ﺑﻌﺾ اﻟﺤﺎﻻت ﺷﺪﻳﺪة اﻟﻨﺪرة، ﻗﺪ ﻳﺒﻘﻰ ﺟﺰء اﻷذن ﻓﻲ أذﻧﻚ ﻋﻨﺪ إزاﻟﺔ أداة اﻟﺴﻤﻊ. ﻓﻲ ﺣﺎﻟﺔ ﺣﺪوث ﻫﺬا اﻷﻣﺮ، ﻳﺠﺐ إزاﻟﺔ ﺟﺰء اﻷذن ﻋﻠﻰ ﻳﺪ .أﺧﺼﺎﺋﻲ ﻃﺒﻲ ١٨٥...
- Seite 186 ﻣﻼﺣﻈﺎت ﻋﺎﻣﺔ ﻋﻦ اﻟﺴﻼﻣﺔ اﻹﻧﺬار .ﺗﺆدي اﻟﺒﻄﺎرﻳﺎت اﻟﺘﻲ ﺑﻬﺎ ﺗﺴﺮب إﻟﻰ ﺗﻠﻒ أﺟﻬﺰة اﻟﺴﻤﻊ ﻗﻢ ﺑﺈﻳﻘﺎف ﺗﺸﻐﻴﻞ أﺟﻬﺰة اﻟﺴﻤﻊ ﻋﻨﺪ ﻋﺪم .اﺳﺘﺨﺪاﻣﻬﺎ ﻟﻠﻤﺤﺎﻓﻈﺔ ﻋﻠﻰ اﻟﺒﻄﺎرﻳﺔ ﻗﻢ ﺑﺈﺧﺮاج اﻟﺒﻄﺎرﻳﺎت ﻋﻨﺪﻣﺎ ﻻ ﺗﻜﻮن أﺟﻬﺰة اﻟﺴﻤﻊ .ﻗﻴﺪ اﻻﺳﺘﺨﺪام ﻟﻔﺘﺮة ﻃﻮﻳﻠﺔ اﻹﻧﺬار ﻟﺘﺠﻨﺐ...
- Seite 187 ﻣﻼﺣﻈﺎت ﻋﺎﻣﺔ ﻋﻦ اﻟﺴﻼﻣﺔ اﻹﻧﺬار أﺟﻬﺰة اﻟﺴﻤﻊ ﺣﺴﺎﺳﺔ ﻟﻠﺤﺮارة اﻟﺸﺪﻳﺪة واﻟﺮﻃﻮﺑﺔ (٠٫١T اﻟﻌﺎﻟﻴﺔ واﻟﻤﺠﺎﻻت اﻟﻤﻐﻨﺎﻃﻴﺴﻴﺔ اﻟﻘﻮﻳﺔ )أﻛﺒﺮ ﻣﻦ .وأﺷﻌﺔ إﻛﺲ واﻹﺟﻬﺎد اﻟﻤﻴﻜﺎﻧﻴﻜﻲ ﻻ ﺗﻌﺮض ﺟﻬﺎز اﻟﺴﻤﻊ ﻟﻠﺤﺮارة اﻟﺸﺪﻳﺪة أو اﻟﺮﻃﻮﺑﺔ .اﻟﻌﺎﻟﻴﺔ .ﻻ ﺗﺘﺮﻛﻪ ﻓﻲ أﺷﻌﺔ اﻟﺸﻤﺲ اﻟﻤﺒﺎﺷﺮة ﻻ ﺗﻘﻢ ﺑﻠﺒﺴﻪ ﻓﻲ اﻟﺤﻤﺎم أو ﻋﻨﺪ ﻋﻤﻞ ﻣﺎﻛﻴﺎج أو ...
- Seite 188 ﻣﻼﺣﻈﺎت ﻋﺎﻣﺔ ﻋﻦ اﻟﺴﻼﻣﺔ اﻟﺘﺤﺬﻳﺮ !ﺧﻄﺮ اﻟﺘﺄﺛﻴﺮ ﻋﻠﻰ اﻷﺟﻬﺰة اﻹﻟﻜﺘﺮوﻧﻴﺔ ﻓﻲ اﻟﻤﻨﺎﻃﻖ اﻟﺘﻲ ﻳﺘﻢ ﻓﻴﻬﺎ ﺗﻘﻴﻴﺾ اﺳﺘﺨﺪام اﻷﺟﻬﺰة اﻹﻟﻜﺘﺮوﻧﻴﺔ أو اﻷﺟﻬﺰة اﻟﻼﺳﻠﻜﻴﺔ، ﺗﺤﻘﻖ ﻣﻤﺎ إذا .ﻛﺎن ﻳﺠﺐ إﻳﻘﺎف ﺗﺸﻐﻴﻞ اﻟﺠﻬﺎز اﻟﺨﺎص ﺑﻚ ﺗﻮﺟﺪ ﻗﻴﻮد ﻋﻠﻰ اﺳﺘﺨﺪام اﻷﺟﻬﺰة اﻟﻼﺳﻠﻜﻴﺔ ﻓﻲ ﺑﻌﺾ .اﻟﺒﻠﺪان...
- Seite 189 ﻣﻼﺣﻈﺎت ﻋﺎﻣﺔ ﻋﻦ اﻟﺴﻼﻣﺔ اﻟﺘﺤﺬﻳﺮ ﻳﺠﺐ أن ﻳﻨﺼﺢ أﺧﺼﺎﺋﻲ رﻋﺎﻳﺔ اﻟﺴﻤﻊ ﻣﺴﺘﺨﺪم ﺟﻬﺎز اﻟﺴﻤﻊ اﻟﻤﺤﺘﻤﻞ ﺑﺎﺳﺘﺸﺎرة ﻃﺒﻴﺐ ﻣﺮﺧﺺ ﻗﺐ اﺳﺘﺨﺪام ﺟﻬﺎز اﻟﺴﻤﻊ إذا ﻗﺮر أﺧﺼﺎﺋﻲ رﻋﺎﻳﺔ اﻟﺴﻤﻊ أن اﻟﻤﺴﺘﺨﺪم :اﻟﻤﺤﺘﻤﻞ ﻳﻌﺎﻧﻲ ﻣﻦ أي ﻣﻦ اﻟﺤﺎﻻت اﻟﺘﺎﻟﻴﺔ .أي ﻋﻴﻮب ﺧﻠﻘﻴﺔ أو ﺗﺸﻮه ﻧﺘﻴﺠﺔ ﻟﺼﺪﻣﺔ ﻓﻲ اﻷذن ...
- Seite 190 ﻣﻼﺣﻈﺎت ﻋﺎﻣﺔ ﻋﻦ اﻟﺴﻼﻣﺔ ﻣﻼﺣﻈﺎت ﻋﺎﻣﺔ ﻋﻦ اﻟﺴﻼﻣﺔ اﻟﺘﺤﺬﻳﺮ !ﺧﻄﺮ اﻟﺨﻨﻖ أدوات اﻟﺴﻤﻊ اﻟﺨﺎﺻﺔ ﺑﻚ ﺗﺤﺘﻮي ﻋﻠﻰ أﺟﺰاء ﺻﻐﻴﺮة .ﻳﻤﻜﻦ ﺑﻠﻌﻬﺎ ﺗﺄﻛﺪ ﻣﻦ ﺗﻮﻓﺮ اﻟﺮﻗﺎﺑﺔ اﻟﻤﻨﺎﺳﺒﺔ ﻟﻠﺮﺿﻊ أو اﻷﻃﻔﺎل .أو اﻟﻤﻌﺎﻗﻴﻦ ذﻫﻨﻴﺎ ﻋﻨﺪ ارﺗﺪاء أﺟﻬﺰة اﻟﺴﻤﻊ .ﺗﺄﻛﺪ ﻣﻦ اﻛﺘﻤﺎل أدوات اﻟﺴﻤﻊ ﺑﺸﻜﻞ دوري ...
- Seite 191 اﻻﺳﺘﺨﺪام اﻟﻤﻘﺼﻮد اﻻﺳﺘﺨﺪام اﻟﻤﻘﺼﻮد أﺟﻬﺰة اﻟﺴﻤﻊ ﻣﺼﻤﻤﺔ ﻟﻤﺴﺎﻋﺪة اﻷﺷﺨﺎص اﻟﻤﺼﺎﺑﻴﻦ ﺑﺎﻟﺼﻤﻢ ﻋﻠﻰ اﻟﺴﻤﻊ ﺑﺸﻜﻞ أﻓﻀﻞ. ﻳﺠﺐ أن ﻳﻘﻮم ﺑﺘﺸﺨﻴﺺ ﺟﻬﺎز اﻟﺴﻤﻊ وإﺻﺪار اﻟﻮﺻﻔﺔ اﻟﻄﺒﻴﺔ ﺑﻪ أﺧﺼﺎﺋﻴﻮ رﻋﺎﻳﺔ اﻟﺴﻤﻊ ﻣﺜﻞ أﻃﺒﺎء .اﻷﻧﻒ واﻷذن واﻟﺤﻨﺠﺮة واﺧﺘﺼﺎﺻﻴﻮ اﻟﺴﻤﻊ اﻗﺮأ واﺗﺒﻊ اﻟﺘﻌﻠﻴﻤﺎت اﻟﻤﻮﺟﻮدة ﻓﻲ دﻟﻴﻞ اﻟﻤﺴﺘﺨﺪم ﻫﺬا ﻟﻌﺪم .اﻟﺘﻌﺮض...
- Seite 192 ﺟﻬﺎز اﻟﺴﻤﻊBTE P ٥٠٠ Explorer M ٥٠٠ Explorer ٢K Prisma اﺧﺘﻴﺎري ﺑﺄﻧﺒﻮب اﺧﺘﻴﺎري ﺑﺄﻧﺒﻮب S-LifeTube S-LifeTube (١٣ :)ﻧﻮع اﻟﺒﻄﺎرﻳﺔ (١٣ :)ﻧﻮع اﻟﺒﻄﺎرﻳﺔ (٣١٢ :)ﻧﻮع اﻟﺒﻄﺎرﻳﺔ ⑥ ﺑﺎب اﻟﺒﻄﺎرﻳﺔ ① ﻣﺸﺒﻚ أذن ⑦ ﻏﻄﺎء ﻣﻘﺒﺲ اﻟﺒﺮﻣﺠﺔ ② زر ﺿﺎﻏﻂ ⑧ إدﺧﺎل اﻟﺼﻮت ③...
- Seite 193 ﺟﻬﺎز اﻟﺴﻤﻊBTE Phoenix (١٣ :)ﻧﻮع اﻟﺒﻄﺎرﻳﺔ (٦٧٥ :)ﻧﻮع اﻟﺒﻄﺎرﻳﺔ :)ﻧﻮع اﻟﺒﻄﺎرﻳﺔ (*٦٧٥/١٣ ⑥ ﻓﺘﺤﺎت اﻟﻤﻴﻜﺮوﻓﻮن ① ﻣﺸﺒﻚ أذن ⑦ ﺑﺎب اﻟﺒﻄﺎرﻳﺔ ② زر ﺿﺎﻏﻂ ⑧ ﻏﻄﺎء ﻣﻘﺒﺲ اﻟﺒﺮﻣﺠﺔ ③ ﻣﻔﺘﺎح ﻗﻼب ⑨ ﻏﻄﺎء أدوات ﺗﺤﻜﻢ MTO ④ ﻣﻔﺘﺎح اﻟﺘﺮﻛﻴﺒﺎت ⑤...
- Seite 194 ﺟﻬﺎز اﻟﺴﻤﻊBTE P/HP/DP (١٣ :)ﻧﻮع اﻟﺒﻄﺎرﻳﺔ (٦٧٥ :)ﻧﻮع اﻟﺒﻄﺎرﻳﺔ ① ﻣﺸﺒﻚ أذن ⑤ ﺑﺎب اﻟﺒﻄﺎرﻳﺔ ⑥ ﻏﻄﺎء ﻣﻘﺒﺲ اﻟﺒﺮﻣﺠﺔ ② زر ﺿﺎﻏﻂ ⑦ إدﺧﺎل اﻟﺼﻮت ③ اﻟﺘﺤﻜﻢ ﻓﻲ ﻣﺴﺘﻮى اﻟﺼﻮت ④ ﻓﺘﺤﺎت اﻟﻤﻴﻜﺮوﻓﻮن ١٩٤...
- Seite 195 ﺟﻬﺎز اﻟﺴﻤﻊBTE S/M/DM S VC/M VC/ DM VC اﺧﺘﻴﺎري ﺑﺄﻧﺒﻮب اﺧﺘﻴﺎري ﺑﺄﻧﺒﻮب اﺧﺘﻴﺎري ﺑﺄﻧﺒﻮب S-LifeTube S-LifeTube S-LifeTube (١٣ :)ﻧﻮع اﻟﺒﻄﺎرﻳﺔ (١٣ :)ﻧﻮع اﻟﺒﻄﺎرﻳﺔ (١٣ :)ﻧﻮع اﻟﺒﻄﺎرﻳﺔ ⑤ ﺑﺎب اﻟﺒﻄﺎرﻳﺔ ① ﻣﺸﺒﻚ أذن ⑥ ﻏﻄﺎء ﻣﻘﺒﺲ اﻟﺒﺮﻣﺠﺔ ② زر ﺿﺎﻏﻂ ⑦...
- Seite 196 ﺟﻬﺎز اﻟﺴﻤﻊBTE ﺟﻬﺎز اﻟﺴﻤﻊBTE Life Life Life ﺑﻤﺸﺒﻚ أذن Life ﺑﻤﺸﺒﻚ أذن اﺧﺘﻴﺎريoptional اﺧﺘﻴﺎري اﺧﺘﻴﺎري LifeTube ﺑﺄﻧﺒﻮب (٣١٢ :)ﻧﻮع اﻟﺒﻄﺎرﻳﺔ (٣١٢ :)ﻧﻮع اﻟﺒﻄﺎرﻳﺔ (١٣ :)ﻧﻮع اﻟﺒﻄﺎرﻳﺔ ⑥ ﻓﺘﺤﺎت اﻟﻤﻴﻜﺮوﻓﻮن LifeTube ① ⑦ ﻏﻄﺎء ﻣﻘﺒﺲ اﻟﺒﺮﻣﺠﺔ LifeTip ② ⑧ ﻋﻠﺒﺔ اﻟﺒﻄﺎرﻳﺔ LifeTip ③...
- Seite 197 اﻟﻤﺤﺘﻮﻳﺎت اﻟﻤﺤﺘﻮﻳﺎت ١٦٧ ﻣﻌﻠﻮﻣﺎت اﻟﺘﺨﻠﺺ ﻣﻦ اﻟﺠﻬﺎز ١٦٨ ﺣﻞ اﻟﻤﺸﺎﻛﻞ ١٧٠ اﻟﺼﻴﺎﻧﺔ واﻟﻌﻨﺎﻳﺔ ١٧٣ اﻟﻮﻇﺎﺋﻒ ١٧٤ إدﺧﺎل اﻟﺼﻮت ١٧٥ ﺿﺒﻂ ﻣﺴﺘﻮى اﻟﺼﻮت ١٧٦ ﺗﻐﻴﻴﺮ ﺑﺮﻧﺎﻣﺞ اﻟﺴﻤﻊ ١٧٩ ﺗﺸﻐﻴﻞ وإﻳﻘﺎف ﺟﻬﺎز اﻟﺴﻤﻊ اﻟﺨﺎص ﺑﻚ ١٨٠ إدﺧﺎل وإﺧﺮاج ﺟﻬﺎز اﻟﺴﻤﻊ ١٨٢ ﻗﻔﻞ وﻓﺘﺢ ﻋﻠﺒﺔ اﻟﺒﻄﺎرﻳﺔ ١٨٤...
- Seite 198 ١٩٨...
- Seite 200 Manufactured by Sivantos GmbH under Trademark License of Siemens AG. © Siemens AG, 09.2014 Document No. A91100-M5100-1084-13-76V6 Order/Item No. 087 81 143 Printed in Germany Sivantos GmbH Henri-Dunant-Strasse 100 91058 Erlangen Germany Phone +49 9131 308 0 www.bestsound-technology.com...