Werbung
Quicklinks
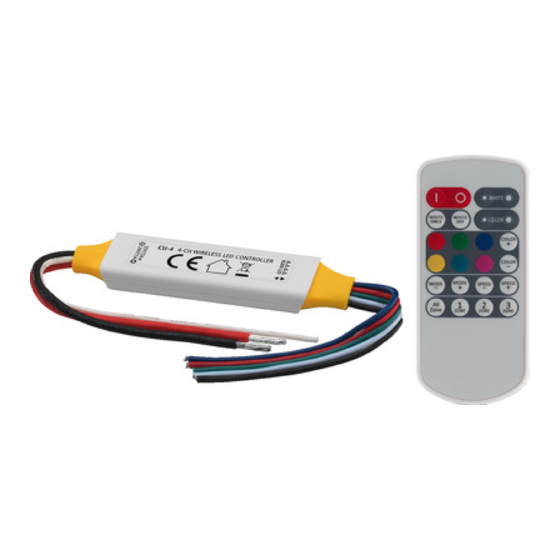
CU-4
Bestell-Nr. • Order no. 38.7520
ELECTRONICS FOR SPECIALISTS
ELECTRONICS FOR SPECIALISTS
Steuergerät mit Fernbedienung
für RGBW-LED-Streifen
Diese Anleitung richtet sich an Elektroinstallateure
(Kapitel „Installation") und an Benutzer ohne besondere
Fachkenntnisse (Kapitel „Bedienung"). Bitte lesen Sie die
Anleitung vor dem Betrieb gründlich durch und heben
Sie sie für ein späteres Nachlesen auf.
1 Verwendungsmöglichkeiten
Das Gerät CU-4 dient zum Steuern von RGBW-LED-Streifen,
die eine Spannung von 12 V⎓ oder 24 V⎓ benötigen (z. B. LEDS-
5MP/RGBW). Über die Funk-Fernbedienung lassen sich Leucht-
farbe, Helligkeit und Licht-Programme einstellen.
2 Wichtige Hinweise für den Gebrauch
Das Gerät entspricht allen relevanten Richtlinien der EU und
ist deshalb mit
gekennzeichnet.
•
Verwenden Sie das Gerät nur im Innenbereich und schüt-
zen Sie es vor Feuchtigkeit, Tropf- und Spritzwasser sowie
vor Kälte und Hitze (zulässiger Einsatztemperaturbereich
0 – 40 °C).
•
Verwenden Sie zum Säubern nur ein trockenes weiches
Tuch, niemals Wasser oder Chemikalien.
•
Wird das Gerät zweckentfremdet, nicht richtig angeschlos-
sen, falsch bedient oder nicht fachgerecht repariert, kann
keine Haftung für daraus resultierende Sach- oder Perso-
nenschäden und keine Garantie für das Gerät übernommen
werden.
Soll das Gerät endgültig aus dem Betrieb genom-
men werden, übergeben Sie es zur umweltgerech-
ten Entsorgung einem örtlichen Recyclingbetrieb.
Batterien dürfen nicht in den Hausmüll geworfen werden.
Geben Sie sie zur umweltgerechten Entsorgung nur in den
Sondermüll (z. B. zurück zum Händler oder zu öffentlichen
Sammelstellen).
2.1 Konformität und Zulassung
Hiermit erklärt MONACOR INTERNATIONAL, dass das Steuerge-
rät und die Fernbedienung (CU-4) der Richtlinie 2014 /53/EU ent-
sprechen. Die EU-Konformitätserklärung kann bei MONACOR
INTERNATIONAL angefordert werden. Das Gerät ist für den
Betrieb in den EU- und EFTA-Staaten allgemein zugelassen
und anmelde- und gebührenfrei.
Controller with Remote Control
for RGBW LED Strips
These instructions are intended for electricians (chapter
"Installation") and for users without any specific techni-
cal knowledge (chapter "Operation"). Please read these
instructions carefully prior to operating the unit and
keep them for later reference.
1 Applications
The unit CU-4 is designed to control RGBW LED strips that
require a voltage of 12 V⎓ or 24 V⎓ (e. g. LEDS-5MP/RGBW).
The wireless remote control can be used to set the light colour,
the brightness and the light programs.
2 Important Notes
The unit corresponds to all relevant directives of the EU and
is therefore marked with
.
•
The unit is suitable for indoor use only. Protect it against
dripping water and splash water, high air humidity and
heat (admissible ambient temperature range 0 – 40 °C).
•
For cleaning only use a dry soft cloth; never use water or
chemicals.
•
No guarantee claims for the unit and no liability for any
resulting personal damage or material damage will be ac-
cepted if the unit is used for other purposes than originally
intended, if it is not correctly connected or operated, or if
it is not repaired in an expert way.
If the unit is to be put out of operation definitively,
take it to a local recycling plant for a disposal which
is not harmful to the environment.
Never put batteries in the household waste. To protect the
environment, always take them to a special waste disposal,
e. g. collection container at your retailer.
2.1 Conformity and approval
Herewith, MONACOR INTERNATIONAL declare that the con-
troller and the remote control (CU-4) comply with the direc-
tive 2014 /53/EU. The EU declaration of conformity is available
on request from MONACOR INTERNATIONAL. The unit is gen-
erally approved for operation in EU and EFTA countries, it is
licence-free and requires no registration.
ELECTRONICS FOR SPECIALISTS
3 Installation
1) Den LED-Streifen an das 5-polige Kabel des Steuergeräts
anschließen:
Aderfarbe
schwarz
weiß
grün
rot
blau
Die vier Ausgänge (R, G, B, W) dürfen durch die LEDs je-
weils mit maximal 1,85 A belastet werden. Bei einer Über-
lastung schaltet das Steuergerät die LEDs ab; die LED am
Steuergerät blinkt rot.
2) Zur Stromversorgung wird ein 12-V- oder 24-V-Gleich-
spannungsnetzgerät benötigt (entsprechend der LED-
Betriebsspannung). Es muss den Strom liefern können, den
die LEDs benötigen. Das Netzgerät an das Kabel mit der
Beschriftung „12 V / 7.5 A or 24 V / 7.5A" anschließen:
Rote Ader = Pluspol, schwarze Ader = Minuspol.
3.1 Fernbedienung
Die Fernbedienung wird mit einer Batterie geliefert. Vor dem
ersten Betrieb die Schutzfolie aus dem Batteriehalter ziehen.
Bei längerem Nichtgebrauch die Batterie sicherheitshalber
herausnehmen, damit die Fernbedienung bei einem eventu-
ellen Auslaufen der Batterie nicht beschädigt wird.
Batterie auswechseln
1) Die Verriegelung des Batteriehalters nach rechts drücken
(1. Pfeil) und den Halter herauszie-
hen (2. Pfeil).
2) Die alte Batterie entfernen und die
neue Batterie (3-V-Knopfzelle, Typ CR 2025) mit dem Plus-
pol nach oben in den Halter legen.
3) Den Halter zurück in die Fernbedienung schieben.
3.2 Steuergerät und Fernbedienung zuordnen
Ab Werk ist das Steuergerät der beiliegenden Fernbedienung
zugeordnet: Das Steuergerät reagiert nur auf diese Fernbe-
dienung. Um dem Steuergerät eine weitere Fernbedienung
zuzuordnen oder um mehreren Steuergeräten eine gemein-
same Fernbedienung zuzuordnen:
1) Das (die) Steuergerät(e) mindestens 5 s von der Stromver-
sorgung trennen.
2) Nach dem Wiederanlegen der Stromversorgung innerhalb
von 5 s die Tasten I (Ein) und WHITE
3 Installation
1) Connect the LED strip to the 5-pole cable of the controller:
Wire colour
Black
White
Green
Red
Blue
The load by the LEDs at each of the four outputs (R, G, B, W)
must not exceed 1.85 A. In case of an overload, the controller
will switch off the LEDs; the LED at the controller will flash
in red.
2) For power supply, a 12 V or 24 V DC power supply unit is
required (according to the LED operating voltage). The
power supply unit must be able to provide the current the
LEDs require. Connect the power supply unit to the cable
with the lettering "12 V / 7.5 A or 24 V / 7.5 A":
Red wire = positive pole, black wire = negative pole.
3.1 Remote control
The remote control is supplied with a battery. Prior to ini-
tial operation, remove the protective film from the battery
support. If the remote control is not used for a longer time,
remove the battery as a precaution so that the remote control
will not be damaged in case the battery should leak.
Replacing the battery
1) Push the latch of the battery support to the right (first
arrow) and pull out the support
(second arrow).
2) Remove the discharged battery and
insert the new battery (3 V button cell of type CR 2025) in
the support, positive pole facing upwards.
3) Push the support back into the remote control.
3.2 Pairing controller and remote control
In the factory, the controller has been paired with the remote
control supplied: The controller will only respond to this re-
mote control. To pair an additional remote control with the
controller or to pair a single remote control with multiple
controllers:
1) Disconnect the controller(s) from the power supply for at
least 5 seconds.
2) Connect the controller(s) to the power supply again and
then simultaneously press the buttons I (On) and WHITE
within 5 seconds. Then, within the next 5 seconds, press
MONACOR INTERNATIONAL GmbH & Co. KG • Zum Falsch 36 • 28307 Bremen • Germany
Copyright
by MONACOR INTERNATIONAL. All rights reserved.
©
ELECTRONICS FOR SPECIALISTS
ELECTRONICS FOR SPECIALISTS
Anschluss
gemeinsamer Pluspol
Minuspol Weiß
Minuspol Grün
Minuspol Rot
Minuspol Blau
CR2025
1.
2.
gleichzeitig drücken.
Connection
Common positive pole
Negative pole white
Negative pole green
Negative pole red
Negative pole blue
CR2025
1.
2.
ELECTRONICS
Dann innerhalb von weiteren 5 s die Taste für die Farbe
Rot drücken. Zur Bestätigung blinkt die LED dreimal weiß.
3) Die Bedienschritte 1 und 2 ggf. für weitere Fernbedienun-
gen wiederholen. Die Steuergeräte speichern die fünf zu-
letzt zugeordneten Fernbedienungen.
4 Bedienung
Beim Drücken einer Taste auf der Fernbedienung leuchtet die
Status-LED des Steuergeräts kurz in weiß.
Tasten
Funktion
I /
LEDs an / aus
6 farbige Tasten
Direktwahl einer Farbe
COLOR + / –
Farbwahl (30 Farben)
nur die weißen LEDs ein;
WHITE ONLY
mit den farbigen Tasten und den Tasten COLOR
lassen sich die farbigen LEDs wieder dazuschalten
weiße LEDs aus;
WHITE OFF
mit den Tasten WHITE
LEDs wieder zu den farbigen LEDs dazuschalten
WHITE
/
weiße LEDs dunkler / heller (10 Stufen)
farbige LEDs dunkler / heller (5 Stufen)
COLOR
/
automatischer Programmablauf
MODE + / –
(34 verschiedene Programme)
SPEED + / –
Geschwindigkeit (10 Stufen)
All Zone / 1 – 3 ZONE bei diesem Modell ohne Funktion
4.1 Status-LED
Die LED des Steuergeräts signalisiert:
LED
Status
blau
normaler Betrieb
kurz weiß
Fernbedienungssignal wird empfangen
max. oder min. Helligkeits- /
kurz hellgrün
Geschwindigkeitsstufe ist erreicht
blinkt rot
Ausgang überlastet oder kurzgeschlossen
blinkt gelb
Steuergerät überhitzt
5 Technische Daten
Stromversorgung: � � � 6 – 24 V⎓, entsprechend der angeschlossenen LEDs
Belastbarkeit: � � � � � � max� 1,85 A pro Ausgang
Sendefrequenz: � � � � 433,92 MHz
Reichweite: � � � � � � � ca� 10 m
Maße, Gewicht: � � � � 87 × 21 × 9 mm, 59 g (Steuergerät)
52 × 7 × 115 mm, 27 g (Fernbedienung)
Änderungen vorbehalten.
the button for the colour red. The LED will flash 3 times in
white as a confirmation.
3) If applicable, repeat steps 1 and 2 for additional remote
controls. The controllers will save the five remote controls
most recently paired.
4 Operation
When a button on the remote control is pressed, the status
LED of the controller will briefly light up in white.
Buttons
Function
I /
LEDs on / off
6 colour buttons
Direct colour selection
COLOR + / –
Colour selection (30 colours)
Only the white LEDs on;
WHITE ONLY
use the colour buttons and the buttons COLOR
to switch on the colour LEDs
White LEDs off; use the buttons WHITE
WHITE OFF
switch on the white LEDs
WHITE
/
White LEDs darker / brighter (10 levels)
Colour LEDs darker / brighter (5 levels)
COLOR
/
Automatic program execution
MODE + / –
(34 different programs)
SPEED + / –
Speed (10 levels)
All Zone / 1 – 3 ZONE Without function for this model
4.1 Status LED
The LED of the controller indicates the following:
LED
Status
Blue
Normal operation
White, briefly
Receiving remote control signal
Light green, briefly Max. or min. level of brightness / speed reached
Red, flashing
Output overloaded or short-circuited
Yellow, flashing
Controller overheated
5 Specifications
Power supply: � � � � � � 6 – 24 V⎓, according to the LEDs connected
Load: � � � � � � � � � � � � 1�85 A max� at each output
Transmission
frequency: � � � � � � � � 433�92 MHz
Range: � � � � � � � � � � � 10 m approx�
Dimensions, weight: � 87 × 21 × 9 mm, 59 g (controller)
52 × 7 × 115 mm, 27 g (remote control)
Subject to technical modification.
A-1687.99.01.08.2015
/
lassen sich die weißen
/
to
Werbung

Verwandte Anleitungen für Monacor CU-4


Inhaltszusammenfassung für Monacor CU-4
- Seite 1 I (On) and WHITE within 5 seconds. Then, within the next 5 seconds, press Subject to technical modification. MONACOR INTERNATIONAL GmbH & Co. KG • Zum Falsch 36 • 28307 Bremen • Germany A-1687.99.01.08.2015 Copyright by MONACOR INTERNATIONAL.
- Seite 2 I (On) e WHITE . Quindi, entro Con riserva di modifiche tecniche. MONACOR INTERNATIONAL GmbH & Co. KG • Zum Falsch 36 • 28307 Bremen • Germany A-1687.99.01.08.2015 Copyright by MONACOR INTERNATIONAL. All rights reserved.