Honeywell Sensepoint XCL Schnellstartanleitung
Fixed gas detector
Vorschau ausblenden
Andere Handbücher für Sensepoint XCL:
- Installationshandbuch (54 Seiten) ,
- Kurzanleitung (6 Seiten)
Inhaltsverzeichnis
Werbung
Quicklinks
Werbung
Inhaltsverzeichnis

Verwandte Anleitungen für Honeywell Sensepoint XCL


Inhaltszusammenfassung für Honeywell Sensepoint XCL
- Seite 1 Gas Detection Sensepoint XCL Fixed Gas Detector Quick Start Guide...
- Seite 2 Sensepoint XCL Fixed Gas Detector Quick Start Guide Read and understand the Sensepoint XCL Operating Instructions before installing, operating or servicing this product. These are available for download from the Honeywell Analytics website. Visit www.honeywellanalytics.com. Safety Installation must be in accordance with the recognized standards of the appropriate authority in the country and locality concerned.
-
Seite 3: Cable Connections
Cable Connections 1. Fit suitable cable glands (included) or conduit fittings to the opened cable entries. 2. Feed the cable through the cable gland. 3. Turn over the detector module and locate the terminal blocks on the back. Remove the terminal blocks, pulling them toward the center of the module. -
Seite 4: Status Indicator
2. Position the detector module onto the back box ensuring that the Status Indicator is in the top left-hand corner when viewed from the front. 3. Tighten the four retaining screws using a No. 2 Phillips screwdriver to secure. 4. Where used, tighten the sealing nut of the cable gland to secure the cable. Refer to the cable gland manufacturer’s instructions. -
Seite 5: Specifications
11 to 32 VDC, Modbus versions: 9 to 32 VDC † 20 to 27 VAC ‡ Dependent on version § Flammable catalytic versions: 10 to 90% RH. Operating the detector outside of this range may result drift and a ¶ decrease detector accuracy. © 2017 Honeywell Analytics... -
Seite 6: Modbus Rtu
Sensepoint XCL ﺍﻟﺛﺎﺑﺕ ﺍﻟﻐﺎﺯﺍﺕ ﻛﺎﺷﻑ ﺍﻟﺳﺭﻳﻊ ﺍﻟﺑﺩء ﺩﻟﻳﻝ ﻳﻣﻛﻥ ﺗﻧﺯﻳﻝ ﻫﺫﻩ ﺍﻹﺭﺷﺎﺩﺍﺕ ﻣﻥ ﻣﻭﻗﻊ ﺃﻭ ﺻﻳﺎﻧﺗﻪ ﻭﻓﻬﻣﻬﺎ ﻗﺑﻝ ﺗﺭﻛﻳﺏ ﻫﺫﺍ ﺍﻟﻣﻧﺗﺞ ﺃﻭ ﺗﺷﻐﻳﻠﻪ Sensepoint XCL ﺍﺣﺭﺹ ﻋﻠﻰ ﻗﺭﺍءﺓ ﺇﺭﺷﺎﺩﺍﺕ ﺗﺷﻐﻳﻝ www.honeywellanalytics.com. ﺗﻔﺿﻝ ﺑﺯﻳﺎﺭﺓ Honeywell Analytics. ﺍﻟﺳﻼﻣﺔ ﻳﺟﺏ ﺃﻥ ﻳﻛﻭﻥ ﺍﻟﺗﺭﻛﻳﺏ ﻭﻓ ﻘ ً ﺎ ﻟﻠﻣﻌﺎﻳﻳﺭ ﺍﻟﺳﺎﺋﺩﺓ ﻟﺩﻯ ﺍﻟﺳﻠﻁﺔ ﺍﻟﻣﻼﺋﻣﺔ ﻓﻲ ﺍﻟﺩﻭﻟﺔ ﻭﺍﻟﻣﻧﻁﻘﺔ... - Seite 7 ﺗﻭﺻﻳﻼﺕ ﺍﻟﻛﺎﺑﻼﺕ ﺃﻭ ﺍﻟﺗﺟﻬﻳﺯﺍﺕ ﺍﻷﻧﺑﻭﺑﻳﺔ ﺑﻣﺩﺍﺧﻝ ﺍﻟﻛﺎﺑﻼﺕ ﺍﻟﻣﻔﺗﻭﺣﺔ ﻣﺿﻣﻧﺔ ﺛ ﺑ ﱢﺕ ﺍﻟﻣﻭﺻﻼﺕ ﺍﻟﻁﺭﻓﻳﺔ ﻟﻠﻛﺎﺑﻼﺕ ﻓﻲ ﺍﻟﻣﻭﺻﻝ ﺍﻟﻁﺭﻓﻲ ﻟﻠﻛﺎﺑﻝ ﻗﻡ ﺑﺈﺩﺧﺎﻝ ﺍﻟﻛﺎﺑﻝ ﻗﻡ ﺑﺈﺯﺍﻟﺔ ﻣﺟﻣﻭﻋﺎﺕ ﺃﻁﺭﺍﻑ ﺍﻟﺗﻭﺻﻳﻝ ﻭﺍﺳﺣﺑﻬﺎ ﻧﺣﻭ ﻣﺭﻛﺯ ﺍﻟﻭﺣﺩﺓ ﺍﻗﻠﺏ ﻭﺣﺩﺓ ﺍﻟﻛﺎﺷﻑ ﻭﺣﺩﺩ ﻣﻭﺿﻊ ﻣﺟﻣﻭﻋﺎﺕ ﺃﻁﺭﺍﻑ ﺍﻟﺗﻭﺻﻳﻝ ﺑﺎﻟﺧﻠﻑ ﺍﺳﺗﻧﺎ...
- Seite 8 ﺿﻊ ﻭﺣﺩﺓ ﺍﻟﻛﺎﺷﻑ ﻓﻲ ﻋﻠﺑﺔ ﺍﻟﺗﻭﺻﻳﻼﺕ ﺍﻟﻛﻬﺭﺑﺎﺋﻳﺔ ﻣﻊ ﺍﻟﺗﺄﻛﺩ ﻣﻥ ﻭﺟﻭﺩ ﻣﺅﺷﺭ ﺍﻟﺣﺎﻟﺔ ﻓﻲ ﺍﻟﺯﺍﻭﻳﺔ ﺍﻟﻌﻠﻳﺎ ﺍﻟﻳﺳﺭﻯ ﻋﻧﺩ ﺭﺅﻳﺗﻪ ﻣﻥ ﺍﻷﻣﺎﻡ " ﻓﻳﻠﻳﺑﺱ " ﺑﺩﻻ ﻣﻥ " ﻣﺻﻠﺏ " ﺑﺭﺍﻏﻲ ﺍﻟﺗﺛﺑﻳﺕ ﺍﻷﺭﺑﻌﺔ ﺑﺎﺳﺗﺧﺩﺍﻡ ﻣﻔﻙ ﺑﺭﺍﻏﻲ ﻫﻧﺎ ﻳﻣﻛﻥ ﺍﺳﺗﺧﺩﺍﻡ ﻛﻠﻣﺔ ﻣﻔﻙ ﺃﺣﻛﻡ...
- Seite 9 ﻓﻭﻟﺕ ﺗﻳﺎﺭ ﻣﺗﺭﺩﺩ ﺇﻟﻰ § ﺍﺳﺗﻧﺎ ﺩ ً ﺍ ﺇﻟﻰ ﺍﻹﺻﺩﺍﺭ ¶ ﻗﺩ ﻳﺅﺩﻱ ﺗﺷﻐﻳﻝ ﺍﻟﻛﺎﺷﻑ ﺧﺎﺭﺝ ﻫﺫﺍ ﺍﻟﻧﻁﺎﻕ ﺇﻟﻰ ﺍﻻﻧﺣﺭﺍﻑ ﺃﻭ ﺍﻧﺧﻔﺎﺽ ﺩﻗﺔ ﻭ ﺭﻁﻭﺑﺔ ﻧﺳﺑﻳﺔ ﺗﺗﺭﺍﻭﺡ ﺑﻳﻥ ﻟﻠﻐﺎﺯﺍﺕ ﺍﻟﻘﺎﺑﻠﺔ ﻟﻼﺷﺗﻌﺎﻝ Catalytic ﺇﺻﺩﺍﺭﺍﺕ ﺍﻟﻣﺳﺗﺷﻌﺭ ﻣﻥ ﻧﻭﻉ ﺍﻟﻛﺎﺷﻑ © 2017 Honeywell Analytics...
- Seite 10 Sensepoint XCL 固定气体探测器 快速启动指南 在安装、操作或维修此产品之前,请先阅读并透彻理解 Sensepoint XCL 操作说明。可从 Honeywell Analytics 网站下载这些操 作说明。请访问 www.honeywellanalytics.com。 安全性 安装必须遵循相关国家和地区的相应机构所颁布的公认标准。 模拟 (mA) 输出版本 +24 V DC 或 24 V AC 2) 0 V 或 24 V AC 4 至 20 mA 4) 公共 Modbus RTU 输出版本...
- Seite 11 电缆连接 1. 将合适的电缆压盖(包括)或导管配件安装到打开的电缆入口上。 2. 将电缆穿过电缆压盖。 3. 将探测器模块翻转,找到背面的接线端子。拆下接线端子,朝模块中心方向拉动接线端子。 4. 将电缆连接至合适的接线端子,参见 2 至 4 节(取决于版本)。将每根电线末端的皮剥掉, 并将其插入相应的端孔,然后使用平口螺丝刀拧紧端接螺钉,直至电线已固定。 5. 将接线端子连接到正确位置。 接地 有效接地对于确保稳定的 Modbus 通信和限制无线射频干扰至关重要。后箱体内提供了接地点。为了防止由于接地环路引起的 错误读数或警报,确保所有电缆的屏蔽线均已在单点接地,最好是在控制器接地。此外,还应该考虑导管、压盖和内部接地板的 接地方式。 注意 任何接地模式都必须避免接地环路。 将探测器模块固定在后箱体上 1. 将前盖从探测器模块上取下,露出固定螺钉,步骤如下: a) 拉下底部的垂悬平片以将其打开。 b) 如需打开前盖,将一个薄且笔直的工具(例如:小螺丝刀)插入位于管龙头右侧的孔中。 c) 对工具轻微施力的同时,逆时针转动前盖直至其停止,然后将其提起。...
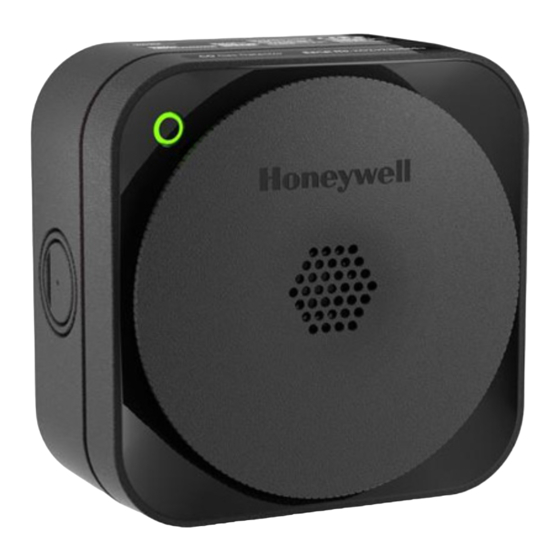
- Seite 12 2. 将探测器模块置于后箱体上,确保状态指示器位于左上角(从正面看时)。 3. 使用 2 号十字螺丝刀拧紧四个固定螺钉。 4. 拧紧电缆压盖的密封螺母(如果使用),以固定电缆。请参阅电缆压盖制造商的说明。 5. 将前盖插入探测器模块,并顺时针旋转直至其锁定到位。 远程送气连接 如果气体探测器安装在难以接近的位置,例如:天花板上,则将一根气管连接至气体探测器,以进行功能测试。 • 如需进行临时连接,打开底部的垂悬平片,将与传感器气体类型兼容的相应 管道连接至气管接头。 • 如需进行永久连接,拆下垂悬平片,将管接头(单独获取)连接至管龙头, 然后再将管道连接至管接头。使用束线带或小型联接螺旋夹固定管道,注意 不要绑得太紧。 10 状态指示器 探测器的正面有一个外部视觉状态指示器。 正常:当目标气体的浓度在正常范围之内,指示器亮 绿灯 。正常指示状态还可设置为 提示性闪烁 或 关闭 。 红灯 警报:当气体浓度超过警报等级阈值时, 快速闪烁。 黄灯 故障:当气体探测器发生故障, 快速闪烁。 蓝牙配对:当气体探测器正在与智能手机进行 Bluetooth® 配对时, 蓝灯 闪烁。 蓝牙连接:当蓝牙连接已经建立时,蓝灯持续亮起。...
- Seite 13 M25 或 ¾ NPT 外部预留进线孔 气体测试管 4 或 6 mm 内径 6 或 8 mm 外径 mA 版本:11 至 32 VDC,Modbus 版本:9 至 32 VDC † 20 至 27 VAC ‡ § 取决于版本 可燃气体催化型版本:10 至 90% 相对湿度。在该范围之外操作探测器可能会导致偏离,并降低探测器精确度。 ¶ © 2017 Honeywell Analytics...
-
Seite 14: Sicherheitshinweise
Sensepoint XCL Stationärer Gasdetektor Kurzanleitung Lesen und verstehen Sie die Sensepoint XCL-Betriebsanleitung vor der Installation, dem Betrieb oder der Wartung dieses Produkts. Diese stehen auf der Webseite von Honeywell Analytics zum Download bereit. Besuchen Sie www.honeywellanalytics.com. Sicherheitshinweise Die Installation muss unter Einhaltung der anerkannten Standards der entsprechenden Behörde im betreffenden Land und Ort erfolgen. -
Seite 15: Kabelverbindungen
Kabelverbindungen 1. In die geöffneten Kabelzugänge geeignete Kabelzuführungen (im Lieferumfang enthalten) oder Kabelkanalbefestigungen einpassen. 2. Das Kabel durch die Einführung führen. 3. Das Detektormodul umdrehen und die Klemmenblöcke auf der Rückseite suchen. Die Klemmenblöcke durch Ziehen in Richtung der Mitte des Moduls entfernen. 4. -
Seite 16: Ferngasverbindung
2. Das Detektormodul auf der Back-Box platzieren und dabei darauf achten, dass sich die Statusanzeige von vorne gesehen in der linken oberen Ecke befindet. 3. Die vier Halteschrauben mit einem Kreuzschlitzschraubendreher der Größe 2 anziehen, um das Modul zu befestigen. 4. -
Seite 17: Technische Daten
11 bis 32 VDC, Modbus-Versionen: 9 bis 32 VDC † 20 bis 27 VAC ‡ Von Version abhängig § Brennbare Wärmetönungsversionen: 10 bis 90 % relative Luftfeuchtigkeit. Der Betrieb des Detektors außerhalb dieses ¶ Bereichs kann zu Abweichungen und einer geringeren Detektorgenauigkeit führen. © 2017 Honeywell Analytics... - Seite 18 Detector de gas fijo Guía rápida Lea y comprenda totalmente las instrucciones de uso de la unidad Sensepoint XCL antes de instalar, usar o reparar el producto. Estos archivos se pueden descargar en el sitio web de Honeywell Analytics. Visite www.honeywellanalytics.com.
-
Seite 19: Conexiones De Cables
Conexiones de cables 1. Coloque pasacables (incluidos) o conductos apropiados en las entradas abiertas para cables. 2. Alimente al cable a través del pasacables. 3. Gire el módulo del detector y localice los bloques de terminales en la parte trasera. Extraiga los bloques de terminales tirando de ellos hacia el centro del módulo. -
Seite 20: Indicador De Estado
2. Coloque el módulo detector en la caja trasera asegurándose de que el indicador de estado esté en la esquina superior izquierda si se mira desde la parte delantera. 3. Apriete los cuatro tornillos de retención con un destornillador Phillips número 2 para que quede firme. -
Seite 21: Especificaciones
20 a 27 V CA ‡ Según la versión § Versiones catalíticas inflamables: humedad relativa de 10 a 90%. Utilizar el detector fuera de este rango puede ¶ aumentar la desviación y reducir los niveles de precisión. © 2017 Honeywell Analytics... - Seite 22 Détecteur de gaz fixe Guide de démarrage rapide Veuillez lire et comprendre les instructions d'utilisation du détecteur de gaz Sensepoint XCL avant de procéder à son installation, son utilisation ou son entretien. Ces instructions peuvent être téléchargées à partir du site Web de Honeywell Analytics.
-
Seite 23: Branchement Des Câbles
Branchement des câbles 1. Placez des presse-étoupe appropriés (inclus) ou raccords de conduit sur les entrées de câble ouvertes. 2. Faites passer le câble à travers le presse-étoupe. 3. Retournez le module du détecteur et repérez les plaques à bornes à l'arrière. Retirez les plaques à... - Seite 24 2. Placez le module du détecteur sur le boîtier arrière en vous assurant que l'indicateur de statut se trouve en haut à gauche vu de face. 3. Serrez les quatre vis de fixation en utilisant un tournevis cruciforme n° 2. 4.
- Seite 25 ‡ Selon les versions § Versions catalytiques inflammables : HR de 10 à 90 %. L'utilisation du détecteur en dehors de cette plage peut ¶ entraîner des déviations et une diminution de la précision du détection. © 2017 Honeywell Analytics...
- Seite 26 Sensepoint XCL Détecteur de gaz fixe Guide de démarrage rapide Lire et comprendre les consignes d’utilisation de Sensepoint XCL avant d’installer, d’utiliser ou d’entretenir ce produit. Elles peuvent être téléchargées à partir du site Web de Honeywell Analytics. Consulter www.honeywellanalytics.com. Sécurité...
- Seite 27 Raccordements de câbles 1. Monter les manchons de raccordement appropriés (inclus) ou les raccords de conduits aux entrées de câble ouvertes. 2. Introduire le câble dans le manchon de raccordement de câble. 3. Retourner le module de détection et localiser les borniers à l’arrière. Retirer les borniers, en les tirant vers le centre du module.
- Seite 28 2. Placer le module de détection sur le boîtier arrière en vous assurant que l’ indicateur de statut est dans le coin supérieur gauche lorsque vu de face. 3. Serrer les quatre vis de fixation à l’aide d’un tournevis Philips n° 2 pour les fixer. 4.
-
Seite 29: Spécifications
‡ Selon la version § Versions catalytiques inflammables : HR de 10 à 90 % L’utilisation du détecteur en dehors de cette plage peut entraîner ¶ une dérive et une réduction de la précision du détecteur. © 2017 Honeywell Analytics... -
Seite 30: Uscita Relè
Rilevatore fisso di gas Guida rapida Leggere attentamente le istruzioni per l'uso di Sensepoint XCL prima di installare o utilizzare il prodotto o effettuare operazioni di manutenzione. Sono disponibili e possono essere scaricate dal sito web Honeywell Analytics. Visitare il sito www.honeywellanalytics.com. -
Seite 31: Collegamenti Dei Cavi
Collegamenti dei cavi 1. Installare pressacavo (inclusi) o dispositivi di fissaggio per condotti adeguati nelle entrate dei cavi aperte. 2. Inserire il cavo nel pressacavo. 3. Capovolgere il modulo rilevatore e individuare le morsettiere sul retro. Rimuovere le morsettiere tirandole verso il centro del modulo. 4. -
Seite 32: Indicatore Di Stato
2. Posizionare il modulo rilevatore nella cassetta posteriore verificando che l'indicatore di stato si trovi nell'angolo superiore sinistro guardandolo dalla parte anteriore. 3. Serrare le quattro viti di fissaggio utilizzando un cacciavite Phillips n. 2. 4. Se utilizzato, serrare il dado di tenuta del pressacavo per fissare il cavo. Consultare le istruzioni del costruttore del pressacavo. - Seite 33 Da 20 a 27 Vca ‡ Secondo la versione § Versioni catalitici infiammabili: da 10 a 90% di umidità relativa. L'utilizzo del rilevatore fuori da tale intervallo può ¶ generare deriva e una minore precisione del rilevatore. © 2017 Honeywell Analytics...
- Seite 34 Sensepoint XCL Vaste gasdetector Beknopte handleiding Lees de Sensepoint XCL-gebruiksinstructies goed door voordat u dit product installeert, gebruikt of onderhoudt. U kunt deze instructies downloaden op de website van Honeywell Analytics. Ga naar www.honeywellanalytics.com. Veiligheid De installatie moet gebeuren conform de geldende normen van de bevoegde instantie in het betreffende land en plaats.
-
Seite 35: Kabelverbindingen
Kabelverbindingen 1. Gebruik geschikte kabelwartels (inbegrepen) of buisfittingen voor de geopende kabelingangen. 2. Leid de kabel door de kabelwartel. 3. Draai de detectormodule om en zoek de aansluitblokken op de achterzijde. Verwijder de aansluitblokken, terwijl u ze naar het midden van de module trekt. 4. - Seite 36 2. Plaats de detectormodule op de backbox en zorg dat de statusindicator zich in de linkerbovenhoek bevindt als u deze van de voorzijde bekijkt. 3. Haal de vier bevestigingsschroeven vast met behulp van een nr. 2 kruiskopschroevendraaier. 4. Indien van toepassing, draai de afdichtmoer van de kabelwartel aan om de kabel te vast te zetten. Raadpleeg de instructies van de fabrikant van de kabelwartel.
- Seite 37 † 20 tot 27 VAC ‡ Afhankelijk van versie § Brandbare katalytische versies: 10% tot 90% relatieve luchtvochtigheid. Het bedienen van de detector buiten dit bereik ¶ kan leiden tot een verhoogde afdrijving en verlaagde detectienauwkeurigheid. © 2017 Honeywell Analytics...
- Seite 38 Detetor de Gás Fixo Guia de iniciação rápida Leia e compreenda as Instruções de funcionamento do Sensepoint XCL antes d e instalar, operar ou efetuar a manutenção deste produto. Pode transferir estas instruções no Web site da Honeywell Analytics. Aceda a www.honeywellanalytics.com.
- Seite 39 Ligações dos cabos 1. Encaixe os bucins dos cabos (incluídos) ou as válvulas de condutas adequados nas entradas de cabos abertas. 2. Passe o cabo através do bucim do cabo. 3. Vire o módulo de detetor e localize os blocos de terminais na parte posterior. Remova os blocos de terminais, puxando-os em direção ao centro do módulo.
- Seite 40 2. Posicione o módulo de detetor na caixa posterior, certificando-se de que o indicador de estado se encontra no canto superior esquerdo quando visualizado de frente. 3. Aperte os quatro parafusos de fixação através de uma chave de parafusos Philips n.º 2 para aparafusar.
- Seite 41 † 20 a 27 V CA ‡ Dependendo da versão § Versões catalíticas inflamáveis: 10 a 90% HR. Operar o detetor fora destes valores pode resultar num desvio e numa ¶ redução da exatidão do detetor. © 2017 Honeywell Analytics...
-
Seite 42: Краткое Руководство
Sensepoint XCL Стационарные датчики газа Краткое руководство Внимательно ознакомьтесь с инструкцией по эксплуатации Sensepoint XCL перед установкой, эксплуатацией и техническим обслуживанием изделия. Инструкцию можно скачать на веб-сайте компании Honeywell Analytics. Посетите www.honeywellanalytics.com. Безопасность Установка должна осуществляться согласно действующим стандартам соответствующего полномочного органа... - Seite 43 Кабельные соединения 1. В образовавшиеся отверстия установите подходящиеся кабельные вводы (прилагаются) или фитинги кабелепровода. 2. Проведите кабель через кабельный ввод. 3. Переверните модуль датчика для доступа к клеммным колодкам на внутренней стороне Снимите клеммные колодки, смещая их к центру модуля. 4.
-
Seite 44: Индикатор Состояния
Соедините модуль датчика с задней крышкой так, чтобы индикатор состояния находился в верхнем левом углу, если смотреть спереди. Затяните четыре крепежных винта с помощью крестообразной отвертки №2. Затяните уплотнительную гайку кабельного ввода (при наличии), чтобы закрепить кабель См. инструкции производителя кабельного ввода. Установите... - Seite 45 20–27 В перем. тока ‡ § В зависимости от версии ¶ Версии с каталитическими датчиками горючих газов: 10–90 % отн. влажности. Эксплуатация датчика за пределами данного диапазона может привести к увеличению дрейфа или снижению точности датчика. © Honeywell Analytics, 2017...
- Seite 46 Tel: +82 (0)2 6909 0300 Fax: +82 (0)2 2025 0388 India Tel: +91 124 4752700 China Tel: +86 10 5885 8788 3000 analytics.ap@honeywe ll.com www.honeywell.com Sensepoint XCL_QSG_V1_11/1 Copyright © 2016 Honeywell Analytics Co., Ltd. All rights reserved. 3017M5000_1 HAA170019...