Kenwood KMM-BT356 Bedienungsanleitung
Vorschau ausblenden
Andere Handbücher für KMM-BT356:
- Schnellstartanleitung (61 Seiten) ,
- Schnellstartanleitung (77 Seiten)
Inhaltsverzeichnis
Werbung
Verfügbare Sprachen
Verfügbare Sprachen
Werbung
Kapitel
Inhaltsverzeichnis
Fehlerbehebung

Verwandte Anleitungen für Kenwood KMM-BT356


Inhaltszusammenfassung für Kenwood KMM-BT356
- Seite 1 KMM-BT356 KMM-BT306 KMM-BT206 DIGITAL MEDIA RECEIVER INSTRUCTION MANUAL RÉCEPTEUR MULTIMÉDIA NUMÉRIQUE MODE D’EMPLOI DIGITAL-MEDIA-RECEIVER BEDIENUNGSANLEITUNG DIGITALE MEDIAONTVANGER GEBRUIKSAANWIJZING © 2019 JVCKENWOOD Corporation B5A-3145-10a (EN)
- Seite 2 Informatie over het weggooien van elektrische en elektronische apparatuur en batterijen (particulieren) Dit symbool geeft aan dat gebruikte elektrische, elektronische producten en batterijen niet bij het normale huishoudelijke afval mogen. Lever deze producten in bij de aangewezen inzamelingspunten, waar ze gratis worden geaccepteerd en op de juiste manier worden verwerkt, teruggewonnen en hergebruikt.
- Seite 3 Conformiteitsverklaring met betrekking tot de RE-richtlijn van de Europese Unie (2014/53/EU) Conformiteitsverklaring met betrekking tot de RoHS richtlijn van de Europese Unie (2011/65/EU) Fabrikant: Declaration of Conformity with regard to the RE Directive 2014/53/EU JVCKENWOOD Corporation Declaration of Conformity with regard to the RoHS Directive 2011/65/EU 3-12, Moriya-cho, Kanagawa-ku, Yokohama-shi, Kanagawa, 221-0022, JAPAN EU-vertegenwoordiger: Manufacturer:...
- Seite 4 Společnost JVCKENWOOD tímto prohlašuje, že S tem JVCKENWOOD izjavlja, da je radijska oprema equipment “KMM-BT356/KMM-BT306/ l΄apparecchio radio “KMM-BT356/KMM-BT306/ rádiové zařízení “KMM-BT356/KMM-BT306/ » KMM-BT356/KMM-BT306/KMM-BT206 « v KMM-BT206” is in compliance with Directive KMM-BT206” è conforme alla Direttiva KMM-BT206” splňuje podmínky směrnice skladu z Direktivo 2014/53/EU.
- Seite 5 HRVATSKI / SRPSKI JEZIK Software. доступен по следующему адресу в сети Интернет: JVCKENWOOD ovim izjavljuje da je radio oprema http://www.kenwood.com/cs/ce/eudoc/ “KMM-BT356/KMM-BT306/KMM-BT206” u skladu s Article 3 Conditions for Grant of License Direktivom 2014/53/EU. Українська 1. When the User transfers the Product, it may also transfer the license to use the Licensed Software Cjeloviti tekst deklaracije Europske unije o Таким...
- Seite 6 Article 4 Right pertaining to the Licensed Software Article 9 Destruction of the Licensed Software Any and all copyrights and other rights pertaining to the Licensed Software and related documents If this Agreement is terminated pursuant to the provision of Article 8, the User shall destroy the Licensed shall belong to the Licensor or the original holder of the right who granted to the Licensor the license or Software, any related documents and copies thereof within two (2) weeks from such date of termination.
- Seite 7 Important Notice concerning the Software -CMP The MIT License (MIT) Copyright (c) 2014 Charles Gunyon -jansson Permission is hereby granted, free of charge, to any person obtaining a copy of this software and associated Copyright (c) 2009-2012 Petri Lehtinen <petri@digip.org> documentation files (the "Software"), to deal in the Software without restriction, including without Permission is hereby granted, free of charge, to any person obtaining a copy of this software and associated limitation the rights to use, copy, modify, merge, publish, distribute, sublicense, and/or sell copies of the...
- Seite 8 sha2 Copyright (c) 1995, 1996 Carnegie-Mellon University. All rights reserved. AUTHOR: Aaron D. Gifford - http://www.aarongifford.com/ Author: Chris G. Demetriou Copyright (c) 2000-2001, Aaron D. Gifford Permission to use, copy, modify and distribute this software and its documentation is hereby granted, All rights reserved.
- Seite 9 T-Kernel 2.0 Accordo2 Player This product uses the source code of T-Kernel 2.0 under T-License 2.0 granted by T-Engine Forum Apache License (www.tron.org) Licensed under the Apache License, Version 2.0, January 2004(the "License"); BSD-3-Clause You may obtain a copy of the license at Copyright (c) 2000-2001, Aaron D.
-
Seite 10: Inhaltsverzeichnis
Using Other Applications ..............14 be different from the actual displays or faceplates. • Operations are explained mainly using buttons on the faceplate of KENWOOD Remote application Tuneln Radio/Tuneln Radio Pro • English indications are used for the purpose of explanation. You can Bluetooth®... -
Seite 11: Before Use
Before Use IMPORTANT • USB rating is indicated on the main unit. To view, detach the faceplate. (Page 4) • To ensure proper use, please read through this manual before using this • Depending on the types of cars, the antenna will automatically extend product. -
Seite 12: Faceplate
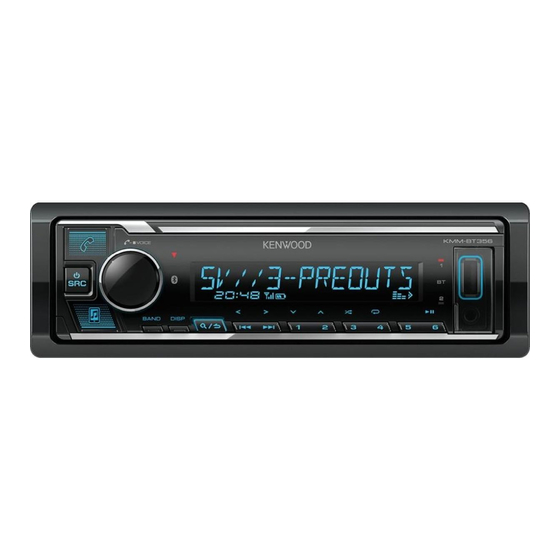
Basics Faceplate Attach Display window* Lights up when Bluetooth connection is established. (Page 16) Detach How to reset Reset the unit within 5 seconds after detaching the faceplate. Detach button Volume knob * Only for illustration purpose. On the faceplate Turn on the power Press B SRC. -
Seite 13: Basics
Getting Started Basics Remote control (RC-406) (supplied for Remote sensor (Do not expose to bright sunlight.) Pull out the insulation sheet when using for the first time. Select the display language and cancel the demonstration When you turn on the power for the first time (or [FACTORY RESET] is set to [YES], see page 7), the display shows: “SEL LANGUAGE” ... -
Seite 14: Set The Other Optional Settings
Getting Started To adjust the clock Default: [XX] Turn the volume knob to select [CLOCK ADJUST], then press the knob. [AUDIO CONTROL] Turn the volume knob to make the settings, then press the knob. [SWITCH PREOUT] (For : Applicable only if [X’OVER] is set to [2WAY].) Set the time in the order of “Hour” ... - Seite 15 • To cancel, press and hold For details on how to update the firmware, visit • To adjust the selected crossover settings, see page 24. <www.kenwood.com/cs/ce/>. [FACTORY RESET] [YES]: Resets the settings to default (except the stored station). ; CAUTION [NO]: Cancels.
-
Seite 16: Radio
Radio Other settings Press the volume knob to enter [FUNCTION]. Turn the volume knob to select an item (see the following table), then press the knob. Repeat step 2 until the desired item is selected/activated or follow the instructions stated on the selected item. Press and hold to exit. -
Seite 17: Usb/Ipod
USB/iPod Radio Connect a USB device [TI] [ON]: Allows the unit to temporarily switch to Traffic Information if available (“TI” indicator lights up) while listening to all sources except in MW/LW. ; [OFF]: Cancels. USB input terminal CA-U1EX (max.: 500 mA) [PTY SEARCH] 1 Turn the volume knob to select the available Program Type (see the (optional accessory)*1... -
Seite 18: Direct Music Search
USB/iPod Select music drive While in USB source, press 5 repeatedly. Stored songs in the following drive will be played back. • Selected internal or external memory of a smartphone (Mass Storage Class). • Selected drive of a multiple drive device. On the faceplate On the remote control You can also select the music drive from the [FUNCTION] menu. - Seite 19 USB/iPod • To cancel, press or DIRECT. Turn the volume knob to select a file, then press the knob. • Not available if Random Play is selected. Selected file starts playing. • Not applicable for iPod USB. [SKIP SEARCH] setting Press the volume knob to enter [FUNCTION].
-
Seite 20: Spotify
Spotify You can listen to Spotify on iPhone/iPod touch (via Bluetooth or via USB On the faceplate On the remote control input terminal) or Android device (via Bluetooth). Press 6 IW. Press ENT IW. Play back/pause Preparation: Press S*3 / T. Press S*3 / T (+). -
Seite 21: Aux
Spotify You can listen to music from a portable audio player via the auxiliary input Search for a song or station jack. Press Preparation: Turn the volume knob to select a list type, then press the knob. Select [ON] for [BUILT-IN AUX] in [SOURCE SELECT]. (Page 6) The list types displayed differ depending on the information sent from Spotify. -
Seite 22: Using Other Applications
Using Other Applications KENWOOD Remote application Settings to use KENWOOD Remote application You can control the KENWOOD car receiver from iPhone/iPod touch (via Press the volume knob to enter [FUNCTION]. Bluetooth or via USB input terminal) or Android device (via Bluetooth) using Turn the volume knob to select an item (see the following table), then KENWOOD Remote application. -
Seite 23: Bluetooth
Bluetooth® Using Other Applications • Depending on the Bluetooth version, operating system and the firmware [STATUS] Shows the status of the selected device. version of your mobile phone, Bluetooth features may not work with this [IOS CONNECTED]: You are able to use the application using the iPhone/ unit. -
Seite 24: Bluetooth - Mobile Phone
When you connect iPhone/iPod touch to the USB input terminal, pairing request (via Bluetooth) is automatically activated if [AUTO PAIRING] is set to Search and select the name of your receiver (“KMM-BT356”/ [ON]. (Page 19) “KMM-BT306”/“KMM-BT206”) on the Bluetooth device. - Seite 25 Bluetooth® The following operations may differ or be unavailable depending on the *1 This adjustment will not affect the volume of the other sources. connected phone. *2 Press and hold VOL to continuously increase the volume to 15. *3 Operations may vary according to the connected Bluetooth device. On the faceplate On the remote control Improve the voice quality...
-
Seite 26: Make A Call
Bluetooth® Make a call [PHONE BOOK] (Applicable only if the phone supports PBAP.) 1 Turn the volume knob quickly to enter alphabet search mode (if the You can make a call from the call history, phonebook, or dialing the number. phonebook contains many contacts). -
Seite 27: Store A Contact In Memory
Bluetooth® Make a call using voice recognition Bluetooth mode settings Press and hold to activate the voice recognition of the connected Press the volume knob to enter [FUNCTION]. phone. Turn the volume knob to select an item (see the following table), then Speak the name of the contact you want to call or the voice command press the knob. -
Seite 28: Bluetooth - Audio
Press and hold and switch between these five devices. “PLEASE PAIR YOUR PHONE PIN 0000” appears on the display. Search and select the name of your receiver (“KMM-BT356”/ Listen to the audio player via Bluetooth “KMM-BT306”/“KMM-BT206”) on the Bluetooth device. -
Seite 29: Amazon Alexa
Access the following URL or scan the QR code with your smartphone: • If you plug in an iPod/iPhone to the USB input terminal while listening to https://www.kenwood.com/car/alexa iPod BT source, the source automatically changes to iPod USB source. Press B SRC to select iPod BT source if the device is still connected via Bluetooth. -
Seite 30: Basic Operations
AMAZON ALEXA (for Tap “Add Device”. Communicate with Alexa via the connected microphone. (Page 15) Tap “Automotive Accessory” or “Headphones” from the list of device “THINKING...” appears when Alexa is processing your voice input. types. “SPEAKING...” appears while Alexa is responding to your voice input. Tap the name of your receiver (“KMM-BT306”/“KMM-BT206”) and “ALEXA”... -
Seite 31: Audio Settings
Audio Settings [MANUAL EQ] Adjusts your own sound settings for each source. • The settings are stored to [USER] in [PRESET EQ]. • The settings made may affect the current settings of [EASY EQ]. [62.5HZ] [LEVEL] [LEVEL –9] to [LEVEL +9] ([LEVEL 0]): Adjusts the level to memorize for each source. -
Seite 32: Crossover Settings
Audio Settings Crossover settings [BALANCE] [L15] to [R15] ([0]): Adjusts the left and right speaker output balance. Below are the available setting items for 2-way crossover and 3-way [VOLUME OFFSET] [–15] to [+6] ([0]): Presets the initial volume level of each source by crossover. - Seite 33 Audio Settings 2-way crossover setting items [SUBWOOFER [SW LPF FRQ] [30HZ]/[40HZ]/[50HZ]/[60HZ]/[70HZ]/[80HZ]/ LPF]*1*2 [90HZ]/[100HZ]/[120HZ]/[150HZ]/[180HZ]/ [SPEAKER SIZE] [220HZ]/[250HZ]/[THROUGH] [FRONT] [SIZE] [8CM]/[10CM]/[12CM]/[13CM]/[16CM]/[17CM]/ [SW LPF SLOPE] [–6DB]/[–12DB]/[–18DB]/[–24DB] [18CM]/[4×6]/[5×7]/[6×8]/[6×9]/[7×10] [SW LPF PHASE] [REVERSE] (180°)/[NORMAL] (0°) [TWEETER] [SMALL]/[MIDDLE]/[LARGE]/[NONE] [SW LPF GAIN] [–8] to [0] (not connected) [REAR] [8CM]/[10CM]/[12CM]/[13CM]/[16CM]/[17CM]/[18CM]/[4×6]/ 3-way crossover setting items...
- Seite 34 Audio Settings [MID RANGE] [HPF FRQ] [30HZ]/[40HZ]/[50HZ]/[60HZ]/[70HZ]/[80HZ]/[90HZ]/ [DTA SETTINGS] [100HZ]/[120HZ]/[150HZ]/[180HZ]/[220HZ]/[250HZ]/ [POSITION] Selects your listening position (reference point). [THROUGH] [ALL]: Not compensating ; [FRONT RIGHT]: Front right seat ; [HPF SLOPE] [–6DB]/[–12DB] [FRONT LEFT]: Front left seat ; [FRONT ALL]: Front seats •...
-
Seite 35: Display Settings
Display Settings Audio Settings When 3-way crossover is selected: Zone identification for color settings and brightness settings [TWEETER LEFT]/[TWEETER RIGHT]/[MID LEFT]/[MID RIGHT]/[WOOFER] – You can only select [WOOFER] if a setting other than [NONE] is selected for [WOOFER] of [SPEAKER SIZE]. (Page 25) •... - Seite 36 Display Settings Change the display settings [BRIGHTNESS] Sets the brightness for day and night separately. 1 [DAY]/[NIGHT]: Select day or night. Press the volume knob to enter [FUNCTION]. 2 Select a zone. (See the illustration on page 27.) Turn the volume knob to select an item (see the following table), then 3 [LVL00] to [LVL31]: Set the brightness level.
-
Seite 37: Installation/Connection
Installation/Connection Part list for installation This section is for the professional installer. For safety’s sake, leave wiring and mounting to professionals. Consult the (A) Faceplate (×1) (B) Trim plate (×1) car audio dealer. WARNING • The unit can only be used with a 12 V DC power supply, negative ground. •... -
Seite 38: Installing The Unit (In-Dash Mounting)
Installation/Connection Installing the unit (in-dash mounting) Removing the unit Detach the faceplate. Remove the trim plate. Insert the extraction keys deeply into the slots on each side, then follow the arrows as shown on the illustration. Do the required wiring. (Page 31) Hook on the top side Orientate the trim... -
Seite 39: Wiring Connection
Yellow (A4) : Ignition (ACC) Black : Earth (ground) connection Purple ] : Rear speaker (right) Brown To connect the Kenwood navigation For 3-way crossover: Tweeter (right) Purple/black [ system, refer your navigation manual (Mute control wire) MUTE Gray ]... -
Seite 40: References
More information Output terminals (See the following “Connect external amplifiers via output terminals”.) For: – Latest firmware updates and latest compatible item list – KENWOOD original application – Any other latest information Visit <www.kenwood.com/cs/ce/>. Connect external amplifiers via output terminals... -
Seite 41: Change The Display Information
• The song order displayed on the selection menu of this unit may differ from that of the iPod/ iPhone. • You cannot operate iPod if “KENWOOD” or “ ” is displayed on iPod. Main display • Depending on the version of the operating system of the iPod/iPhone, some functions may not operate on this unit. -
Seite 42: Troubleshooting
Troubleshooting References (For Symptom Remedy Each time you press DISP, the display information changes. Sound cannot be heard. • Adjust the volume to the optimum level. • If the information is unavailable or not recorded, “NO TEXT”, “NO INFO”, or other information •... - Seite 43 Troubleshooting Symptom Remedy Symptom Remedy “UNSUPPORTED DEVICE” • Check whether the connected USB device is compatible “iPod ERROR” • Reconnect the iPod. appears. with this unit and ensure the file systems are in • Reset the iPod. supported formats. (Page 32) “MEMORY FULL”...
- Seite 44 Troubleshooting Symptom Remedy Symptom Remedy Voice calling method is not • Use voice calling method in a more quiet environment. No response from Alexa after Amazon cloud was unable to analyze the voice input. successful. • Reduce the distance from the microphone when you the voice input.
-
Seite 45: Specifications
Specifications Frequency Range 87.5 MHz — 108.0 MHz (50 kHz step) Frequency Response (±3 dB) 20 Hz — 20 kHz Usable Sensitivity 0.71 μV/75 Ω Input Maximum Voltage 1 000 mV (S/N = 30 dB) Input Impedance 30 kΩ Quieting Sensitivity 2.0 μV/75 Ω... - Seite 46 Specifications Tone Action Band 1: 62.5 Hz ±9 dB Band 2: 100 Hz ±9 dB Band 3: 160 Hz ±9 dB Band 4: 250 Hz ±9 dB Band 5: 400 Hz ±9 dB Band 6: 630 Hz ±9 dB Band 7: 1 kHz ±9 dB Band 8: 1.6 kHz ±9 dB Band 9: 2.5 kHz ±9 dB Band 10: 4 kHz ±9 dB...
- Seite 48 • Les opérations sont expliquées principalement en utilisant les touches de la Application KENWOOD Remote façade du • Les indications en anglais sont utilisées dans un but explicatif. Vous pouvez...
-
Seite 49: Avant L'utilisation
Avant l’utilisation IMPORTANTES • La classe USB est indiquée sur l’appareil principal. Pour le voir, détachez la façade. (Page 4) • Pour utiliser correctement l’appareil, veuillez ce manuel complément avant • En fonction du type de voiture, l’antenne s’étendra automatiquement quand de l’utiliser. -
Seite 50: Fonctionnement De Base
Fonctionnement de base Façade Attachez Fenêtre d’affichage* S’allume quand la connexion Bluetooth est établie. (Page 16) Détachez Comment réinitialiser Réinitialisez l’appareil en moins de 5 secondes après avoir détaché la façade. Touche de Bouton de volume détachement * Uniquement à des fins d’illustration. Pour Sur la façade Mettez l’appareil sous tension... -
Seite 51: Prise En Main
Prise en main Fonctionnement de base Télécommande (RC-406) (fourni pour Capteur de télécommande (Ne l’exposez Pas à la lumière directe du soleil.) Retirez la feuille d’isolant lors de la Sélectionne la langue d’affichage et annule la première utilisation. démonstration Quand vous mettez l’appareil sous tension pour la première fois (ou que : Les fonctions de la télécommande ne sont pas [FACTORY RESET] est réglé... -
Seite 52: Réglage Des Autres Réglages Optionnels
Prise en main Pour ajuster l’horloge [XX] Défaut: Tournez le bouton de volume pour choisir [CLOCK ADJUST] , puis appuyez sur [AUDIO CONTROL] le bouton. Tournez le bouton de volume pour faire les réglages, puis appuyez sur le [SWITCH PREOUT] [X’OVER] (Pour : Applicable uniquement si est réglé... - Seite 53 Le type de transition sélectionnée apparaît. à niveau n’est pas activée). Pour en savoir plus sur la mise à niveau du micrologiciel, consultez • Pour annuler, maintenez enfoncée <www.kenwood.com/cs/ce/>. • Pour ajuster les réglages de la transition sélectionnée, voir page 24. [FACTORY RESET] [YES] : Réinitialise les réglages aux valeurs par défaut (sauf la station...
-
Seite 54: Radio
Radio Autres paramètres Appuyez sur le bouton de volume pour entrer [FUNCTION] Tournez le bouton de volume pour sélectionner un élément (voir le tableau suivant), puis appuyez sur le bouton. Répétez l’étape 2 jusqu’à ce que l’élément souhaité soit sélectionné/activé ou suivez les instructions données pour l’élément sélectionné. -
Seite 55: Usb/Ipod
USB/iPod Radio Connectez un périphérique USB [TI] [ON] : Permet à l’appareil de commuter temporairement sur les informations routières si elles sont disponibles (L’indicateur “TI” s’allume) pendant l’écoute de [OFF] n’importe quelle source sauf MW/LW. ; : Annulation. Prise d’entrée USB CA-U1EX (max.: 500 mA) [PTY SEARCH] Tournez le bouton de volume pour sélectionner le type de programme (accessoire en option)*1... - Seite 56 USB/iPod Sélectionnez le lecteur de musique Quand la source est USB, appuyez répétitivement sur 5. Les morceaux mémorisés dans le lecture suivant seront lus. • Mémoire sélectionnée interne ou externe d’un smartphone (Mass Storage Class). • Lecteur sélectionné parmi plusieurs lecteurs. Vous pouvez aussi choisir le lecture de musique à...
-
Seite 57: Recherche Rapide
USB/iPod • Pour annuler, appuyez sur ou DIRECT. Tournez le bouton de volume pour choisir un fichier, puis appuyez sur le • Non disponible si la lecture aléatoire est sélectionné. bouton. • Ne peut pas être utilisé pour iPod USB. La lecture du fichier sélectionné... -
Seite 58: Spotify
Spotify Vous pouvez écouter Spotify à partir d’un iPhone/iPod touch (via Bluetooth ou via Pour Sur la façade Sur la télécommande la prise d’entrée USB) ou périphérique Android (via Bluetooth) Lecture/pause Appuyez sur 6 Appuyez sur ENT Préparation: Sauter une plage Appuyez sur Appuyez sur •... -
Seite 59: Aux
Spotify Vous pouvez écouter de la musique à partir d’un lecteur audio portable via la prise Recherche d’un morceau ou d’une station d’entrée auxiliaire. Appuyez sur Préparation: Tournez le bouton de volume pour choisir un type de liste, puis appuyez Sélectionnez [ON] pour... -
Seite 60: Utilisation D'autres Applications
Utilisation d’autres applications Application KENWOOD Remote Réglages pour utiliser l’application KENWOOD Remote Vous pouvez commander l’autoradio KENWOOD à partir d’un iPhone/iPod touch Appuyez sur le bouton de volume pour entrer [FUNCTION] (via Bluetooth ou via la prise d’entrée USB) ou d’un périphérique Android (via Tournez le bouton de volume pour sélectionner un élément (voir le tableau... -
Seite 61: Bluetooth
Bluetooth® Utilisation d’autres applications • En fonction de la version Bluetooth, du système d’exploitation et de la version [STATUS] Montre l’état du périphérique sélectionné. [IOS CONNECTED] du micrologiciel de votre téléphone portable, la fonction Bluetooth peut ne : Vous pouvez utiliser l’application à l’aide de l’iPhone/iPod pas fonctionner avec cet appareil. -
Seite 62: Bluetooth - Téléphone Portable
SRC pour mettre l’appareil sous tension. [ON] . (Page 19) Recherchez et sélectionnez le nom de votre récepteur (“KMM-BT356”/ “KMM-BT306”/“KMM-BT206”) sur le périphérique Bluetooth. Appuyez sur le bouton de volume pour faire le pairage une fois que vous avez “PAIRING”... - Seite 63 Bluetooth® Les opérations suivantes peuvent différer ou peuvent ne pas être disponibles en *1 Cet ajustement n’affecte pas le volume des autres sources. fonction du téléphone connecté. *2 Maintenez VOL enfoncé de façon continue pour augmenter le volume sur 15. *3 Les opérations peuvent différer en fonction du périphérique Bluetooth connecté.
-
Seite 64: Faire Un Appel
Bluetooth® Faire un appel [PHONE BOOK] (Applicable uniquement quand le téléphone prend en charge PBAP.) Tournez le bouton de volume rapidement pour entrer en mode de recherche Vous pouvez faire un appel à partir de l’historique, du répertoire d’adresses alphabétique (si le répertoire d’adresses contient beaucoup de contacts). ou composer le numéro. - Seite 65 Bluetooth® Faites au appel en utilisant la reconnaissance vocale Réglages du mode Bluetooth Maintenez enfoncée pour activer la reconnaissance vocale du téléphone Appuyez sur le bouton de volume pour entrer [FUNCTION] connecté. Tournez le bouton de volume pour sélectionner un élément (voir le tableau Dites le nom du contact que vous souhaitez appeler ou la commande suivant), puis appuyez sur le bouton.
-
Seite 66: Bluetooth - Audio
Quand la source est BT AUDIO, vous pouvez vous connecter à cinq périphériques “PLEASE PAIR YOUR PHONE PIN 0000” apparaît sur l’affichage. audio Bluetooth et commuter parmi ces cinq périphériques. Recherchez et sélectionnez le nom de votre récepteur (“KMM-BT356”/ “KMM-BT306”/“KMM-BT206”) sur le périphérique Bluetooth. Écoute du lecteur audio via Bluetooth Utilisez le périphérique Bluetooth pour valider le pairage. -
Seite 67: Amazon Alexa
Accédez à l’URL suivant ou scannez le code QR avec votre smartphone. • Vous pouvez commander iPod/iPhone de la même façon que iPod/iPhone via https://www.kenwood.com/car/alexa prise d’entrée USB. (Page 9) • Si vous branchez un iPod/iPhone sur la prise d’entrée USB pendant l’écoute d’une source iPod BT, la source change automatiquement sur iPod USB. -
Seite 68: Opérations De Base
AMAZON ALEXA (pour Touchez “Add Device (Ajout de périphérique)”. Communiquez avec Alexa via le microphone connecté. (Page 15) “THINKING... ” apparaît pendant qu’ A lexa traite l’entrée vocale. Touchez “Automotive Accessory (Accessoire automobile)” ou “Headphones “SPEAKING... ” apparaît pendant qu’ A lexa répond à votre entrée vocale. (Casque d’écoute)”... -
Seite 69: Réglages Audio
Réglages audio [MANUAL EQ] Ajuste vos propres réglages sonores pour chaque source. [USER] [PRESET EQ] • Les réglages sont mémorisés sur dans [EASY EQ] • Les réglages réalisés peuvent affecter les réglages actuels de [62.5HZ] [LEVEL] [LEVEL –9] à [LEVEL +9] [LEVEL 0] ): Réglez le niveau à... - Seite 70 Réglages audio Réglages de transition [BALANCE] [L15] [R15] à ( ): Règle la balance de sortie des enceintes gauche et droite. Voici les options de réglage disponibles pour la transition 2 voies et la transition [VOLUME OFFSET] [–15] à [+6] ( ): Prérègle le niveau de volume initial de chaque source en 3 voies.
- Seite 71 Réglages audio Options de réglage de la transition 2 voies [SUBWOOFER [SW LPF FRQ] [30HZ] [40HZ] [50HZ] [60HZ] [70HZ] [80HZ] LPF] *1*2 [90HZ] [100HZ] [120HZ] [150HZ] [180HZ] [220HZ] [250HZ] [THROUGH] [SPEAKER SIZE] [SW LPF SLOPE] [–6DB] [–12DB] [–18DB] [–24DB] [FRONT] [SIZE] [8CM] [10CM]...
- Seite 72 Réglages audio [MID RANGE] [HPF FRQ] [30HZ] [40HZ] [50HZ] [60HZ] [70HZ] [80HZ] [90HZ] [DTA SETTINGS] [100HZ] [120HZ] [150HZ] [180HZ] [220HZ] [250HZ] [POSITION] Sélectionne votre position d’écoute (point de référence). [THROUGH] [ALL] : Sans compensation ; [FRONT RIGHT] : Siège avant droit ; [HPF SLOPE] [–6DB] [–12DB] [FRONT LEFT]...
-
Seite 73: Réglages D'affichage
Réglages d’affichage Réglages audio Quand la transition 3 voies est sélectionnée: Identification de zone pour les réglages de la couleur et les réglages de la [TWEETER LEFT] [TWEETER RIGHT] [MID LEFT] [MID RIGHT] [WOOFER] luminosité – Vous pouvez sélectionner uniquement [WOOFER] si un autre réglage que [NONE]... - Seite 74 Réglages d’affichage Changez les réglages d’affichage [BRIGHTNESS] Réglez la luminosité séparément pour le jour et la nuit. 1 [DAY] [NIGHT] : Choisissez le jour ou la nuit. Appuyez sur le bouton de volume pour entrer [FUNCTION] Choisissez une zone. (Voir l’illustration de la page 27.) Tournez le bouton de volume pour sélectionner un élément (voir le tableau 3 [LVL00] à...
-
Seite 75: Installation/Connexion
Installation/Connexion Liste des pièces pour l’installation Cette section est réservée aux installateurs professionnels. Pour des raison de sécurité, laissez le travail de câblage et de montage des Façade (×1) Plaque d’assemblage (×1) professionnels. Consultez votre revendeur autoradio. MISE EN GARDE •... - Seite 76 Installation/Connexion Installation de l’appareil (montage encastré) Retrait de l’appareil Retirez la façade. Retirez la plaque d’assemblage. Insérez les clés d’extraction profondément dans les fentes de chaque côté, puis suivez les flèches indiquées sur l’illustration. Réalisez les connexions nécessaires. (Page 31) Crochet sur le côté...
- Seite 77 : Connexion à la terre (masse) Violet Pour connecter au système de navigation : Enceinte arrière (droite) Marron Kenwood, reportez-vous à votre manuel de Pour la transition 3 voies : Enceinte des aigus (droite) Violet/noir (Câble de contrôle de la MUTE...
-
Seite 78: Références
Prises de sortie (Reportez-vous à “Connectez les amplificateurs extérieurs via les prises de sortie” Pour: – Les dernières mise à jour du micrologiciel et la liste de compatibilité la plus récente ci-après.) – Application originale KENWOOD – Autres informations récentes Consultez <www.kenwood.com/cs/ce/>. -
Seite 79: Changez L'information Sur L'affichage
(par ex. le nom de la station) apparaît ou l’affichage est vide. iPod/iPhone. • Il n’est pas possible d’utiliser un iPod lorsque “KENWOOD” ou “ ” est affiché sur l’iPod. • En fonction de la version du système d’exploitation de l’iPod/iPhone, certaines fonctions peuvent ne pas Affichage principal être utilisables sur cet appareil. -
Seite 80: Guide De Dépannage
Guide de dépannage Références (Pour Symptôme Remède Chaque fois que vous appuyez sur DISP, les informations affichées changent. • Si aucune information n’est disponible ou si aucune information n’est enregistrée, “NO TEXT”, “NO INFO”, Le son ne peut pas être •... - Seite 81 Guide de dépannage Symptôme Remède Symptôme Remède “UNSUPPORTED DEVICE” • Vérifiez si le périphérique USB connecté est compatible avec “iPod ERROR” • Reconnectez l’iPod. apparaît. cet appareil et assurez-vous que le système de fichiers est • Réinitialisez l’iPod. dans un format compatible. (Page 32) “MEMORY FULL”...
- Seite 82 Guide de dépannage Symptôme Remède Symptôme Remède La méthode d’appel vocal ne • Utilisez la méthode d’appel vocal dans un environnement Aucune réponse d’Alexa après Amazon cloud n’a pas été capable d’analyser l’entrée vocale. réussie pas. plus calme. l’entrée vocale. •...
-
Seite 83: Spécifications
Spécifications Plage de fréquences 87,5 MHz — 108,0 MHz (pas de 50 kHz) Réponse en fréquence (±3 dB) 20 Hz — 20 kHz Sensibilité utilisable 0,71 μV/75 Ω Tension maximum d’entrée 1 000 mV (S/B = 30 dB) Impédance d’entrée 30 kΩ Seuil de sensibilité 2,0 μV/75 Ω (DIN S/B = 46 dB) Version Bluetooth 4.2 Réponse en fréquence (±3 dB) - Seite 84 Spécifications Action en tonalité Bande 1: 62,5 Hz ±9 dB Bande 2: 100 Hz ±9 dB Bande 3: 160 Hz ±9 dB Bande 4: 250 Hz ±9 dB Bande 5: 400 Hz ±9 dB Bande 6: 630 Hz ±9 dB Bande 7: 1 kHz ±9 dB Bande 8: 1,6 kHz ±9 dB Bande 9: 2,5 kHz ±9 dB...
- Seite 86 Grund können sie sich von den tatsächlichen Anzeigen oder Frontblenden Verwendung anderer Anwendungen ..........14 unterscheiden. • Die Bedienung wird im Wesentlichen anhand der Tasten auf der Frontblende KENWOOD Remote-Anwendung erläutert. • Englischsprachige Anzeigen werden zur Erklärung verwendet. Sie können die Tuneln Radio/Tuneln Radio Pro...
-
Seite 87: Vor Der Inbetriebnahme
Vor der Inbetriebnahme WICHTIG • Die USB-Kennung ist auf dem Hauptgerät angegeben. Zum Betrachten nehmen Sie die Frontblende ab. (Seite 4) • Um richtige Verwendung sicherzustellen, lesen Sie die Bedienungsanleitung vor • Je nach dem Typ des Fahrzeugs wird die Antenne automatisch ausgeschoben, der Verwendung des Produkts sorgfältig durch. - Seite 88 Grundlagen Frontblende Anbringen Displayfenster* Leuchtet beim Herstellen der Bluetooth-Verbindung auf. (Seite 16) Abnehmen Rücksetzen Nehmen Sie einen Reset am Gerät innerhalb von 5 Sekunden nach dem Abnehmen der Frontblende vor. Abnehmen-Taste Lautstärke-Regler * Nur für Illustrationszwecke. Auf der Frontblende Einschalten Drücken Sie SRC.
-
Seite 89: Grundlagen
Erste Schritte Grundlagen Fernbedienung (RC-406) (mitgeliefert für Fernbedienungssensor (Nicht hellem Sonnenlicht aussetzen.) Bei der ersten Verwendung ziehen Sie Wählen Sie die Anzeigesprache und brechen Sie die das Schutzblatt heraus. Demonstration ab Beim ersten Einschalten des Geräts (oder [FACTORY RESET] ist auf [YES] gestellt, : Die Fernbedienungsfunktionen sind nicht verfügbar. -
Seite 90: Festlegen Anderer Optionaler Einstellungen
Erste Schritte Zum Einstellen der Uhr [XX] Standard: Drehen Sie den Lautstärke-Regler zum Wählen von [CLOCK ADJUST] , und [AUDIO CONTROL] drücken Sie dann den Regler. Drehen Sie den Lautstärke-Regler, um die Einstellungen vorzunehmen, [SWITCH PREOUT] [X’OVER] [2WAY] (Für : Gilt nur wenn gestellt ist.) und drücken Sie dann den Regler. -
Seite 91: Übergangstyp Ändern
Der gewählte Übergangstyp erscheint. wird nicht ausgeführt). Einzelheiten darüber, wie Sie die Firmware aktualisieren können, besuchen Sie • Zum Abbrechen halten Sie gedrückt. <www.kenwood.com/cs/ce/>. • Zum Anpassen der gewählten Übergangseinstellungen siehe Seite 24. [FACTORY RESET] [YES] : Setzt die Einstellungen auf Standardwerte zurück (ausgenommen [NO] gespeicherte Sender). ;... -
Seite 92: Radio
Radio Andere Einstellungen Drücken Sie den Lautstärke-Regler, um auf [FUNCTION] zu schalten. Drehen Sie den Lautstärke-Regler zum Wählen eines Gegenstands (siehe folgende Tabelle), und drücken Sie dann den Regler. Wiederholen Sie Schritt 2, bis der gewünschte Gegenstand gewählt/ aktiviert ist, oder folgen Sie den Anweisungen auf dem gewählten Gegenstand. -
Seite 93: Usb/Ipod
USB/iPod Radio Schließen Sie ein USB-Gerät an [TI] [ON] : Erlaubt es, das Gerät kurzzeitig auf Verkehrsinformation schalten, wenn verfügbar (Die “TI” -Anzeige leuchtet auf), während alle Quellen gehört werden USB-Eingangsterminal [OFF] ausgenommen auf MW/LW. ; : Hebt auf. CA-U1EX (max.: 500 mA) (optionales Zubehörteil)*1 [PTY SEARCH] Drehen Sie den Lautstärke-Regler zum Wählen des verfügbaren Programmtyps... -
Seite 94: Wählen Sie Das Musiklaufwerk
USB/iPod Wählen Sie das Musiklaufwerk Während USB als Quelle gewählt ist, drücken Sie 5 wiederholt. Im folgenden Laufwerk gespeicherte Titel werden abgespielt. • Wählen Sie internen oder externen Speicher für ein Smartphone (Massenspeicherklasse). • Gewähltes Laufwerk bei Gerät mit mehreren Laufwerken. Sie können das Musiklaufwerk auch aus dem [FUNCTION] -Menü... -
Seite 95: Suchlauf Überspringen
USB/iPod • Zum Aufheben drücken Sie oder DIRECT. Drehen Sie den Lautstärke-Regler zum Wählen einer Datei, und drücken Sie • Nicht verfügbar, wenn Zufallswiedergabe gewählt ist. dann den Regler. • Gilt nicht für iPod USB. Die gewählte Datei beginnt zu spielen. [SKIP SEARCH]-Einstellung Wählen Sie eine zur Wiedergabe gewünschte Datei Drücken Sie den Lautstärke-Regler, um auf... -
Seite 96: Spotify
Spotify Sie können Spotify auf dem iPhone/iPod touch (über Bluetooth oder über USB- Auf der Frontblende An der Fernbedienung Eingang) oder Android-Gerät (über Bluetooth) hören. Wiedergabe/Pause Drücken Sie 6 Drücken Sie ENT Vorbereitung: Einen Track Drücken Sie Drücken Sie *3 / •... -
Seite 97: Aux
Spotify Sie können Musik von einem tragbaren Audioplayer über die AUX- Suchen Sie nach einem Song oder Sender Eingangsbuchse hören. Drücken Sie Vorbereitung: Drehen Sie den Lautstärke-Regler zum Wählen eines Listentyps, und Wählen Sie [ON] für [BUILT-IN AUX] [SOURCE SELECT] . (Seite 6) drücken Sie dann den Regler. -
Seite 98: Verwendung Anderer Anwendungen
Tabelle), und drücken Sie dann den Regler. Wiederholen Sie Schritt 2, bis der gewünschte Gegenstand gewählt/ Vorbereitung: aktiviert ist. Installieren Sie vor dem Verbinden die neueste Version der KENWOOD Remote- Halten Sie zum Beenden gedrückt. Anwendung auf Ihrem Gerät. -
Seite 99: Bluetooth - Verbindung Unterstützte Bluetooth-Profile
Bluetooth® Verwendung anderer Anwendungen • Je nach der Bluetooth-Version, dem Betriebssystem und der Firmwareversion [STATUS] Zeigt den Status des gewählten Geräts. [IOS CONNECTED] Ihres Mobiltelefons arbeiten einige Bluetooth-Merkmal möglicherweise nicht : Sie können die Anwendung mit dem über Bluetooth oder auf dieser Einheit. -
Seite 100: Bluetooth - Handy
Pairing-Anforderung (über Bluetooth) aktiviert, wenn Drücken Sie SRC, um die Einheit einzuschalten. [AUTO PAIRING] [ON] gestellt ist. (Seite 19) Suchen und wählen Sie den Namen Ihres Receivers (“KMM-BT356”/ “KMM-BT306”/“KMM-BT206”) auf dem Bluetooth-Gerät. Drücken Sie den Lautstärke-Regler einmal zum Pairing, nachdem Sie den “PAIRING” “PASS XXXXXX” “Gerätename”... -
Seite 101: Verbessern Sie Die Sprachqualität
Bluetooth® Die folgenden Bedienungsvorgänge sind je nach dem angeschlossenen Telefon *1 Diese Einstellung hat keine Auswirkung auf den Lautstärkepegel der anderen Quellen. möglicherweise nicht verfügbar. *2 Halten Sie VOL gedrückt, um die Lautstärke kontinuierlich auf 15 zu steigern. *3 Die Bedienung kann je nach dem angeschlossenen Bluetooth-Gerät unterschiedlich sein. Auf der Frontblende An der Fernbedienung Verbessern Sie die Sprachqualität... -
Seite 102: Tätigen Sie Einen Ruf
Bluetooth® Tätigen Sie einen Ruf [PHONE BOOK] (Nur gültig, wenn das Telefon PBAP unterstützt.) Drehen Sie den Lautstärke-Regler schnell, um auf alphabetische Suche zu Sie können einen Ruf von der Ruf-Historie, dem Telefonbuch oder durch Wählen schalten (wenn das Telefonbuch viele Kontakte enthält). der Telefonnummer tätigen. -
Seite 103: Einen Ruf Mit Spracherkennung Tätigen
Bluetooth® Einen Ruf mit Spracherkennung tätigen Bluetooth-Modus-Einstellungen Halten Sie gedrückt, um die Spracherkennung auf dem Drücken Sie den Lautstärke-Regler, um auf [FUNCTION] zu schalten. angeschlossenen Telefon zu aktivieren. Drehen Sie den Lautstärke-Regler zum Wählen eines Gegenstands (siehe Sprechen Sie den Namen des anzurufenden Kontakts oder den folgende Tabelle), und drücken Sie dann den Regler. -
Seite 104: Bluetooth - Audio
Während BT AUDIO als Quelle eingestellt ist, können Sie die Verbindung zu fünf “PLEASE PAIR YOUR PHONE PIN 0000” erscheint im Display. Bluetooth-Audiogeräten herstellen und zwischen diesen Geräten umschalten. Suchen und wählen Sie den Namen Ihres Receivers (“KMM-BT356”/ “KMM-BT306”/“KMM-BT206”) auf dem Bluetooth-Gerät. Hören von Ton von Ihrem Audioplayer über Bluetooth Bedienen Sie das Bluetooth-Gerät, um das Pairing zu bestätigen. -
Seite 105: Amazon Alexa
Smartphone: iPod BT-Quelle hören, schaltet die Quelle automatisch auf iPod USB um. Drücken SRC, um iPod BT als Quelle zu wählen wenn das Gerät immer noch über https://www.kenwood.com/car/alexa Bluetooth angeschlossen ist. Option B: Manuelles Pairing Starten Sie die Alexa-Mobilanwendung und gehen Sie zur Registerkarte “Devices (Geräte)”. -
Seite 106: Beginnen Sie Zu Hören
AMAZON ALEXA (für Tippen Sie auf “Add Device (Gerät hinzufügen)”. Kommunizieren Sie mit Alexa über das angeschlossene Mikrofon. (Seite 15) Tippen Sie auf “Automotive Accessory (Automotives Zubehör)” oder “THINKING... ” erscheint, während Alexa Ihre Spracheingabe verarbeitet. “Headphones (Kopfhörer)” aus der Liste von Gerätetypen. “SPEAKING... -
Seite 107: Audioeinstellungen
Audioeinstellungen [MANUAL EQ] Passt Ihre eigenen Klangeinstellungen für jede Quelle an. • Die Einstellungen werden unter [USER] [PRESET EQ] gespeichert. • Die vorgenommenen Einstellungen können die aktuellen Einstellungen [EASY EQ] beeinflussen. [62.5HZ] [LEVEL] [LEVEL –9] [LEVEL +9] [LEVEL 0] bis ): Stellt den Pegel zum Speichern für jede Quelle ein. (Bevor Sie eine Einstellung vornehmen, wählen Sie eine anzupassende Quelle aus.) Drücken Sie den Lautstärke-Regler, um auf... -
Seite 108: Übergangseinstellungen
Audioeinstellungen Übergangseinstellungen [BALANCE] [L15] [R15] bis ( ): Stellen Sie die Ausgangsbalance zwischen linken und rechten Lautsprechern ein. Im Folgenden werden die verfügbaren Einstellpunkte für 2-Wege-Übergang und [VOLUME OFFSET] [–15] [+6] bis ( ): Nehmen Sie die Vorwahl des anfänglichen 3-Wege-Übergang gezeigt. Lautstärkepegels für jede Quelle in Bezug auf den FM (UKW)-Lautstärkepegel vor. - Seite 109 Audioeinstellungen Einstellpunkte für 2-Wege-Übergang [SUBWOOFER [SW LPF FRQ] [30HZ] [40HZ] [50HZ] [60HZ] [70HZ] [80HZ] LPF] *1*2 [90HZ] [100HZ] [120HZ] [150HZ] [180HZ] [220HZ] [250HZ] [THROUGH] [SPEAKER SIZE] [SW LPF SLOPE] [–6DB] [–12DB] [–18DB] [–24DB] [FRONT] [SIZE] [8CM] [10CM] [12CM] [13CM] [16CM] [17CM] [18CM] [4×6]...
- Seite 110 Audioeinstellungen [MID RANGE] [HPF FRQ] [30HZ] [40HZ] [50HZ] [60HZ] [70HZ] [80HZ] [90HZ] [DTA SETTINGS] [100HZ] [120HZ] [150HZ] [180HZ] [220HZ] [250HZ] [POSITION] Wählt Ihre Hörposition (Bezugspunkt). [THROUGH] [ALL] : Keine Kompensation ; [FRONT RIGHT] : Vorderer rechter Sitz ; [HPF SLOPE] [–6DB] [–12DB] [FRONT LEFT] : Vorderer linker Sitz ;...
-
Seite 111: Display-Einstellungen
Display-Einstellungen Audioeinstellungen Wenn 3-Wege-Übergang gewählt ist: Zonen-Identifikation für Farbeinstellungen und Helligkeitseinstellungen [TWEETER LEFT] [TWEETER RIGHT] [MID LEFT] [MID RIGHT] [WOOFER] – Sie können nur [WOOFER] wählen, wenn eine andere Einstellung als [NONE] für [WOOFER] unter [SPEAKER SIZE] gewählt ist. (Seite 25) • [R-SP LOCATION] unter [CAR SETTINGS]... -
Seite 112: Ändern Sie Die Display-Einstellungen
Display-Einstellungen Ändern Sie die Display-Einstellungen [BRIGHTNESS] Stellen Sie die Helligkeit für Tag und Nacht separat ein. 1 [DAY] [NIGHT] : Wählen Sie Tag oder Nacht. Drücken Sie den Lautstärke-Regler, um auf [FUNCTION] zu schalten. Wählen Sie eine Zone. (Siehe Abbildung auf Seite 27.) Drehen Sie den Lautstärke-Regler zum Wählen eines Gegenstands (siehe 3 [LVL00] [LVL31]... -
Seite 113: Einbau/Anschluss
Einbau/Anschluss Teileliste für den Einbau Dieser Abschnitt ist für den professionellen Einbautechniker gedacht. Überlassen Sie aus Sicherheitsgründen die Arbeiten zur Montage Frontblende (×1) Frontrahmen (×1) und Verkabelung ausgewiesenem Fachpersonal. Lassen Sie sich vom Autoradiohändler beraten. WARNUNG • Das Gerät kann nur bei 12 V DC-Versorgung mit negativer Masse eingebaut Einbauhalterung (×1) Kabelbaum (×1) werden. -
Seite 114: Einbau Der Einheit (Einbau Im Armaturenbrett)
Einbau/Anschluss Einbau der Einheit (Einbau im Armaturenbrett) Entfernen der Einheit Nehmen Sie die Frontblende ab. Nehmen Sie den Frontrahmen ab. Setzen Sie die Ausziehschlüssel tief in die Schlitze an jeder Seite ein und folgen dann den mit Pfeil gekennzeichneten Anweisungen wie in der Abbildung gezeigt. - Seite 115 Gelb (A4) Schwarz : Erdungsanschluss (Masse) Lila : Hinterer Lautsprecher (rechts) Beziehen Sie sich hinsichtlich des Anschlusses Braun Für 3-Wege-Übergang: Hochtöner (rechts) an das Kenwood-Navigationssystem auf die Lila/Schwarz (Stummschaltungs- MUTE Bedienungsanleitung des betreffenden Geräts Steuerkabel) Grau : Vorderer Lautsprecher (rechts) Für 3-Wege-Übergang: Mitteltöner (rechts)
-
Seite 116: Zur Bezugnahme
Bei: – Neuste Firmware-Aktualisierungen und eine Liste der neuesten kompatiblen Artikel Folgenden.) – KENWOOD-Originalanwendung – Jegliche neuesten Informationen Besuchen Sie <www.kenwood.com/cs/ce/>. Abspielbare Dateien Anschließen von externen Verstärkern über Ausgangsklemmen • Für USB-Massenspeichergerät: Bei Anschluss eines externen Verstärkers an die Ausgangsklemmen dieser Einheit MP3 (.mp3), WMA (.wma), AAC (.aac), AAC (.m4a), WAV (.wav), FLAC (.flac) -
Seite 117: Ändern Der Display-Information
Information (z.B. Sendername) oder die Anzeige ist leer. unterscheiden. • Sie können den iPod nicht bedienen, wenn “KENWOOD” oder “ ” auf dem iPod angezeigt wird. • Je nach der Version des Betriebssystems des iPod/iPhone sind einige Funktionen möglicherweise nicht Hauptdisplay verfügbar. -
Seite 118: Fehlersuche
Fehlersuche Zur Bezugnahme (Für Symptom Abhilfe Jedesmal, wenn Sie DISP drücken, wechselt die Anzeige-Information. • Wenn die Information nicht verfügbar oder nicht aufgezeichnet ist, erscheint “NO TEXT”, “NO INFO” oder Es wird kein Ton gehört. • Die Lautstärke auf den optimalen Pegel einstellen. andere Information (z.B. - Seite 119 Fehlersuche Symptom Abhilfe Symptom Abhilfe “UNSUPPORTED DEVICE” • Prüfen Sie, ob das angeschlossene USB-Gerät kompatibel mit “iPod ERROR” • Erneutes Anschließen des iPod. erscheint. diesem Gerät ist, und stellen Sie sicher, dass die Dateisysteme • Setzen Sie den iPod erneut zurück. die unterstützten Formate haben.
- Seite 120 Fehlersuche Symptom Abhilfe Symptom Abhilfe Sprach-Rufmethode ist nicht • Verwenden Sie die Sprach-Rufmethode in einer ruhigeren Keine Antwort von Alexa nach Amazon Cloud konnte die Spracheingabe nicht analysieren. erfolgreich. Umgebung. der Spracheingabe. • Verringern Sie den Abstand zum Mikrofon, während Sie den Falsche Antwort von Alexa.
-
Seite 121: Technische Daten
Technische Daten Frequenzbereich 87,5 MHz — 108,0 MHz (50-kHz-Raster) Frequenzgang (±3 dB) 20 Hz — 20 kHz Empfindlichkeit 0,71 μV/75 Ω Maximaler Spannungseingang 1 000 mV (Rauschabstand = 30 dB) Eingangsimpedanz 30 kΩ Empfindlichkeitsschwelle 2,0 μV/75 Ω (DIN S/N = 46 dB) Version Bluetooth 4.2 Frequenzgang (±3 dB) 30 Hz —... - Seite 122 Technische Daten Klangregler Band 1: 62,5 Hz ±9 dB Band 2: 100 Hz ±9 dB Band 3: 160 Hz ±9 dB Band 4: 250 Hz ±9 dB Band 5: 400 Hz ±9 dB Band 6: 630 Hz ±9 dB Band 7: 1 kHz ±9 dB Band 8: 1,6 kHz ±9 dB Band 9: 2,5 kHz ±9 dB Band 10: 4 kHz ±9 dB...
- Seite 124 • De bediening wordt voornamelijk uitgelegd met gebruik van de toetsen op KENWOOD Remote app het voorpaneel van de • Voor de uitleg worden de aanduidingen in het Engels gebruikt. U kunt de taal...
-
Seite 125: Alvorens Gebruik
Alvorens gebruik BELANGRIJK • Het USB-vermogen is aangegeven op het hoofdtoestel. Verwijder het voorpaneel om het vermogen te controleren. (Pagina 4) • Lees alvorens dit product in gebruik te nemen deze handleiding door voor • Afhankelijk van het automerk wordt de antenne automatisch uitgetrokken een juist gebruik. -
Seite 126: Basispunten
Basispunten Voorpaneel Bevestigen Displayvenster* Licht op wanneer een Bluetooth verbinding is gemaakt. (Pagina 16) Verwijderen Terugstellen Stel het toestel terug binnen 5 seconden na het verwijderen van het voorpaneel. Verwijdertoets Volumeknop * Alleen ter illustratie. Voor het Op het voorpaneel Inschakelen van de stroom Druk op SRC. -
Seite 127: Starten
Starten Basispunten Afstandsbediening (RC-406) (bijgeleverd voor Afstandsbedieningssensor (Stel niet aan schel zonlicht bloot.) Verwijder alvorens ingebruikname het Kies de displaytaal en annuleer de demonstratie isolatievel. Wanneer u de stroom voor het eerst inschakelt (of [FACTORY RESET] is ingesteld op [YES] , zie pagina 7), verschijnt: “SEL LANGUAGE” ... -
Seite 128: Stel De Andere Optionele Instellingen In
Starten Instellen van de klok [XX] Basisinstelling: Draai de volumeknop om [CLOCK ADJUST] te kiezen en druk vervolgens op [AUDIO CONTROL] de knop. Draai de volumeknop om de instellingen te maken en druk vervolgens op [SWITCH PREOUT] [X’OVER] [2WAY] (Voor : Alleen van toepassing indien de knop. - Seite 129 (upgraden is niet geactiveerd). Ga voor details aangaande de update van firmware naar • Houd even ingedrukt om te annuleren. <www.kenwood.com/cs/ce/>. • Zie pagina 24 voor het instellen van crossover. [FACTORY RESET] [YES] : Stelt de instellingen naar de standaardinstellingen terug (uitgezonderd [NO] opgeslagen zenders). ;...
-
Seite 130: Radio
Radio Overige instellingen Druk op de volumeknop om [FUNCTION] op te roepen. Draai de volumeknop om een onderdeel te kiezen (zie de volgende tabel), en druk vervolgens op de knop. Herhaal stap 2 totdat het gewenste onderdeel is gekozen/geactiveerd of volg de aanwijzingen voor het geselecteerde onderdeel. -
Seite 131: Usb/Ipod
USB/iPod Radio Sluit een USB-apparaat aan [TI] [ON] : Laat het toetsel tijdelijk overschakelen naar verkeersinformatie indien beschikbaar (De “TI”-indicator gaat branden) tijdens het luisteren naar alle USB-ingangsaansluiting [OFF] bronnen, behalve MW/LW. ; : Geannuleerd. CA-U1EX (max.: 500 mA) (los verkrijgbare accessoire)*1 [PTY SEARCH] Draai de volumeknop om een beschikbaar Programmatype te kiezen (zie het volgende gedeelte “Beschikbare programmatypes voor... - Seite 132 USB/iPod Selecteer het muziekstation Druk met USB als bron gekozen herhaaldelijk op 5. De in de volgende drive opgeslagen nummers worden afgespeeld. • Geselecteerde interne of externe geheugen van een smartphone (massa- opslagklasse). • Geselecteerde station van een apparaat met meerdere stations. U kunt de muziekschijf ook selecteren vanuit het [FUNCTION] -menu.
-
Seite 133: Snelzoeken
USB/iPod • Druk om te annuleren op of DIRECT. Draai de volumeknop om een bestand te kiezen en druk vervolgens op de • Niet beschikbaar indien willekeurige weergave is gekozen. knop. • Niet van toepassing op iPod USB. Het geselecteerde bestand wordt afgespeeld. [SKIP SEARCH] instelling Selecteer een bestand om af te spelen [FUNCTION]... -
Seite 134: Spotify
Spotify U kunt luisteren naar Spotify vanaf uw iPhone/iPod touch (via Bluetooth of via de Voor het Op het voorpaneel Op de afstandsbediening USB-aansluiting) of Android-apparaten (via Bluetooth). Afspelen/pauzeren Druk op 6 Druk op ENT Voorbereiding: Nummer overslaan Druk op *3 / Druk op *3 /... -
Seite 135: Aux
Spotify U kunt naar muziek luisteren van een draagbare audiospeler via de aux- Een lied of zender zoeken ingangsaansluiting. Druk op Voorbereiding: Draai de volumeknop om een lijsttype te selecteren en druk op de knop. Kies [ON] voor [BUILT-IN AUX] [SOURCE SELECT] . -
Seite 136: Andere Toepassingen Gebruiken
Herhaal stap 2 totdat het gewenste onderdeel is gekozen/geactiveerd. Voorbereiding: Houd even ingedrukt om te voltooien. Installeer de laatste versie van de KENWOOD Remote app op uw apparaat alvorens de verbinding te maken. Druk op om naar het voorgaande instelonderdeel terug te keren. -
Seite 137: Bluetooth
Bluetooth® Andere toepassingen gebruiken • Afhankelijk van de Bluetooth-versie, het besturingssysteem en de [STATUS] Toont de status van het gekozen apparaat. [IOS CONNECTED] firmwareversie van uw mobiele telefoon, werken Bluetooth-functies mogelijk : U kunt de app gebruiken met de iPhone/iPod touch die via niet met dit apparaat. -
Seite 138: Bluetooth - Mobiele Telefoon
Druk op SRC om het toestel in te schakelen. Wanneer u een iPhone/iPod touch aansluit op de USB-ingang, wordt het Zoek en selecteer de naam van uw receiver (“KMM-BT356”/ koppelingsverzoek (via Bluetooth) automatisch geactiveerd als [AUTO PAIRING] “KMM-BT306”/“KMM-BT206”) op het Bluetooth-apparaat. - Seite 139 Bluetooth® De volgende bediening is mogelijk verschillend of niet beschikbaar afhankelijk van *1 Deze instelling heeft geen effect op het volume van andere bronnen. de telefoon die u heeft verbonden. *2 Houd VOL even ingedrukt om het volume snel naar 15 te verhogen. *3 De bedieningen zijn mogelijk anders afhankelijk van de verbonden Bluetooth apparatuur.
- Seite 140 Bluetooth® Bellen [PHONE BOOK] (Alleen beschikbaar wanneer de aangesloten telefoon voor PBAP geschikt is.) Verdraai de volumeknop snel voor het invoeren van de letterzoekfunctie (indien U kunt bellen met gebruik van de geschiedenis van gesprekken, het telefoonboek er veel gegevens in het telefoonboek zijn). of gewoon het intoetsen van het nummer.
- Seite 141 Bluetooth® Bellen met gebruik van stemherkenning Bluetooth functie-instellingen Houd even ingedrukt om de stemherkenning van de aangesloten Druk op de volumeknop om [FUNCTION] op te roepen. telefoon te activeren. Draai de volumeknop om een onderdeel te kiezen (zie de volgende tabel), Zeg de naam van een persoon die u wilt bellen of gebruik telefoonfuncties en druk vervolgens op de knop.
-
Seite 142: Bluetooth - Audio
Tijdens de BT AUDIO bron, kunt u vijf Bluetooth audio-apparaten verbinden en “PLEASE PAIR YOUR PHONE PIN 0000” verschijnt op het display. tussen deze vijf apparaten schakelen. Zoek en selecteer de naam van uw receiver (“KMM-BT356”/“KMM-BT306”/ “KMM-BT206”) op het Bluetooth-apparaat. Luister naar de audiospeler via Bluetooth Bedien het Bluetooth apparaat om het koppelen te bevestigen. -
Seite 143: Amazon Alexa
Voer de volgende URL in of scan de QR-code met uw smartphone: Druk herhaaldelijk op SRC om iPod BT te kiezen. https://www.kenwood.com/car/alexa • U kunt de iPod/iPhone op dezelfde manier bedienen als met een iPod/iPhone die via de USB-ingangsaansluiting is verbonden. (Pagina 9) •... - Seite 144 AMAZON ALEXA (voor de Tik op “Add Device (Apparaat toevoegen)”. Communiceer met Alexa via de aangesloten microfoon. (Pagina 15) “THINKING... ” verschijnt wanneer Alexa uw spraakinvoer verwerkt. Tik op “Automotive Accessory (Autotoebehoren)” of “Headphones “SPEAKING... ” verschijnt terwijl Alexa reageert op uw spraakinvoer. (Koptelefoon)”...
-
Seite 145: Audio-Instellingen
Audio-instellingen [MANUAL EQ] Past uw eigen geluidsinstellingen voor elke bron aan. [USER] [PRESET EQ] • De instellingen worden opgeslagen naar • De gemaakte instellingen hebben mogelijk invloed op de huidige instellingen voor [EASY EQ] [62.5HZ] [LEVEL] [LEVEL –9] [LEVEL +9] [LEVEL 0] tot ): Instellen van het vast te leggen niveau voor iedere bron. - Seite 146 Audio-instellingen Crossover-instellingen [BALANCE] [L15] [R15] tot ( ): Instellen van het weergavebalans tussen de linker- en rechterluidspreker. Hieronder vindt u de instelbare onderdelen voor 2-weg crossover en 3-weg [VOLUME OFFSET] [–15] [+6] tot ( ): Stelt het initiële volumeniveau van elke bron van te crossover.
- Seite 147 Audio-instellingen Instelbare onderdelen voor 2-weg crossover [SUBWOOFER [SW LPF FRQ] [30HZ] [40HZ] [50HZ] [60HZ] [70HZ] [80HZ] LPF] *1*2 [90HZ] [100HZ] [120HZ] [150HZ] [180HZ] [220HZ] [250HZ] [THROUGH] [SPEAKER SIZE] [SW LPF SLOPE] [–6DB] [–12DB] [–18DB] [–24DB] [FRONT] [SIZE] [8CM] [10CM] [12CM] [13CM] [16CM] [17CM]...
- Seite 148 Audio-instellingen [MID RANGE] [HPF FRQ] [30HZ] [40HZ] [50HZ] [60HZ] [70HZ] [80HZ] [90HZ] [DTA SETTINGS] [100HZ] [120HZ] [150HZ] [180HZ] [220HZ] [250HZ] [POSITION] Kiezen van uw luisterpositie (referentiepunt). [THROUGH] [ALL] : Geen compensatie ; [FRONT RIGHT] : Rechtervoorstoel ; [HPF SLOPE] [–6DB] [–12DB] [FRONT LEFT] : Linkervoorstoel ;...
-
Seite 149: Display-Instellingen
Display-instellingen Audio-instellingen Indien 3-weg crossover is gekozen: Zone-identificatie voor kleurinstellingen en helderheidsinstellingen [TWEETER LEFT] [TWEETER RIGHT] [MID LEFT] [MID RIGHT] [WOOFER] – U kunt [WOOFER] alleen kiezen indien een andere instelling dan [NONE] gekozen voor [WOOFER] [SPEAKER SIZE] . (Pagina 25) • [R-SP LOCATION] [CAR SETTINGS] kan alleen worden gekozen indien:... - Seite 150 Display-instellingen Wijzig de scherminstellingen [BRIGHTNESS] Stel de helderheid voor het display en de toetsen voor dag en nacht afzonderlijk in. 1 [DAY] [NIGHT] : Kies dag of nacht. Druk op de volumeknop om [FUNCTION] op te roepen. Kies een zone. (Zie de afbeelding op pagina 27.) Draai de volumeknop om een onderdeel te kiezen (zie de volgende tabel), 3 [LVL00] [LVL31]...
-
Seite 151: Installeren/Verbinden
Installeren/Verbinden Onderdelenlijst voor het installeren Dit gedeelte is voor de professionele installateur. Laat het monteren en verbinden voor de veiligheid door een vakman Voorpaneel (×1) Sierplaat (×1) uitvoeren. Raadpleeg de auto-audiohandelaar. WAARSCHUWING • Dit toestel kan uitsluitend worden gebruikt in een auto met 12 Volt gelijkstroom, negatieve aarding. - Seite 152 Installeren/Verbinden Installeren van het toestel (in-dashboard montage) Verwijderen van het toestel Verwijder het voorpaneel. Verwijder de sierplaat. Steek de verwijdersleutels diep in de uitsparingen aan iedere kant en volg dan de pijlen zoals in de afbeelding wordt getoond. Sluit als vereist aan. (Pagina 31) Haak aan de bovenkant Richt de sierplaat Dashboard van uw auto...
-
Seite 153: Verbinden Van Draden
Zwart : Massaverbinding Paars : Achterluidspreker (rechts) Bruin Raadpleeg de navigatiehandleiding als Voor 3-weg crossover: Tweeter (rechts) Paars/zwart u een Kenwood navigatiesysteem wilt (Draad voor besturing van MUTE aansluiten dempingsfunctie) : Voorluidspreker (rechts) Grijs Voor 3-weg crossover: Middenbereik luidspreker Grijs/zwart... -
Seite 154: Ter Referentie
Meer informatie Uitgangsaansluitingen (Zie het volgende “Externe versterkers aansluiten via uitgangsklemmen”.) Voor de : – Een lijst met de laatste firmware-updates en compatibele onderdelen – Originele app van KENWOOD – Andere actuele informatie Ga naar <www.kenwood.com/cs/ce/>. Externe versterkers aansluiten via uitgangsklemmen... -
Seite 155: Veranderen Van De Displayinformatie
(bijvoorbeeld zendernaam) of het is leeg. iPod/iPhone. • U kunt de iPod niet bedienen wanneer “KENWOOD” of “ ” op de iPod wordt weergegeven. • Afhankelijk van de versie van het besturingssysteem van de iPod/iPhone, werken bepaalde functies Hoofdscherm mogelijk niet met dit toestel. -
Seite 156: Oplossen Van Problemen
Oplossen van problemen Ter referentie (Voor de Symptoom Oplossing Door iedere druk op DISP verandert de display-informatie. • Indien er geen informatie beschikbaar is of niet is opgenomen, verschijnt “NO TEXT”, “NO INFO”, of een Geen geluid. • Stel het volume op het optimale niveau in. andere melding (bijvoorbeeld zendernaam) of het is leeg. - Seite 157 Oplossen van problemen Symptoom Oplossing Symptoom Oplossing “UNSUPPORTED DEVICE” • Controleer of het aangesloten USB-apparaat met dit toestel “iPod ERROR” • Verbind de iPod weer. verschijnt. compatibel is en of de bestandssystemen het vereiste formaat • Stel de iPod terug. hebben.
- Seite 158 Oplossen van problemen Symptoom Oplossing Symptoom Oplossing Bellen met stemherkenning • Gebruik de stemherkenning voor het bellen op een stillere Geen reactie van Alexa na de Amazon cloud kon de spraakinvoer niet analyseren. werkt niet. plaats. spraakinvoer. • Spreek dichter bij de microfoon in. Verkeerde reactie van Alexa.
-
Seite 159: Technische Gegevens
Technische gegevens Frequentiebereik 87,5 MHz — 108,0 MHz (50 kHz stappen) Frequentieweergave (±3 dB) 20 Hz — 20 kHz Bruikbare gevoeligheid 0,71 μV/75 Ω Maximale ingangsspanning 1 000 mV (S/R = 30 dB) Ingangsimpedantie 30 kΩ Onderdrukkingsgevoeligheid 2,0 μV/75 Ω (DIN S/R = 46 dB) Versie Bluetooth 4.2 Frequentieweergave (±3 dB) 30 Hz — 15 kHz Frequentiebereik 2,402 GHz —... - Seite 160 Technische gegevens Toonbereik Band 1: 62,5 Hz ±9 dB Band 2: 100 Hz ±9 dB Band 3: 160 Hz ±9 dB Band 4: 250 Hz ±9 dB Band 5: 400 Hz ±9 dB Band 6: 630 Hz ±9 dB Band 7: 1 kHz ±9 dB Band 8: 1,6 kHz ±9 dB Band 9: 2,5 kHz ±9 dB Band 10: 4 kHz ±9 dB...
- Seite 164 • Microsoft and Windows Media are either registered trademarks or trademarks of Microsoft Corporation in the United States and/or other countries. • Use of the Made for Apple badge means that an accessory has been designed to connect specifically to the Apple product(s) identified in the badge and has been certified by the developer to meet Apple performance standards.