Herunterladen Inhalt Inhalt Diese Seite drucken
Inhaltsverzeichnis

Werbung

Verfügbare Sprachen
  • DE

Verfügbare Sprachen

  • DEUTSCH, seite 31
Serial Remote
Control Unit
取扱説明書
2
ページ
Operating Instructions
Mode d'emploi
Page 23
Bedienungsanleitung
Istruzioni per l'uso
電気製品は、安全のための注意事項を守らないと、火災
警告
や人身事故になることがあります。
この取扱説明書には、事故を防ぐための重要な注意事項と製品の取り扱い
かたを示しています。この取扱説明書をよくお読みのうえ、製品を安全に
お使いください。お読みになったあとは、いつでも見られるところに必ず
保管してください。
SVRM-911
© 1997 by Sony Corporation
Page 14
Seite 31
Pagina 39
3-861-355-03(1)
J
EN
F
D
I

Werbung

Inhaltsverzeichnis
loading

Inhaltszusammenfassung für Sony SVRM-911

  • Seite 1 3-861-355-03(1) Serial Remote Control Unit 取扱説明書 ページ Operating Instructions Page 14 Mode d’emploi Page 23 Bedienungsanleitung Seite 31 Istruzioni per l’uso Pagina 39 電気製品は、安全のための注意事項を守らないと、火災 警告 や人身事故になることがあります。 この取扱説明書には、事故を防ぐための重要な注意事項と製品の取り扱い かたを示しています。この取扱説明書をよくお読みのうえ、製品を安全に お使いください。お読みになったあとは、いつでも見られるところに必ず 保管してください。 SVRM-911 © 1997 by Sony Corporation...
  • Seite 2 日本語 安全のために 目次 ソニー製品は安全に充分配慮して設計されています。 しかし、 電気製品は、 まち 警告表示の意味 がった使いかたをする と、 火災や感電などによ り死亡や大けがなど人身事故につ 取扱説明書および製品では、 次の ながる こ とがあ り 、 危険です。 ような表示をしています。 表示の 事故を防ぐために次のこ とを必ずお守り く ださい。 内容をよく 理解してから本文をお 読みく ださい。 安全のための注意事項を守る 4∼5ページの注意事項をよ く お読みく ださい。 製品全般の注意事項が記されてい 警告 ます。 この表示の注意事項を守らない 定期点検をする と、...
  • Seite 3: Inhaltsverzeichnis

    目次 警告 ....................注意 ....................電池についての安全上のご注意 ............概要 ..................... 各部の名称と働き ................準備 ..................... リ チウム電池を使う ..................9 ラ ッ クに取り付ける ..................9 電源とデュプリ ケーターを接続する ............10 操作 ....................日付と時刻を設定する ................11 ユーザーIDを設定する................12 仕様 ....................お手入れ ................... 日 保証書とアフターサービス ............. 本...
  • Seite 4 下記の注意を守らないと、 警告 火災 感電 死亡 大けが 目次 や により や につながることがあります。 火災 感電 電源コードを傷つけない 電源コー ドを傷つける と、 火災や感電の原因となる こ とがあ り ます。 • 設置時に、 製品と壁やラ ック(棚)などの間に、 はさみ込んだり しない。 禁止 • 電源コー ドを加工したり、 傷つけたり しない。 • 重いものをのせたり 、 引っ張ったり しない。 • 熱器具に近づけたり、 加熱したり しない。 •...
  • Seite 5: 電池についての安全上のご注意

    下記の注意を守らないと、 注意 けが 損害 をしたり周辺の物品に を与えることがあります。 ぬれた手で電源プラグをさわらない ぬれた手で電源プラグを抜き差しする と、 感電の原因となる こ とがあ り ます。 禁止 付属の電源コード、および指定の接続コードを使う 付属の電源コー ド、 および指定された接続コー ドを使わないと、 感電や故障の原因 となる こ とがあ り ます。 注意 不安定な場所に設置しない ぐらついた台の上や傾いたと ころに設置する と、 倒れたり落ちたり してけがの原因 となる こ とがあ り ます。 禁止 また、 設置 ・ 取り付け場所の強度を充分にお確かめく ださい。 転倒、移動防止の処置をする...
  • Seite 6: 各部の名称と働き

    概要 データの設定や保存が可能 シリ アルリモー ト コン ト ロールユニッ トSVRM-911は、 SVO-965などの デュプリ ケーターを、 シリ アルコン ト ロール信号を使ってリ モー ト コン ユーザーID や時刻などのデータや、オーディ オリ ミ ッ ターの ON/ ト ロールします。 OFF、 ビデオAGC 回路の ON/OFFなどのデュプリ ケーターの動 作条件を簡単に設定する ことができます。 設定したユーザーIDや 本機には次のよう な特長があ り ます。...
  • Seite 7 POWER( EJECT ( 電源 スイッチ イジェクト ボタン ON 側を押すと本機に電源が供給されます。 デュプリ ケーターからカセッ ト を取り出すと き押します。押すと点灯 します。 表示設定ボタン 9 テープ走行ボタン 以下のボタ ンを使ってLED 表示を設定します。 以下のボタ ンを使って、 テープ走行をコン ト ロールします。 それぞれ ボタン 働き 押すと点灯します。 U ID SET ユーザーIDを設定する と き押すと、左端の桁が ユーザー 設定 点滅する。 ボタン 働き...
  • Seite 8 各部の名称と働き !∞ REMOTE( リモート 端子 シ リ アルコン ト ロール信号の出力端子です。 ピンプラグ付きの接続 ケーブル (別売り) で、 SVO-965などのCTRL P IN端子と接続しま す。 !§ 電池装着部 データのバックアップ用リ チウム電池を装着します。 (リ チウム電池 は出荷時に装着されています。 ) !¶ y 信号用アース 端子 信号用のアース端子です。 必要に応じて、 システムの接地線に接 続します。 !• ⁄ AC IN ( 電源入力 端子...
  • Seite 9: リチウム電池を使う

    準備 ご注意 新しい電池を入れ、ふたを閉める。 本機の設置は、お買い上げ店にご依頼く ださい。 リチウム電池を使う リチウム電池は、 本機に内蔵された時計を動作させるために、 出荷 時に本機に装着されています。 日付やユーザーIDなどのデータ を 新しい電池 保存する ときは、 あ らかじめ次の手順を行います。 ふた 本機の電源を入れ、 データ表示部のLED表示が点灯する こ と を確認する。 BATTERYスイ ッチをONにする。 後面パネルのBATTERYスイ ッチをONにする。 ラックに取り付ける 電池を使わないときは データを保存する必要がないと きは、 BATTERYスイ ッチをOFFに 本機を市販の EIA 標準 19イ ンチラ ックに取り付けるには、付属の したり、 電池を入れないで本機を使用する こ と もできます。 電池が ラ...
  • Seite 10: 電源とデュプリケーターを接続する

    ピンプラグ付きケーブル 別売り CTRL P OUT CTRL P IN CTRL P IN 台まで接続可能 SVO-965 SVO-965 CTRL P OUT 台目 1台目 ピンプラグ付きケーブル 別売り SVRM-911 REMOTE ⁄AC IN REMOTE ⁄AC IN 電源へ ピンプラグ付きケーブル 別売り 台まで接続可能 電 源 コ ー ド 付属 ピンプラグ付きケーブル 別売り...
  • Seite 11: 日付と時刻を設定する

    操作 本機を使ってデュプリ ケーターをコン ト ロールする と きは、 以下の点 にご注意く ださい。 • POWERスイ ッチを OFFにすると、時計以外の機能は働きませ 月 日 年 時 分 ユーザー ん。 a) ユーザーID の設定は次ページ参照。 • 本機の機能のう ち、 コン ト ロールするデュプリ ケーターに装備され ていない機能は働きません。 • 本機はデュプリ ケーターからのステータス信号を受け取っていま 表示が点滅しているときは せん。 (本機とデュプリ ケーターの間では双方向通信を行ってい 電池の寿命が近づいています。新しい電池と交換してく ださ ません。...
  • Seite 12: ユーザーIdを設定する

    操作 表示が点滅しているときは ユーザー を設定する 電池の寿命が近づいています。 新しい電池と交換してく ださ い。 電池が完全に消耗する と、 設定したユーザーIDのデータ が消えてしまいます。 U ID SETボタ ンを押す。 ユーザーID の左端の桁が点滅します。 “ 前面 INCまたはDECボタ ンを押して、 点滅している桁を希望の数 値に設定する。 SHIFTボタ ンを押し、点滅している桁を変える。 後面 手順 と を繰り返し、 すべての桁を希望の値に設定する。 再度 U ID SETボタ ンを押す。 以下の点を確認してからPOWERスイ ッチをONにする。 確認する場所 確認する内容 設定したユーザーIDが登録されます。...
  • Seite 13 仕様 保証書とアフターサービス リモー ト コン ト ロール ピンジャ ック4 個 保証書について シ リ アル信号 • この製品には保証書が添付されていますので、 お買い上げの際 電源電圧 AC 100V、 50Hz/60Hz お受け取り く ださい。 消費電力 • 所定事項の記入および記載内容をお確かめのう え、 大切に保存 保存温度 −20℃∼+ 60℃ してく ださい。 動作温度 5℃∼40℃ 外形寸法 (幅 / 高さ/ 奥行き) 424×88×351mm アフターサービスについて...
  • Seite 14 The model and serial numbers are located at the rear. to operate this equipment. Record the serial number in the space provided below. Refer to these numbers whenever you call upon your Sony This device requires shielded interface cables to comply with dealer regarding this product.
  • Seite 15: Overview

    Specifications ..............22 Overview Controlling up to 2,000 duplicators The SVRM-911 Serial Remote Control Unit is used to This unit is equipped with four terminals for control duplicators, such as the SVO-965/915/915L (or connecting duplicators. Up to 500 duplicators can be SVO-965P/915P/915PL), using serial control signals.
  • Seite 16: Location And Function Of Parts And Controls

    Location and Function of Parts and Controls 1 POWER switch 4 LED display 2 LED display setting buttons 5 LED display switch 3 CLOCK SET button 6 TEST buttons CLOCK SET DATE /U ID U ID AUDIO OUT TEST U ID SET SHIFT EJECT CHANGER START...
  • Seite 17: Eject Button

    7 Record/playback functions setting switches !™ AUDIO OUT (audio output) switch Set the switches below according to the recording or When the AUDIO SELECT switch of a duplicator is playback function desired. set to REMOTE, the audio output of the duplicator can be switched.
  • Seite 18: Preparations

    Preparations Open the cover of the battery compartment and Note remove the battery. Please consult your Sony dealer for installation of the unit. Using a Lithium Battery Battery compartment A lithium battery is preinstalled in the unit at shipping. Battery Perform the steps below to store the date and User ID data.
  • Seite 19: Connecting To The Power Source And Duplicators

    SVO-965/ be connected 965P 965P CTRL P OUT 2nd unit 1st unit Connecting cord with phono plugs (not supplied) SVRM-911 REMOTE ⁄AC IN REMOTE To AC power ⁄AC IN supply Connecting cord with phono plugs (not supplied) Up to 500 units can...
  • Seite 20: Operation

    Operation Please note the following when controlling a duplicator using this unit. Month Year Hour Minute User ID • When the POWER switch is turned OFF, no functions will operate except for the clock. a) See next page to set User ID. •...
  • Seite 21: Setting The User Id

    To cancel the setting When the LEDs are blinking In step 7, instead of pressing the CLOCK SET button, The battery is exhausted. Please replace it with a press the U ID SET, EJECT, TEST, or SEARCH new battery. If the battery’s power is completely button, or any of the tape transport buttons.
  • Seite 22: Notes On Use

    Notes on Use Specifications Operation and storage locations Remote control Phono jacks (4) Avoid operation or storage in any of the following Serial signal places. Power requirements • Location subject to extremes of temperature Model for USA and Canada: (operating temperature range 5°C to 40°C (41°F to 100 to 120 V AC, 50/60 Hz 104°F)) Model for European countries:...
  • Seite 23: Aperçu

    Aperçu Table des matières Le contrôleur sériel SVRM-911 sert à contrôler des Aperçu .............23 duplicateurs, tels que SVO-965/915/915L (SVO-965P/ Localisation et fonction des commandes ..24 915P/915PL) à l’aide de signaux de contrôle sériel.
  • Seite 24: Localisation Et Fonction Des Commandes

    Localisation et fonction des commandes 1 Interrupteur POWER 4 Affichage DEL 2 Touches de réglage de l’affichage DEL 5 Commutateur d’affichage DEL 3 Touche CLOCK SET 6 Touches TEST CLOCK SET DATE /U ID U ID AUDIO OUT U ID SET SHIFT TEST EJECT...
  • Seite 25 7 Commutateurs de réglage des fonctions 0 Touche de démarrage de l’échangeur de cassette d’enregistrement/lecture (CHANGER START) Régler les commutateurs ci-dessous selon la fonction Appuyer pour démarrer l’échangeur automatique de d’enregistrement ou lecture souhaitée. cassette SVCC-960. Commutateur Fonction !¡ Touches de recherche (SEARCH) VIDEO AGC (vidéo AGC) Régler à...
  • Seite 26: Préparatifs

    (+B, M4) Dans ce cas, la remplacer par une pile au lithium (4 mm, pouces). CR2025 Sony. L’emploi d’une autre pile risque de provoquer le feu ou une explosion. ATTENTION La pile peut exploser si elle n’est pas traitée avec soin.
  • Seite 27: Raccordement À Une Source D'alimentation Et À Des Duplicateurs

    SVO-965/ SVO-965/ raccordables 965P 965P CTRL P OUT Unité 2 Unité 1 Cordon de raccordement avec prises phono (non fourni) SVRM-911 REMOTE ⁄AC IN REMOTE Vers une prise d’alimentation ⁄AC IN secteur Cordon de raccordement avec prises phono (non fourni) 500 unités max.
  • Seite 28: Exploitation

    Exploitation Tenir compte des points ci-dessous lors du contrôle d’un duplicateur à l’aide de cet appareil. Mois Jour Année Heure Minute Identification • Quand l’interrupteur POWER est sur OFF, aucune de l’utilisateur fonction ne sera opérante, sauf l’horloge. a) Voir la page suivante pour la pose de l’identification •...
  • Seite 29: Pose D L'identification De L'utilisateur

    Pour annuler un réglage Quand les DEL clignotent A l’étape 7, au lieu de presser la touche CLOCK SET, La pile est épuisée. La remplacer par une neuve. appuyer sur la touche U ID, EJECT, TEST ou Si la pile est complètement épuisée, les données SEARCH, ou toute autre touche d’exploitation de la d’identification sauvegardées seront perdues.
  • Seite 30: Remarques Sur L'utilisation

    Remarques sur Spécifications l’utilisation Emplacements de fonctionnement et de Exploitation à distance stockage Prises phono (4) Eviter de faire fonctionner ou de ranger l’appareil aux Signal sériel emplacements suivants. Alimentation Modèle pour les Etats-Unis et le • Emplacement soumis à des températures extrêmes Canada: Secteur de 100 à...
  • Seite 31: Kurzbeschreibung

    Diese Steuereinheit bietet die folgenden Merkmale. Gestellmontage ..........34 Netz- und Duplikator-Anschlüsse ....35 Steuerung von bis zu 2000 Duplikatoren Mit ihren vier Steueranschlüssen kann die SVRM-911 Betrieb ............. 36 viermal 500 Duplikatoren für eine Gesamtkapazität Einstellen von Datum und Uhrzeit ....36 von 2000 Duplikatoren steuern.
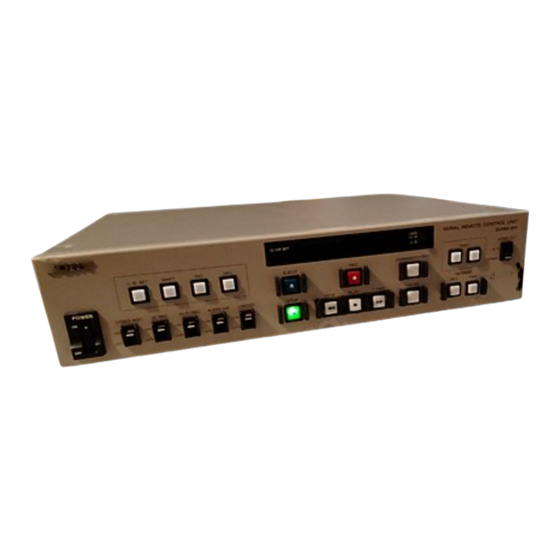
  • Seite 32: Lage Und Funktion Der Teile

    Lage und Funktion der Teile 1 POWER-Schalter 4 LED-Anzeige 2 Tasten zur Einstellung der LED-Anzeige 5 LED-Anzeigeschalter 3 CLOCK SET-Taste 6 TEST-Tasten CLOCK SET DATE /U ID U ID AUDIO OUT TEST U ID SET SHIFT EJECT CHANGER START Hi-Fi NORMAL POWER SEARCH...
  • Seite 33 7 Schalter zur Einstellung der Aufnahme/ !™ Audioausgangs-Schalter AUDIO OUT Wiedergabe-Funktionen Wenn der AUDIO SELECT-Schalter am Duplikator Stellen Sie diese Schalter wunschgemäß wie folgt ein. auf REMOTE steht, läßt sich der Audioausgang am Duplikator umschalten. Schalter Funktion Hi-Fi: Ausgabe nur von Hi-Fi-Audio- VIDEO AGC Zur Aktivierung der automatischen Video- Aufzeichnungen.
  • Seite 34: Vorbereitungsmaßnahmen

    Vorbereitungsmaßnahmen Stellen Sie den BATTERY-Schalter auf OFF. Hinweis Zur Installation des SVRM-911 wenden Sie sich bitte Öffnen Sie die Batteriefachabdeckung und an Ihren Sony-Fachhändler. entnehmen Sie die alte Batterie. Verwendung einer Lithiumbatterie Abdeckung Bei werkseitiger Auslieferung ist bereits eine Batterie Lithiumbatterie eingelegt.
  • Seite 35: Netz- Und Duplikator-Anschlüsse

    CTRL P IN Bis zu 500 CTRL P IN SVO-965P Duplikatoren SVO-965P CTRL P OUT anschließbar Zweites Gerät Erstes Gerät Cinchkabel (nicht mitgeliefert) SVRM-911 REMOTE ⁄AC IN REMOTE ⁄AC IN Netzsteckdose Bis zu 500 Cinchkabel (nicht mitgeliefert) Duplikatoren Netzkabel anschließbar...
  • Seite 36: Betrieb

    Betrieb Zur Steuerung eines Duplikators mit diesem Gerät beachten Sie bitte die folgenden Punkte. Monat Jahr Stunde Minuten Benutzer-ID • Mit dem POWER-Schalter in Stellung OFF sind alle Funktionen mit Ausnahme der Uhr ausgeschaltet. a) Zur Benutzer-ID siehe nächste Seite. •...
  • Seite 37: Einstellen Der Benutzer-Id

    Abbrechen der Einstellungen Wenn die LEDs blinken Drücken Sie in Schritt 7 anstelle der CLOCK SET- Dies bedeutet, daß die Lithiumbatterie nahezu Taste die Taste U ID SET, EJECT, TEST, SEARCH erschöpft ist und ausgewechselt werden muß. Bei oder einer der Bandtransporttasten. vollständig erschöpfter Batterie gehen die gespeicherten Daten (Datum und Uhrzeit) verloren.
  • Seite 38: Hinweise Zum Sachgemäßen Betrieb

    Hinweise zum sachgemäßen Betrieb Technische Daten Vorsichtsmaßnahmen bei Betrieb und Steuersignal Über Cinchbuchsen (4) Lagerung Serielles Signal Vermeiden Sie den Betrieb bzw. die Lagerung an Stromversorgung 100 bis 240 V Wechselspannung, Orten, wo die folgenden 50/60 Hz Bedingungen herrschen: Leistungsaufnahme •...
  • Seite 39: Presentazione

    Per evitare scosse elettriche, non aprire l’apparecchio. Per le riparazioni, rivolgersi solo a personale qualificato. Indice Presentazione L’unità di controllo a distanza seriale SVRM-911 Presentazione ..........39 serve per controllare duplicatori, come lo SVO-965P/ Posizione e funzione delle parti e dei 915P/915PL mediante segnali di controllo seriali.
  • Seite 40: Posizione E Funzione Delle Parti E Dei Comandi

    Posizione e funzione delle parti e dei comandi 1 Interruttore 2 Tasti di impostazione per il display a 4 Display a LED 5 Interruttore del display a LED POWER 3 Pulsante CLOCK SET 6 Tasti TEST CLOCK SET DATE /U ID U ID AUDIO OUT U ID SET...
  • Seite 41 7 Interruttori di impostazione per le funzioni di 0 Tasto di avvio cambiatore di cassette registrazione/riproduzione (CHANGER START) Regolare gli interruttori indicati di seguito secondo la Premerlo per avviare il funzionamento di un funzione di registrazione o di riproduzione desiderata. cambiatore di cassette automatico SVCC-960.
  • Seite 42: Preparativi

    (+B, 4 mm (M4)). lampeggia. In questo caso, sostituire la pila con una pila al litio CR2025 Sony. L’uso di una pila di tipo diverso può comportare il rischio di incendi o esplosioni. La durata normale della pila è di 1 anno circa.
  • Seite 43: Collegamento Alla Fonte Di Alimentazione E Ai Duplicatori

    SVO-965P SVO-965P CTRL P OUT 500 apparecchi. Secondo Primo apparecchio apparecchio Cavo di collegamento con spine fono (non in dotazione) SVRM-911 REMOTE ⁄AC IN REMOTE alla fonte di alimentazione ⁄AC IN Cavo di collegamento con È possibile spine fono (non in dotazione)
  • Seite 44: Funzionamento

    Funzionamento Tenere presente quanto segue quando si controlla un La data e l’ora appaiono sul display a LED come duplicatore mediante questo apparecchio. mostrato qui sotto (quando l’interruttore DATE è regolato su M/D/Y). • Quando l’interruttore POWER è disattivato (regolato su OFF), nessuna funzione si attiverà, ad eccezione dell’orologio.
  • Seite 45: Impostazione Del Codice Di Identificazione Dell'utilizzatore

    Quanto segue appare sul display a LED. Per correggere i valori Prima di premere il pulsante CLOCK SET al punto 7, Nel modo DATE/U ID: premere il tasto SHIFT per far lampeggiare l’indicazione desiderata, quindi correggere il valore usando i tasti INC e DEC. Data/Ora Codice di identificazione...
  • Seite 46: Note Sull'uso

    Caratteristiche tecniche Note sull’uso Luoghi di impiego e di deposito Controllo a distanza Non usare e non riporre l’apparecchio in nessuno dei Prese fono (4) seguenti luoghi: Segnale seriale • Luoghi soggetti a temperature eccessive (gamma Alimentazione Corrente alternata a 220 ~ 240 V, della temperatura di impiego: da 5°C a 40°C) 50/60 Hz •...
  • Seite 48 お問い合わせ ソニー株式会社 B & I 営業本部 北 海 道 営業所 (011)231-8121 名 古 屋 営業所 (052)201-6871 東   北 営業所 (022)257-7830 北   陸 営業所 (076)240-8110 関   東 営業所 (048)652-8808 京   滋 営業所 (075)691-7860 新   潟 出張所 (025)270-3253 大...

Inhaltsverzeichnis