
Verwandte Anleitungen für Klarstein Metrobreeze 9 New York City


Inhaltszusammenfassung für Klarstein Metrobreeze 9 New York City
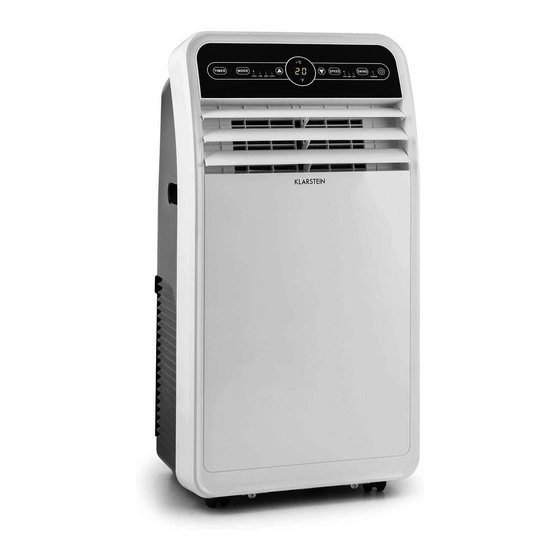
- Seite 1 Metrobreeze 9 New York City Klimaanlage Air Conditioner Aire acondicionado Climatiseur Condizionatore d’aria 10028190 10028191...
-
Seite 3: Inhaltsverzeichnis
Sehr geehrter Kunde, wir gratulieren Ihnen zum Erwerb Ihres Gerätes. Lesen Sie die folgenden Hinweise sorgfältig durch und befolgen Sie diese, um möglichen Schäden vorzubeugen. Für Schäden, die durch Missachtung der Hinweise und unsachgemäßen Gebrauch entstehen, übernehmen wir keine Haftung. Scannen Sie den folgenden QR-Code, um Zugriff auf die aktuellste Bedienungsanleitung und weitere Informationen rund um das Produkt zu erhalten. -
Seite 4: Sicherheitshinweise
SICHERHEITSHINWEISE • Lesen Sie sich alle Hinweise sorgfältig durch und bewahren Sie die Bedienungsanleitung zum Nachschlagen gut auf. • Benutzen Sie die Klimaanlage nur in Innenräumen. • Schließen Sie das Gerät nur an Steckdosen an, die der Spannung des Geräts entsprechen. -
Seite 5: Hinweise Zum Kältemittel R290
HINWEISE ZUM KÄLTEMITTEL R290 Warnhinweise • Die Klimaanlage muss aufrecht aufbewahrt und transportiert werden. Andernfalls können irreparable Kompressorschäden entstehen. Lassen Sie das Gerät im mindestens 24 Stunden stehen, bevor Sie es in Betrieb nehmen. • Schalten Sie den das Gerät vor der Reinigung aus und trennen Sie es von der Stromversorgung. -
Seite 6: Geräteübersicht
GERÄTEÜBERSICHT Griff Lufteinlass (links) Bedienfeld Luftleitlamelle Rollfuß Fernbedienung Lufteinlass (rechts) Luftauslass Wasserauslass 10 Lufteintrittsgitter 1 1 Abluftschlauch 12 Dichtungsrahmen... -
Seite 7: Bedienfeld Und Fernbedienung
BEDIENFELD UND FERNBEDIENUNG Power Gerät ein- und ausschalten. Schwingen In diesem Modus schwingt die Luftleitlamelle automatisch. Geschwindigkeit Wählen Sie zwischen hoher/mittlerer/niedriger Luftgeschwindigkeit. Hoch/Runter Stellen sie mit den Pfeiltasten Zeit und Temperatur ein. Modus Wählen Sie zwischen Kühlung/Lüftung/Entfeuchtung. Timer Gerät nach einer bestimmten Zeit automatisch ein-/ ausschalten. -
Seite 8: Installation
Bei Geräten, die nur kühlen Bei Geräten, die kühlen und heizen INSTALLATION • Stellen Sie das Gerät auf einen ebenen Untergrund in der Nähe des Fensters auf. • Lassen Sie um das Gerät herum mindestens 50 cm Platz, um ausreichende Luftzirkulation zu gewährleisten. - Seite 9 Schritt 3: Drehen Sie das Ende des Abluftschlauchs im Uhrzeigersinn an die Abluftöffnung an der Rückseite des Geräts. Schritt 4: Stecken Sie das schmale Ende des Abluftschlauchs in die Öffnung des Dichtungsrahmens und schrauben Sie es fest. Wichtige Hinweise zur Installation •...
-
Seite 10: Vor Dem Ersten Gebrauch
VOR DEM ERSTEN GEBRAUCH Fernbedienung vorbereiten Schieben Sie die Abdeckung des Batteriefachs zurück, um es zu öffnen. Stecken Sie zwei neue Alkaline-Batterien ins Batteriefach und achten Sie darauf, dass Sie die Batterien richtigherum einsetzen. Schieben Sie die Abdeckung wieder auf das Batteriefach. Wichtige Hinweise zum Umgang mit Batterien •... -
Seite 11: Timer-Modus
Entfeuchtungs-Modus • Drücken Sie auf die Mode-Taste an Gerät oder Fernbedienung und wählen Sie den Entfeuchtungs- Modus aus. Sobald der Modus aktiv ist leichtet die Kontrollleuchte für den Entfeuchtungs-Modus auf. • Entfernen Sie den Stopfen aus dem Wasserablauf und bringen Sie einen Wasserablaufschlauch an (siehe Bild). -
Seite 12: Reinigung Und Pflege
REINIGUNG UND PFLEGE Das Gerät besitzt ein automatisches Wasserverdampfungs-System. Durch die Zirkulation des Kondenswassers wird der Kompressor gekühlt. Dadurch verbessert sich nicht nur die Kühlleistung, es wird auch Energie gespart. Wassertank entleeren Falls der Wassertank voll ist, leuchtet „FL“ auf dem Display auf und ein Alarm ertönt. Der Kompressor stoppt automatisch. - Seite 13 Filter reinigen Wir empfehlen Ihnen das Filtersieb alle zwei Wochen zu reinigen. Falls die Luft sehr staubig ist, reinigen Sie den Filter öfter. Wenn sich der Filter mit Staub zusetzt, verringert sich die Leistung des Geräts. Reinigen Sie den Filter wie folgt: •...
-
Seite 14: Fehlermeldungen
Gerät nach Saisonende einlagern Falls sie das Gerät länger nicht benutzen oder einlagern möchten, befolgen Sie die folgenden Schritte: • Ziehen Sie den Stopfen aus dem Wasserauslass und entleeren Sie den Wassertank. • Lassen Sie die Klimaanlage 2 Stunden lang im Luftverteilungs-Modus laufen, bis das Gerät innen komplett trocken ist. -
Seite 15: Fehlerbehebung
FEHLERBEHEBUNG Fehler Mögliche Ursache Lösung Das Gerät funktioniert Das Gerät ist aus. Schalten Sie das Gerät nicht. ein. Das Display zeigt „FL“. Schalten Sie das Gerät aus, entleeren Sie den Tank und schalten Sie das Gerät wieder ein. Der Ausschalt-Timer ist Starten Sie das Gerät aktiv. -
Seite 16: Hinweise Zur Entsorgung
HINWEISE ZUR ENTSORGUNG Befindet sich die linke Abbildung (durchgestrichene Mülltonne auf Rädern) auf dem Produkt, gilt die Europäische Richtlinie 2012/19/EU. Diese Produkte dürfen nicht mit dem normalen Hausmüll entsorgt werden. Informieren Sie sich über die örtlichen Regelungen zur getrennten Sammlung elektrischer und elektronischer Gerätschaften. - Seite 17 Dear Customer, Congratulations on purchasing this equipment. Please read this manual carefully and take care of the following hints to avoid damages. Any failure caused by ignoring the items and cautions mentioned in the instruction manual is not covered by our warranty and any liability. Scan the QR code to get access to the latest user mannual and other information about the product.
-
Seite 18: Safety Instructions
SAFETY INSTRUCTIONS • Read all the safety and operating instructions carefully and retain them for future reference. • This air-conditioner is suitable for indoor use only rather than for other occasions. • Rated operating range: this unit shall be connected to 220-240V / 50 Hz power output end. -
Seite 19: Notes On Refrigerant R290
NOTES ON REFRIGERANT R290 Warnings • The air conditioning system must be kept and transported upright. Otherwise, irreparable compressor damage may occur. Leave the unit for at least 24 hours before putting it into operation. • Switch off the device and disconnect it from the power supply before cleaning. •... -
Seite 20: Product Overview
PRODUCT OVERVIEW Handle Air inlet (left) Control panel Air guide bar Truckle Remote controller Air inlet (right) Air outlet Outfall 10 Inlet grille 1 1 Exhaust pipe assembly 12 Window seal plate assembly... -
Seite 21: Control Panel And Remote Control
CONTROL PANEL AND REMOTE CONTROL Power Press the button to turn on/off air conditioner Swing Pressing the button can make air guide bar swings automatically. Wind speed Press the button to select high, medium and low wind speed. Up and Down Press to set temperature and time. -
Seite 22: Installation
For devices that only cool down For equipment that cools and heats INSTALLATION • Place the machine at flat floor near a window. • To maintain a good air circulation and obtain an optimum machine performance, it shall leave a 50 cm space around. Mounting the Window Seal Step 1: Measure window size. - Seite 23 Step 3: Screw the exhaust pipe assembly (exhaust joint end) into the rear panel exhaust port (counter clockwise). Step 4: Place the exhaust pipe assembly (exhaust flat port) into the window sealing plate assembly and fix it with screws. Important Hints on Installation •...
-
Seite 24: Before First Use
BEFORE FIRST USE Remote Controller Slide the battery cover on the back of the remote controller to open. Insert 2 new alkaline 7th batteries. When inserted, their terminals shall be ensured to be installed correctly. Put the battery cover into place. Important Hints on Using Batteries •... -
Seite 25: Dehumidification Mode
Dehumidification mode • Select dehumidification mode by pressing mode button or via remote controller, and the dehumidification indicator light is on. • As shown in the picture below, remove the plug of drainage outfall, insert the aqueduct, and put another end of the aqueduct into water containers or drain channels. -
Seite 26: Cleaning And Care
CLEANING AND CARE The product has an automatic water evaporation system. The circulation of condensed water cools the condenser. This not only increase refrigeration efficiency but save energy. Discharging the Water Container If the machine’s water container is full, the display screen will present “FL” accompanied by audible alarm, and the compressor will stop working automatically. - Seite 27 Cleaning the Filter Screen It’s recommended to cleaning the filter screen once every two weeks, if the indoor air quality is poor, cleaning frequency shall be raised. Since the filter becomes clogged with dust, the conditioning effect will be reduced. Specific cleaning steps are as follows: •...
-
Seite 28: Error Messages
Seasonal Maintenance If the machine will be not in use for a long time, its maintenance follows the steps below: • Pull out the plug in drainage fallout to drain off water. • Keep the conditioner working 2 hours in the air distribution mode until its inside becomes dry. -
Seite 29: Troubleshooting
TROUBLESHOOTING Problem Possible Cause Solution Conditioner does not No power. Power on. work. Screen displays “FL”. Re-start and put back to normal after power cut and drainage. Off-timer function is Restart after it being activated. turned off 3 minutes. The refrigeration Direct sunlight. -
Seite 30: Hints On Disposal
HINTS ON DISPOSAL According to the European waste regulation 2012/19/EU this symbol on the product or on its packaging indicates that this product may not be treated as household waste. Instead it should be taken to the appropriate collection point for the recycling of electrical and electronic equipment. - Seite 31 Estimado cliente: Le felicitamos por la adquisición de este producto. Lea atentamente el siguiente manual y siga cuidadosamente las instrucciones de uso con el fin de evitar posibles daños. La empresa no se responsabiliza de los daños ocasionados por un uso indebido del producto o por haber desatendido las indicaciones de seguridad.
-
Seite 32: Indicaciones De Seguridad
INDICACIONES DE SEGURIDAD • Por favor, lea con atención las siguientes indicaciones y conserve el manual de instrucciones mientras tenga el aparato en su poder. • No utilice el aparato al aire libre. Utilícelo solamente en espacios cerrados y secos. •... -
Seite 33: Indicaciones Sobre El Refrigerante R290
INDICACIONES SOBRE EL REFRIGERANTE R290 Advertencias • Transporte y guarde el aparato en posición vertical. De lo contrario, podría dañar de forma irreparable el compresor. Deje el aparato en posición vertical durante al menos 24 horas antes de ponerlo en marcha. •... -
Seite 34: Descripción Del Aparato
DESCRIPCIÓN DEL APARATO Entrada del flujo de aire (izquierda) Controles Lamas de ventilación Ruedas Mando a distancia Entrada del flujo de aire (derecha) Salida del flujo de aire Salida de agua 10 Rejilla de entrada 1 1 Tubo de salida del aire 12 Marco aislante para ventana... -
Seite 35: Controles Y Mando A Distancia
CONTROLES Y MANDO A DISTANCIA Power Encender/apagar el aparato Oscilación En este modo las lamas se mueven automáticamente Velocidad Seleccione la velocidad del flujo de aire (alta/media/ baja) Arriba/abajo Con los botones de flechas, ajuste la temperatura y el tiempo Modo Elija entre el modo refrigeración/distribución de aire/ deshumidificación. -
Seite 36: Instalación
Aparatos con función refrigeradora Aparatos con función refrigeradora y calefactora INSTALACIÓN • Coloque el aparato en una superficie plana próxima a una ventana. • Mantenga el aparato a una distancia de al menos 50 cm del resto de objetos para garantizar una buena circulación del aire. - Seite 37 Paso 3: enrosque el extremo del tubo de salida de aire en el sentido de las agujas del reloj en la salida de aire situada en la parte trasera del aparato. Paso 4: coloque el extremo más estrecho del tubo de salida de aire en la entrada del marco aislante y fíjelo con fuerza.
-
Seite 38: Antes Del Primer Uso
ANTES DEL PRIMER USO Preparación del mando a distancia Deslice la tapa del compartimento para pilas hacia atrás para abrirlo. Introduzca dos pilas alcalinas nuevas en el compartimento prestando atención a colocarlas con la polaridad en la dirección correcta. Vuelva a colocar la tapa. Indicaciones importantes relacionadas con las pilas •... -
Seite 39: Modo Temporizador
Modo deshumidificador • Pulse en el botón Mode del aparato o del mando a distancia y seleccione el modo deshumidificador. Una vez se haya activado, se encenderá el piloto correspondiente. • Retire el tapón de la salida del agua y coloque un tubo de desagüe (ver ilustración). -
Seite 40: Limpieza Y Cuidado
LIMPIEZA Y CUIDADO El aparato cuenta con un sistema automático de evaporación del agua. Gracias a la circulación del agua condensada, el compresor se enfría. De este modo, no solamente se mejora el rendimiento de refrigeración, sino que también se ahorra energía. Vaciar el depósito de agua Si el depósito está... - Seite 41 Limpieza del filtro Le recomendamos limpiar el filtro de rejilla cada dos semanas. Si el aire tiene una gran concentración de polvo, será necesario limpiarlo con más frecuencia todavía. A medida que se acumula el polvo en el filtro, la eficiencia del aparato desciende. Siga estos consejos para proceder a la limpieza del filtro: •...
-
Seite 42: Avisos De Error
Guardar el aparato para un periodo prolongado de inactividad Si quiere guardar el aparato durante un periodo de tiempo prolongado, siga estas indicaciones: • Quite el tapón del conducto de desagüe y vacíe el depósito de agua. • Ponga en marcha el aparato en modo distribución de aire durante dos horas hasta que se haya secado completamente. -
Seite 43: Resolución De Problemas
RESOLUCIÓN DE PROBLEMAS Problema Causa principal Solución El aparato no funciona El aparato está apagado Encienda el aparato El display muestra “FL” Apague el aparato, vacíe el depósito y vuelva a encenderlo. El temporizador de Ponga en marcha el apagado está activado. aparato tras una pausa de tres minutos. -
Seite 44: Retirada Del Aparato
RETIRADA DEL APARATO Si el aparato lleva adherida la ilustración de la izquierda (el contenedor de basura tachado) entonces rige la normativa europea, directiva 2012/19/UE. Este producto no debe arrojarse a un contenedor de basura común. Infórmese sobre las leyes territoriales que regulan la recogida separada de aparatos eléctricos y electrónicos. - Seite 45 Chère cliente, cher client, Toutes nos félicitations pour l’acquisition de ce nouvel appareil. Veuillez lire attentivement et respecter les instructions de ce mode d’emploi afin d’éviter d’éventuels dommages. Le fabricant ne saurait être tenu pour responsable des dommages dus au non- respect des consignes de sécurité...
-
Seite 46: Consignes De Sécurité
CONSIGNES DE SÉCURITÉ • Lire attentivement les consignes et conserver ce mode d’emploi pour une consultation ultérieure. • Utiliser le climatiseur seulement en intérieur. • S’assurer que la tension de votre installation électrique correspond à la tension de l‘appareil. • Pour éviter tout risque d’électrocution dû à une anomalie ou un dysfonctionnement, l’appareil doit être branché... -
Seite 47: Remarques Concernant Le Réfrigérant R290
REMARQUES CONCERNANT LE RÉFRIGÉRANT R290 Mises en garde • Le climatiseur doit être entreposé et transporté à la verticale. Faute de quoi, le compresseur pourrait être endommagé de façon irréparable. En cas de doute, laissez l‘appareil reposer pendant au moins 24 heures avant de le mettre en service. -
Seite 48: Aperçu De L'appareil
APERÇU DE L’ APPAREIL Poignée Entrée d’air (gauche) Panneau de commande Volets de direction de l’air Roulettes Télécommande Entrée d’air (droite) Sortie d’air Évacuation d’eau 10 Grille d’entrée d’air 1 1 Conduit d’évacuation de l’air 12 Cadre d’étanchéité... -
Seite 49: Panneau De Commande Et Télécommande
PANNEAU DE COMMANDE ET TÉLÉCOMMANDE Power Allumer et éteindre l’appareil. Oscillation Dans ce mode, les volets d’air oscillent automatiquement. Vitesse Sélectionner entre vitesse de l’air haute, moyenne ou basse. Haut/bas Les touches fléchées permettent le réglage de la minuterie et de la température. Mode Sélectionner entre climatisation, ventilation, déshumidification. -
Seite 50: Installation
Appareils uniquement climatiseur Appareils climatiseurs et radiateurs INSTALLATION • Installer l‘appareil sur une surface plane à proximité d’une fenêtre. • Laisser au moins 50 cm d’espace libre tout autour de l‘appareil pour permettre une bonne ventilation. Montage du cadre d’étanchéité Étape 1: mesurer la largeur de la fenêtre. - Seite 51 Étape 3: visser l’extrémité du conduit d’évacuation d’air dans le sens des aiguilles d’une montre à la sortie d’air située à l’arrière de l’appareil. Étape 4: insérer l’extrémité plus fine du conduit dans l’ouverture du cadre d’étanchéité et visser. Remarques importantes concernant l’installation •...
-
Seite 52: Avant La Première Utilisation
AVANT LA PREMIÈRE UTILISATION Préparation de la télécommande Pour ouvrir le compartiment à piles, faire coulisser le couvercle. Insérer deux piles alcalines neuves dans le compartiment en veillant à les placer dans le bon sens. Replacer le couvercle du compartiment à piles. Remarques importantes concernant les piles •... -
Seite 53: Mode Déshumidification
Mode déshumidification • Appuyer sur la touche MODE de l‘appareil ou de la télécommande pour sélectionner le mode déshumidification. Lorsque le mode est activé, le témoin lumineux du mode déshumidification s’allume. • Retirer le bouchon de l’évacuation d’eau et raccorder un tuyau d’évacuation d’eau (voir schéma). -
Seite 54: Nettoyage Et Entretien
NETTOYAGE ET ENTRETIEN L‘appareil dispose d’un système automatique d’évaporation d’eau. La circulation de l’eau condensée permet le refroidissement du compresseur. Cette méthode permet à la fois un refroidissement optimal et une économie d’énergie. Vidange du réservoir d’eau Lorsque le réservoir d’eau est plein, « FL » s’affiche sur l’écran digital et une alarme retentit. - Seite 55 Nettoyage du filtre Il est recommandé de nettoyer le tamis du filtre deux fois par mois. Si l’air est très poussiéreux, nettoyer le filtre plus régulièrement. Si la poussière bouche le filtre, l’efficacité de l‘appareil est réduite. Suivre les étapes suivantes pour le nettoyage du filtre : •...
-
Seite 56: Messages D'erreurs
Stockage de l‘appareil après la saison Avant une longue période sans utilisation de l‘appareil ou avant de le stocker, suivre les étapes suivantes : • Retirer le bouchon de l’évacuation d’eau et vidanger le réservoir d’eau. • Faire fonctionner l‘appareil en mode ventilation pendant deux heures, jusqu’à ce qu’il soit entièrement sec à... -
Seite 57: Résolution Des Problèmes
RÉSOLUTION DES PROBLÈMES Problème Cause possible Solution L’appareil ne fonctionne L'appareil est éteint. Allumer l'appareil. pas. L’écran digital affiche « Éteindre l'appareil, vider FL ». le réservoir et rallumer l'appareil. La minuterie d’extinction Patienter 3 minutes avant est active. d’allumer l'appareil. La fonction climatisation Les portes/fenêtres sont Fermer toutes les portes/... -
Seite 58: Informations Sur Le Recyclage
INFORMATIONS SUR LE RECYCLAGE Le pictogramme ci-contre apposé sur le produit signifie que la directive européenne 2012/19/UE s‘applique (poubelle à roues barrée d’une croix). Ces produits ne peuvent être jetés dans les poubelles domestiques courantes. Renseignez- vous concernant les règles appliquées pour la collecte d’appareils électriques et électroniques. - Seite 59 Gentile cliente, La ringraziamo per aver acquistato il dispositivo. La preghiamo di leggere attentamente le seguenti istruzioni per l’uso e di seguirle per evitare possibili danni tecnici. Non ci assumiamo alcuna responsabilità per danni scaturiti da una mancata osservazione delle avvertenze di sicurezza e da un uso improprio del dispositivo.
-
Seite 60: Avvertenze Di Sicurezza
AVVERTENZE DI SICUREZZA • Leggere attentamente le seguenti avvertenze di sicurezza e conservare il presente manuale d’istruzioni per consultazioni future. • Utilizzare il dispositivo esclusivamente in ambienti interni. • Collegare il dispositivo solo a prese che corrispondono alla tensione indicata. •... -
Seite 61: Avvertenze Sul Refrigerante R290
AVVERTENZE SUL REFRIGERANTE R290 Avvertenze • Il climatizzatore deve essere conservato e trasportato in verticale, altrimenti possono risultare danni irreparabili al compressore. Lasciare il dispositivo in posizione verticale per almeno 24 ore prima di metterlo in funzione. • Spegnere il dispositivo e staccare la spina prima di pulirlo. •... -
Seite 62: Descrizione Del Prodotto
DESCRIZIONE DEL PRODOTTO Impugnatura Ingresso dell’aria (sinistra) Pannello di controllo Deflettori Rotelline Telecomando Ingresso dell’aria (destra) Uscita dell’aria Scarico dell’acqua 10 Griglia d’ingresso dell’aria 1 1 Tubo di scarico dell’aria 12 Piastra di installazione alla finestra... -
Seite 63: Pannello Di Controllo E Telecomando
PANNELLO DI CONTROLLO E TELECOMANDO Power Accensione e spegnimento. Swing In questa modalità i deflettori oscillano automaticamente per orientare il flusso d’aria in diverse direzioni. Velocità Selezionare la velocità: HIGH (alta), MID (media), LOW (bassa). Freccia rivolta verso Impostare con le frecce il timer e la temperatura. l’alto e verso il basso MODE... -
Seite 64: Installazione
Per dispositivi con funzione di Per dispositivi con funzione di raffreddamento. raffreddamento e riscaldamento INSTALLAZIONE • Posizionare il dispositivo su una superficie piana nelle vicinanze di una finestra. • Lasciare almeno 50 cm di spazio intorno al dispositivo per garantire una circolazione dell’aria sufficiente. - Seite 65 Fase 3: Avvitare in senso orario l’estremità del tubo di scarico dell’aria nel foro posto sulla parte posteriore del dispositivo. Fase 4: Inserire l’estremità più sottile del tubo di scarico dell’aria nel foro della piastra di installazione e fissarla utilizzando le viti. Importanti indicazioni sull’installazione •...
-
Seite 66: Avvertenze Per Il Primo Utilizzo
AVVERTENZE PER IL PRIMO UTILIZZO Telecomando Per aprire il vano batteria, tirare indietro il coperchio. Inserire due batterie alcaline nel vano batteria e prestare attenzione che queste siano inserite correttamente. Reinserire il coperchio del vano batteria. Avvertenze importanti per l’utilizzo delle batterie •... - Seite 67 Modalità di deumidificazione • Premere il tasto MODE sul dispositivo o sul telecomando e selezionare la modalità di deumidificazione. Non appena la modalità è attiva, si accende la spia luminosa per questa funzione. • Rimuovere il tappo dello scarico dell’acqua e collegare il tubo di scarico dell’acqua, come mostrato nella figura.
-
Seite 68: Pulizia E Manutenzione
PULIZIA E MANUTENZIONE Il dispositivo possiede un sistema automatico di vaporizzazione dell’acqua. Il compressore si raffredda attraverso la circolazione dell’acqua di condensa. In questo modo si migliora non solo la capacità di raffreddamento, ma si risparmia anche energia. Svuotare il serbatoio Nel caso in cui il serbatoio è... - Seite 69 Pulire il filtro Si consiglia di pulire il filtro ogni due settimane, e nel caso in cui l’aria sia molto polverosa, pulirlo con una frequenza maggiore. La polvere infatti influenza negativamente le prestazioni del dispositivo. Pulire quindi il filtro seguendo le seguenti indicazioni: •...
-
Seite 70: Segnalazione Degli Errori
Conservare il dispositivo a fine stagione: Nel caso in cui il dispositivo non venga utilizzato per un tempo prolungato, o si desidera conservarlo, seguire le seguenti istruzioni: • Togliere il tappo dallo scarico dell’acqua e svuotare il serbatoio. • Lasciare il dispositivo per due ore in modalità di ventilazione finché non è completamente asciutto all’interno. -
Seite 71: Risoluzione Degli Errori
RISOLUZIONE DEGLI ERRORI Errore Causa possibile Soluzione Il dispositivo non funziona Il dispositivo è spento. Accendere il dispositivo. Sul display appare “FL”. Spegnere il dispositivo, svuotare il serbatoio e riaccendere il dispositivo. E’ stato programmato lo Accendere il dispositivo spegnimento del timer. dopo una pausa di 3 minuti. -
Seite 72: Smaltimento
SMALTIMENTO Se sul prodotto è presente la figura a sinistra (il cassonetto dei rifiuti mobile sbarrato), si applica la direttiva europea 2012/19/UE. Questi prodotti non possono essere smaltiti con i rifiuti normali. Informarsi sulle disposizioni vigenti in merito alla raccolta separata di dispositivi elettrici ed elettronici. Non smaltire i vecchi dispositivi con i rifiuti domestici.