Inhaltsverzeichnis
Werbung
Verfügbare Sprachen
Verfügbare Sprachen
Wireless Room Thermostat
Installation and Operation
Drahtloser Raumthermostat
Montage und Bedienung
Thermostat d'ambiance
sans-fil pré-configuré
Installation et Utilisation
Draadloze Kamerthermostaat
Installatie en gebruik
Bezprzewodowy Termostat
Pomieszczeniowy
Instrukcja Montażu i Obsługi
Termostat de cameră fără fir
Instalare şi Operare
Werbung
Kapitel
Inhaltsverzeichnis

Verwandte Anleitungen für Honeywell HCW 80


Inhaltszusammenfassung für Honeywell HCW 80
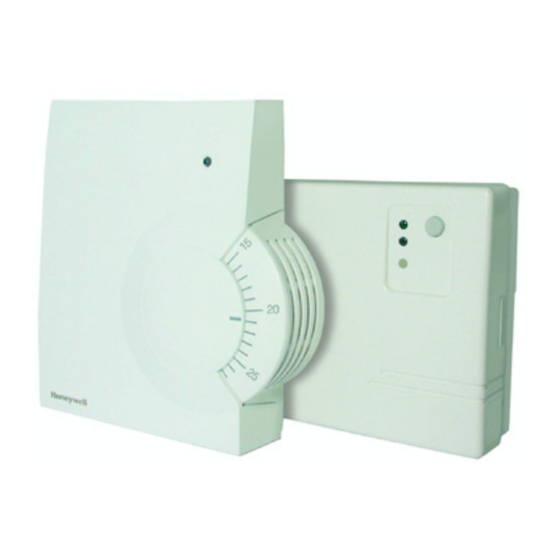
- Seite 1 Wireless Room Thermostat Installation and Operation Drahtloser Raumthermostat Montage und Bedienung Thermostat d’ambiance sans-fil pré-configuré Installation et Utilisation Draadloze Kamerthermostaat Installatie en gebruik Bezprzewodowy Termostat Pomieszczeniowy Instrukcja Montażu i Obsługi Termostat de cameră fără fir Instalare şi Operare...
- Seite 3 ENGLISH DEUTSCH FRANÇAIS NEDERLANDS POLSKI ROMÂN...
-
Seite 5: Inhaltsverzeichnis
Factory reset of relay module HC60NG ....9 Mount the device with a distance of at ► Particular features of the room unit HCW 80 ..10 least 30 cm to metallic objects such as wall boxes or boiler housings 8.1. -
Seite 6: Overview
Overview Overview Installation The room unit HCW 80 is used for intelligent room 3.1. Installation relay module HC60NG temperature control in combination with the relay module HC60NG. It can be used to control gas and oil boilers, a variety of valves and actuators or electrical heating systems. -
Seite 7: Connections For R6660D And Hc60Ng
NOT that the heating will be on, this depends on the programmer settings. CAUTION Incorrect wiring! Honeywell accepts no liability for any loss or damage arising from any errors or omissions that may be inadvertently Fig. 8: Wiring diagram for HC60NG contained within this sketch. -
Seite 8: Installation Room Unit Hcw 80
Red LED Fig. 10: Positioning the room unit HCW 80 Send button Place the room unit HCW 80 at the installation site. ► Fig. 13: Battery polarity and send button Remove the housing cover of the room unit HCW 80 ►... -
Seite 9: Checking
System check See section 5.1 “Assignment to the relay module ► HC60NG”. Adjust the set point of the room unit HCW 80 to 30 °C. ► If the room temperature is >30 °C the relay module Improve the data transfer. -
Seite 10: Particular Features Of The Room Unit Hcw 80
If appropriate, put the adjustment back in, rotated by 180° ► The red LED at the HCW 80 will be switched ON for 4 sec if until it has the position shown. the deviation between the set point and the room Turn the adjustment dial to position 19. -
Seite 11: 10. Appendix
Receiver class 2 (ETSI EN300 sources (metal, wireless failure 220-1 version 1.3.1) devices). RF binding method Factory pre-bound with the room Correct installation site. ► unit HCW 80 (kit Y6630D1007 Repeat the teach-in. ► only) HC60NG does HC60NG Environmental & Standard Reset HC60NG. ►... -
Seite 13: Allgemeine Sicherheitshinweise
► Zurücksetzen des Relaismoduls HC60NG tens 30 cm Abstand zu Metallge- (R6660D1009) auf die Werkseinstellungen ..17 genständen wie Wandkästen oder Besondere Merkmale des Raumgeräts HCW 80. 18 Boilergehäusen, schnurlosen Telefo- nen nach DECT-Standard etc. 8.1. Bedienung ............18 Montieren Sie das Gerät nicht auf 8.2. -
Seite 14: Übersicht
Übersicht Übersicht Montage Das Raumgerät HCW 80 wird in Kombination mit dem Re- 3.1. Montage des Relaismoduls laismodul HC60NG (R6660D1009) zur intelligenten Raum- HC60NG (R6660D1009) temperaturregelung verwendet. Es kann zur Regelung von Gas- und Öl-Kesseln, von verschiedenen Ventilen und Stel- lantrieben oder von elektrischen Heizsystemen eingesetzt werden. -
Seite 15: Anschlüsse Für R6660D Und Hc60Ng
Dies hängt von den Einstellungen am Programmierer ab. VORSICHT Fehlerhafte Verdrahtung! Honeywell haftet nicht für Schäden, die auf versehentliche Fehler oder Auslas- Abb. 8: Anschlussschema für HC60NG (forts.) sungen im vorliegenden Schema zu- rückzuführen sind. Es handelt sich lediglich um eine Skizze für Vor-... -
Seite 16: Montage Des Raumgeräts Hcw 80
► Polung ein (siehe Abb. 13). Rote LED Abb. 10: Raumgerät HCW 80 positionieren Sendeknopf Positionieren Sie das Raumgerät HCW 80 am Montageort. ► Abb. 13: Polung der Batterien und Sendeknopf Nehmen Sie den Gehäusedeckel des Raumgeräts ► HCW 80 ab (siehe Abb. 11 Die Batterien müssen ersetzt werden, wenn die... -
Seite 17: Überprüfung
5 s ein Testsignal. Installieren Sie die Geräte nicht über metallischen Wand- ► Die LED des HCW 80 blitzt bei jedem vom HCW 80 ge- Anschlussdosen und mindestens 30 cm entfernt von der sendeten Testsignal kurz auf. Abdeckung des Wärmeerzeugers. -
Seite 18: Besondere Merkmale Des Raumgeräts Hcw
Prüfen Sie, ob das Stellrad auf der in Abb. 15 gezeigten ► mechanischen Thermostaten, wobei folgendes gilt: Position steht. Die rote LED am HCW 80 schaltet sich für vier Sekunden Setzen Sie das Stellrad ggf. um 180° verdreht wieder ein, ► ein, wenn die Abweichung zwischen Sollwert und Raum- bis es die gezeigte Position hat. -
Seite 19: Anhang
• Verschmutzungsgrad ist 2 Teach-in aufeinander • Bemessungsspannung ist 4000 V abgestimmt (entspricht Überspannungskategorie III) • Softwareklasse ist A 10.2. Technische Daten HCW 80 10.5. WEEE-Richtlinie 2002/96/EG – Batterien 1,5 V Mignon, Typ LR06 Elektro- und Elektronikgesetz Frequenz 868,3 MHz (Sender) Betriebstemperatur 0 °C bis 50 °C... -
Seite 21: Instructions Générales De Sécurité
Installation du module relais HC60NG ....22 tension. 3.1.1. Connexions pour R6660D, HC60NG....23 L’appareil doit être installé par un ► 3.2. Installation du thermostat d'ambiance HCW 80... 24 installateur qualifié. Tests ..............25 Respectez les normes en vigueur ► 4.1. Test du système ..........25 durant l'installation. -
Seite 22: Général
Le HCW 80 et le HC60NG communiquent ensemble par radio-fréquences (RF) sur une fréquence de 868 MHZ. Le HCW 80 et le HC60NG sont livrés en un kit déjà pré-configuré, favorisant son installation Fig. 2: Emplacement du HC60NG simple et rapide. -
Seite 23: Connexions Pour R6660D, Hc60Ng
PAS que le chauffage sera en service, ceci dépend des paramètres du programmateur. ATTENTION Câblage incorrect ! Honeywell décline toute responsabilité en cas de pertes ou dommages découlant d'erreurs ou omissions quelconques pouvant être contenues par inadvertance Fig. -
Seite 24: Installation Du Thermostat D'ambiance Hcw 80
Fig. 13: Logement des piles, voyant et bouton Placer le thermostat d'ambiance HCW 80. ► Les batteries doivent être remplacées dès que le Enlever le capot du HCW 80 (voir Fig. 11 ► voyant rouge du HCW 80 clignote (voir chapitre 9 "Changement des batteries"). -
Seite 25: Tests
HC60NG ► s'allume nous indiquant donc qu'il n'a pas reçu de signal HCW 80 au moins 15 sec jusqu'à ce que le voyant rouge depuis 1 h. s'éteigne. Lorsque la communication RF est rétablie, le HC60NG Le HCW 80 est désormais en mode test et envoie un... -
Seite 26: Particularités Du Hcw 80
► indications du voyant comme suit : indiquée Fig. 15. Le voyant rouge du HCW 80 sera allumé durant 4 sec si le Si nécessaire, tournez de 180° pour afficher la position ► différentiel entre la consigne et la température d'ambiance indiquée... -
Seite 27: 10. Appendice
1 m les 3 secondes • Action du type 1,8 entre le HCW 80 et le • L'ensemble résiste à des température de 75 °C pour les HC60NG. composants et 125 °C pour les borniers électriques. Le voyant rouge... -
Seite 29: Algemene Veiligheidsinstructies
Installatie relaismodule HC60NG ......30 spanning. 3.1.1. Aansluitingen voor R6660D, HC60NG ....31 Zorg ervoor dat het toestel niet ► 3.2. Installatie ruimtebediening HCW 80 ....32 onder spanning staat. Controles ............. 33 Laat het werk over aan ► 4.1. Systeemtest............33 gekwalificeerd personeel. -
Seite 30: Overzicht
868 MHz. Volg de installatieschema’s voor het installeren en het ► De HCW 80 en de HC60NG zijn reeds met verbinden van de voeding met de HC60NG relaismodule. elkaar verbonden. Zij worden geleverd als een vooringestelde kit, voor snelle installatie (plug en play). -
Seite 31: Aansluitingen Voor R6660D, Hc60Ng
NIET dat de verwarming is ingeschakeld; dit hangt af van de programmering. VOORZICHTIG Foutieve aansluiting! Honeywell aanvaardt geen Fig. 8: Aansluitschema HC60NG aansprakelijkheid voor verlies of schade als gevolg van eventuele fouten of onvolkomenheden in deze schets. -
Seite 32: Installatie Ruimtebediening Hcw 80
Plaats de ruimtebediening HCW 80 waar deze moet ► HCW 80 knippert, dienen de batterijen komen. vervangen te worden (zie hoofdstuk 9 Neem de behuizing van de ruimtebediening HCW 80 weg ► “Vervanging batterijen”). (zie Fig. 11 De behuizing wegnemen). Plaats de behuizing in de ►... -
Seite 33: Controles
15 sec, en dit tot de rode LED van de HCW 80 uit is. Verlies van communicatie De HCW 80 is nu in de testmode en zendt om de 5 sec Indien er gedurende 1 uur geen RF communicatie is, dan een testsignaal uit. -
Seite 34: Bijzondere Kenmerken Van De Ruimtebediening
Indien vereist, plaats de aanpassing terug in, 180° volgende LED aanduiding: ► gedraaid, totdat het de getoonde positie heeft. De rode LED van de HCW 80 zal gedurende 4 sec. aan zijn, indien de afwijking tussen het instelpunt en de Draai de kiesschijf naar positie 19. ►... -
Seite 35: 10. Bijlage
► 220-1 versie 1.3.1) verbinding bronnen van werkt niet RF verbindings- Verbinding gerealiseerd in de interferentie (metaal, methode fabriek, met de HCW 80 draadloze toestellen). (uitsluitend kit Y6630D1007) Verplaats het toestel. ► Omgeving & Standaarden Herhaal de teach-in. ► Werkingstemperatuur 0 tot 40 °C indien belasting relais... -
Seite 37: Ogólne Zasady Bezpieczeństwa
Upewnij się, że urządzenie jest ► wyłączone. 3.1.1. Schemat połączeń R6660D, HC60NG ....39 Prace powinny być wykonane 3.2. Montaż modułu pomieszczenio-wego HCW 80 ... 40 ► przez autoryzowany i Kontrola ............... 41 wykwalifikowany personel. 4.1. Kontrola instalacji ..........41 Skontrolować... -
Seite 38: Hc60Ng
Przegląd Przegląd Montaż Moduł pomieszczeniowy HCW 80 jest używany do 3.1. Montaż modułu przekaźnikowego inteligentnej regulacji temperatury wewnątrz pomieszczenia HC60NG razem z modułem przekaźnikowym HC60NG. Może być wykorzystywany do sterowania kotłami gazowymi i olejowymi, zaworami i instalacjami ogrzewania elektrycznego. Moduł pomieszczeniowy HCW 80 nie wymaga okablowania. -
Seite 39: Schemat Połączeń R6660D, Hc60Ng
– zależy to od ustawień programatora. Ostrzeżenie Nieprawidłowe podłączenie elektryczne! Firma Honeywell nie przejmuje odpowiedzialności za straty czy szkody wynikające z błędów lub pominięć, Rys. 8: Schemat podłączeń elektrycznych HC60NG które mogą być ewentualnie zawarte w niniejszym szkicu. -
Seite 40: Montaż Modułu Pomieszczenio-Wego Hcw 80
Umieścić moduł pomieszczeniowy HCW 80 w miejscu ► Rys. 13: Polaryzacja baterii i przycisk komunikacji instalacji. Zdjąć pokrywę obudowy z modułu HCW 80 (patrz Rys. 11: ► Baterie należy wymienić gdy miga czerwona Zdejmowanie pokrywy obudowy) dioda w module pomieszczeniowym HCW 80 (patrz Rozdział... -
Seite 41: Kontrola
Przytrzymać przycisk uczenia na HCW 80 przez co ► najmniej 15 sek. aż do zgaśnięcia czerwonej diody. Utrata połączenia HCW 80 jest w trybie testowania I wysyła sygnał testowy Kiedy komunikacja radiowa jest zerwana przez okres co 5 sek. 1 godziny, czerwona dioda na module przekaźnikowym Dioda na HCW 80 miga przy wysyłaniu każdego sygnału... -
Seite 42: Szczególne Właściwości Modułu Pomieszczenio-Wego Hcw 80
6 cykli na godzinę Częstotliwość włączania na godzinę Wymiana baterii Rys. 15: Moduł pomieszczeniowy HCW 80 (nastawy na skali w °C) Baterie należy wymienić, gdy na urządzeniu HCW 80 Wybierz pożądaną temperaturę za pomocą pokrętła (patrz ► czerwona dioda miga a urządzenie nie jest w trybie Rys. -
Seite 43: 10. Dodatek
5. • Nominalne napięcie 4000 V (zgodnie z III kategorią nizowane przepięć) • Oprogramowanie klasy A 10.2. Dane techniczne HCW 80 10.5. Dyrektywa WEEE 2002/96/EC – Baterie 1,5 V, typ LR06, AA Usuwanie odpadów Częstotliwość 868,3 MHz (nadajnik) elektronicznych Temp. -
Seite 45: Instrucţiuni Generale De Siguranţă
► sub tensiune. 3.1.1. Conexiunile pentru R6660D, HC60NG....47 Toate lucrările trebuie să fie efectuate 3.2. Instalarea unităţii de cameră HCW 80....48 ► de către personal calificat autorizat. Verificare ............. 49 Respectaţi regulamentele locale 4.1. Verificarea sistemului .......... 49 ►... -
Seite 46: Prezentare Generală
Prezentare generală Prezentare generală Instalare Unitatea de cameră HCW 80 este utilizată pentru controlul 3.1. Instalarea modulului releu HC60NG inteligent al temperaturii din cameră în combinaţie cu modulul releu HC60NG. Poate fi utilizată pentru controlul cazanelor cu gaz şi ulei, a unei diversităţi de supape şi actuatori sau a sistemelor de încălzire electrice. -
Seite 47: Conexiunile Pentru R6660D, Hc60Ng
NU şi dacă acea temperatură va fi atinsă, aceasta depinde de reglajele programatorului. ATENŢIE Conectare incorectă! Honeywell nu acceptă nici o Fig. 8: Scheme de conectare HC60NG responsabilitate pentru orice pierdere sau daună datorată oricărei erori sau omisiuni care ar putea fi conţinută din neatenţie în această... -
Seite 48: Instalarea Unităţii De Cameră Hcw 80
LED-ul roşu Butonul de transmitere Fig. 10: Poziţionarea unităţii de cameră HCW 80 Fig. 13: Polaritatea bateriei şi butonul de transmitere Amplasaţi unitatea de cameră HCW 80 în locul de ► Bateriile trebuie înlocuite când LED-ul roşu al instalare. unităţii de cameră HCW 80 clipeşte Înlăturaţi capacul carcasei unităţii de cameră... -
Seite 49: Verificare
Verificare Dacă configurarea a eşuat: 4.1. Verificarea sistemului Vezi secţiunea 5.1 “Asignarea la modulul releu HC60NG”. ► Reglaţi punctul de setare al unităţii de cameră HCW 80 la ► Îmbunătăţiţi transferul de date. ► 30 °C. Îmbunătăţirea transferului de date Dacă... -
Seite 50: Caracteristici Particulare Ale Unităţii De Cameră
Frecvenţa ciclului 6 cicluri pe oră Modulaţia lăţimii pulsului pe oră Schimbarea bateriilor Fig. 15: Unitatea de cameră HCW 80 (setările de pe scală în °C) Schimbaţi bateriile dacă LED-ul roşu al unităţii de cameră Selectaţi punctul de setare al temperaturii dorite în cameră ►... -
Seite 51: Anexă
► radio 220-1 versiunea 1.3.1) interferenţe (metale, nereuşită dispozitive fără fir). Metoda de conectare Pre-delimitată din fabrică cu unitatea de cameră HCW 80 Locul corect de instalare. ► (numai set Y6630D1007) Repetaţi configurarea. ► Mediu & Standard HC60NG nu HC60NG şi Resetaţi HC60NG. - Seite 52 Manufactured for and on behalf of the Environmental and Combustion Controls Division of Honeywell Technologies Sàrl, Ecublens, Route du Bois 37, Switzerland by its Authorized Representative: Honeywell GmbH Böblinger Straße 17 71101 Schönaich, Germany Tel.: (++49) (0) 7031 637 01 Fax: (++49) (0) 7031 637 493 http://europe.hbc.honeywell.com...